quadfixr Docs
Everything you need to get the most out of quadfixr - from setting up your first drone to tracking repairs and managing your fleet.
First things first — make sure you've got the app installed:


New to quadfixr? Watch the quick intro to see what it can do.
Or keep reading for the full feature breakdown below.
Overview
quadfixr is a maintenance and repair tracking app built for FPV pilots and drone enthusiasts. Keep a full history of every repair, crash, and parts swap across your entire fleet - all in one place.
quadfixr helps you stay on top of what's broken, what's been fixed, and what's next.
With Pro features, you can also track repair costs, manage your parts inventory, and track batteries.
Getting Started
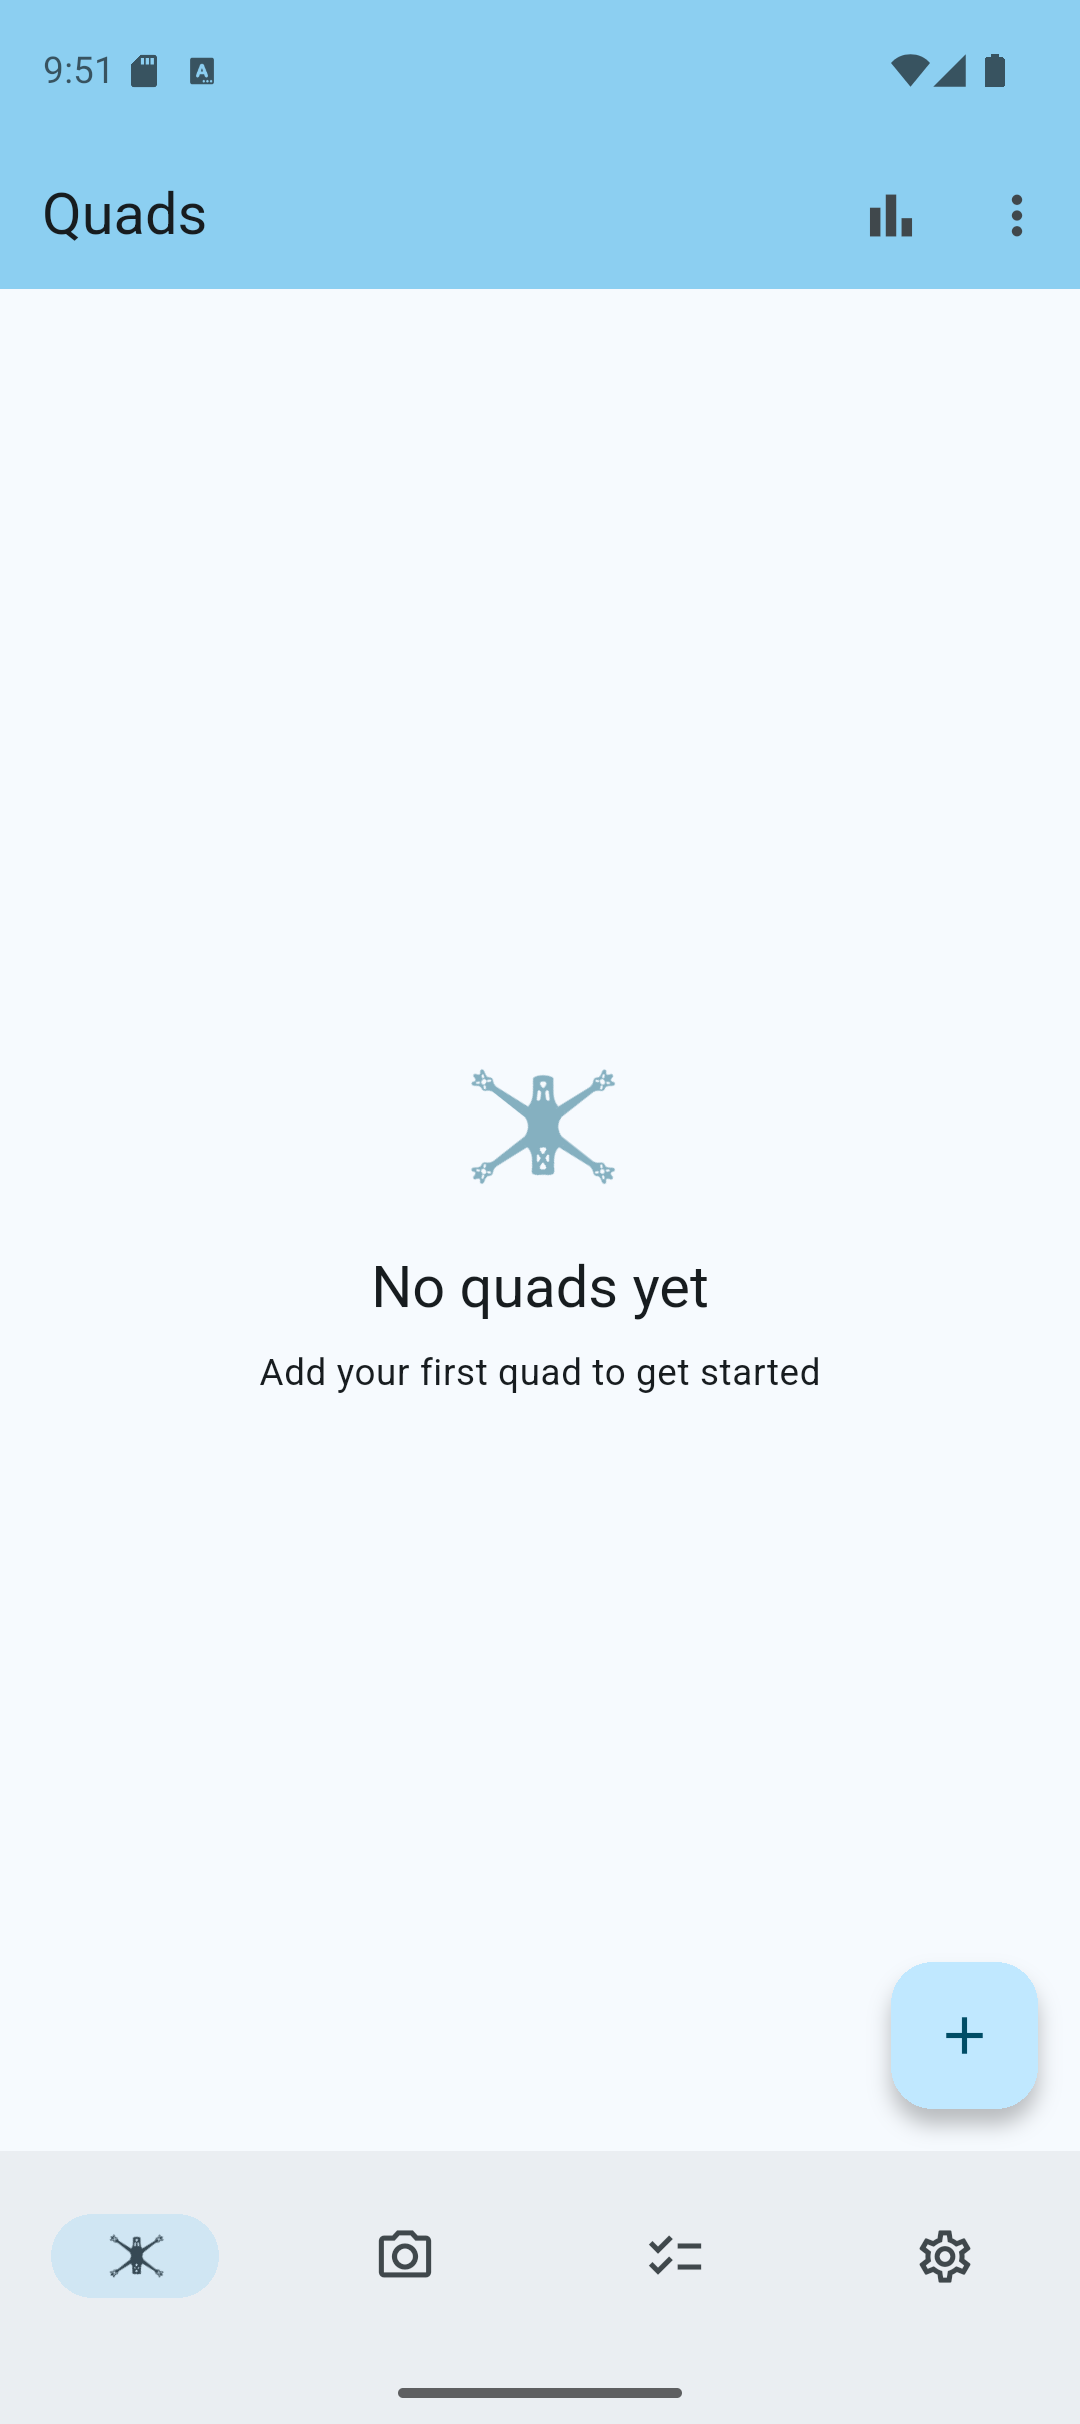
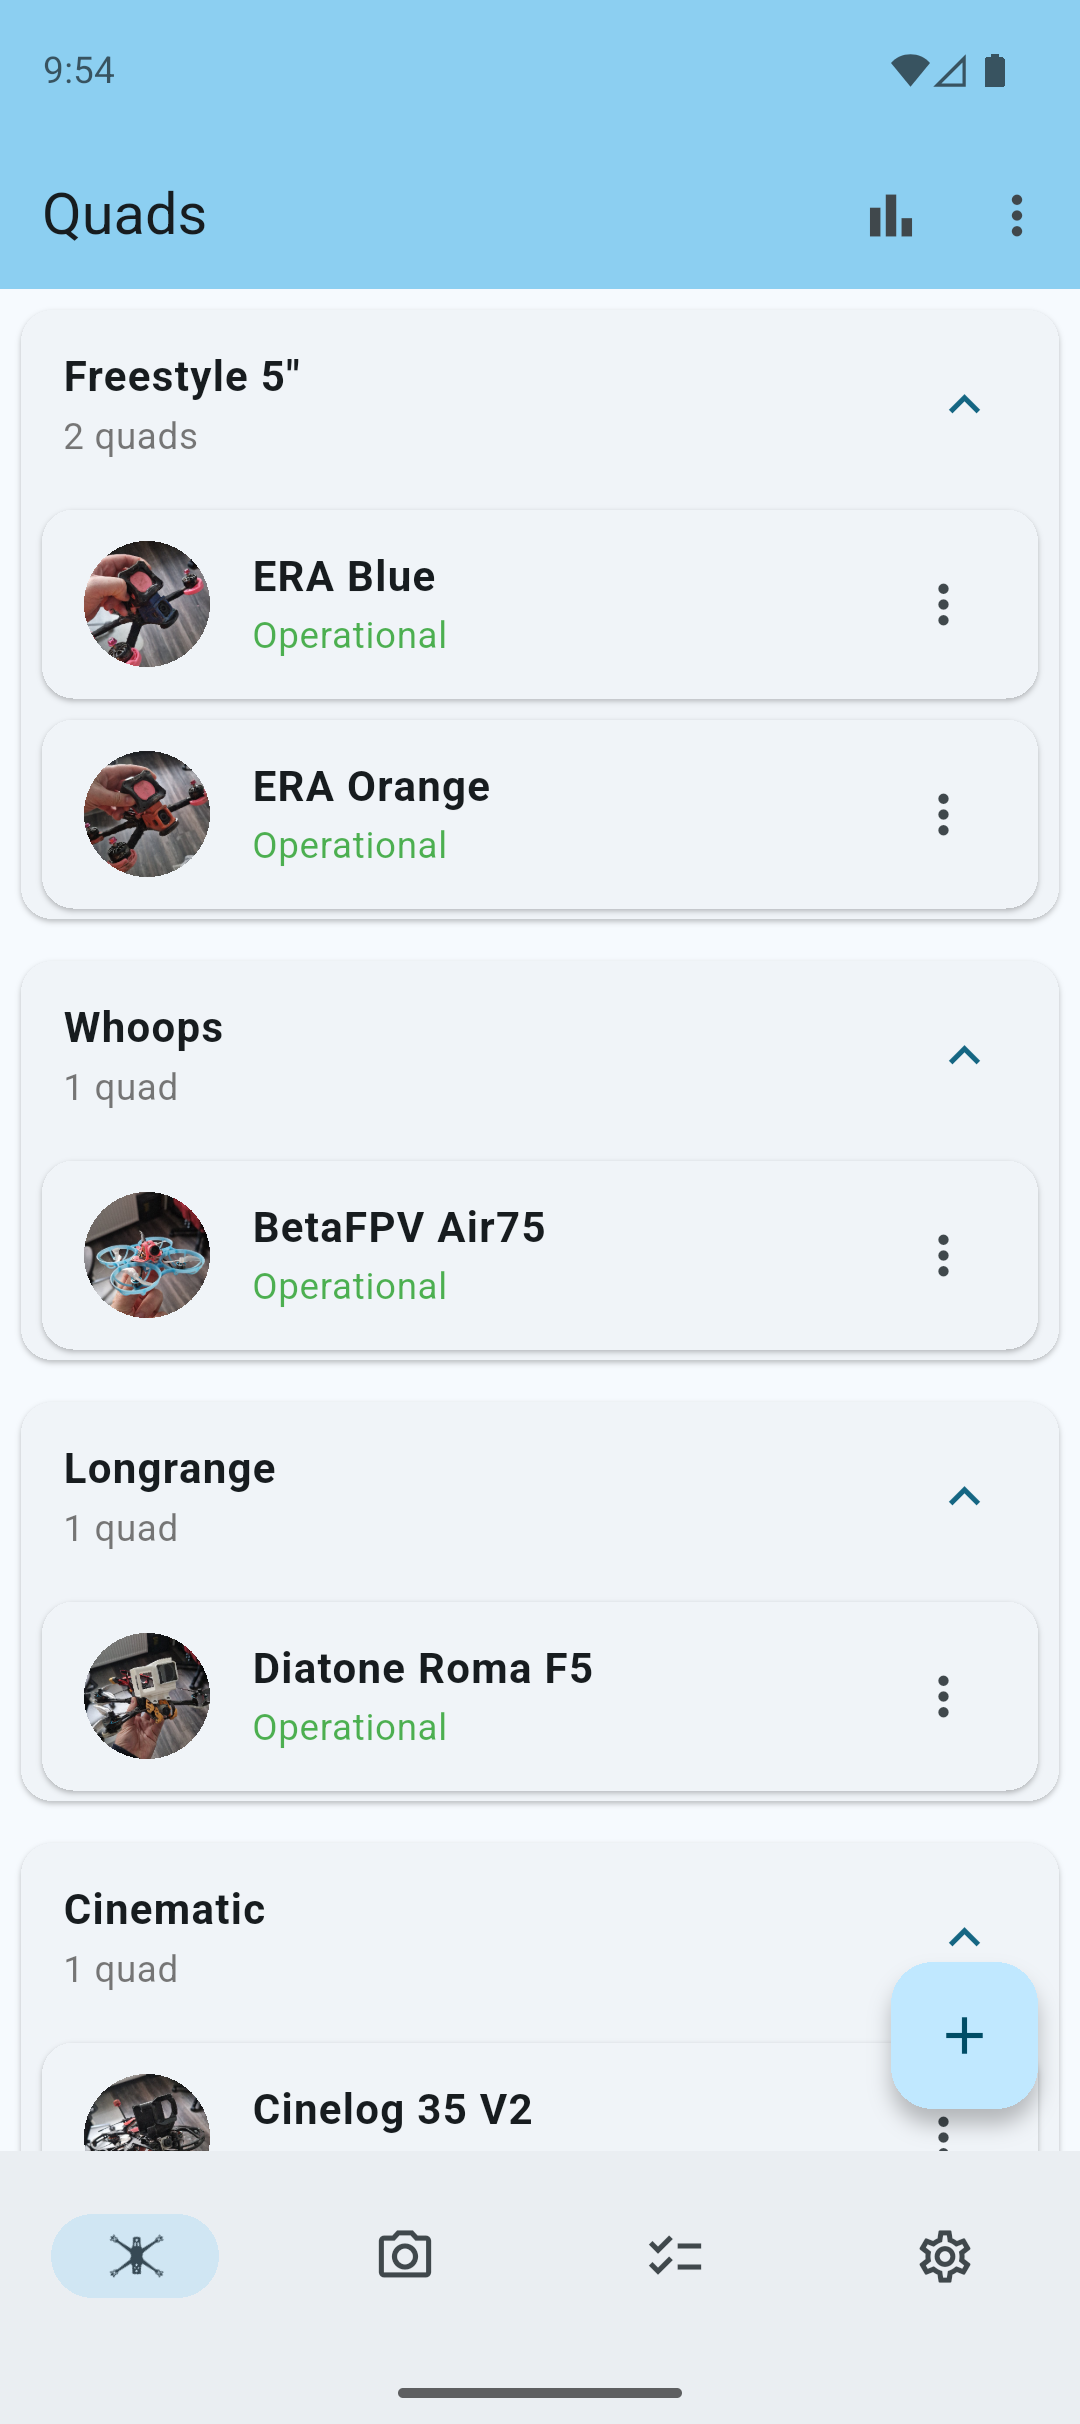
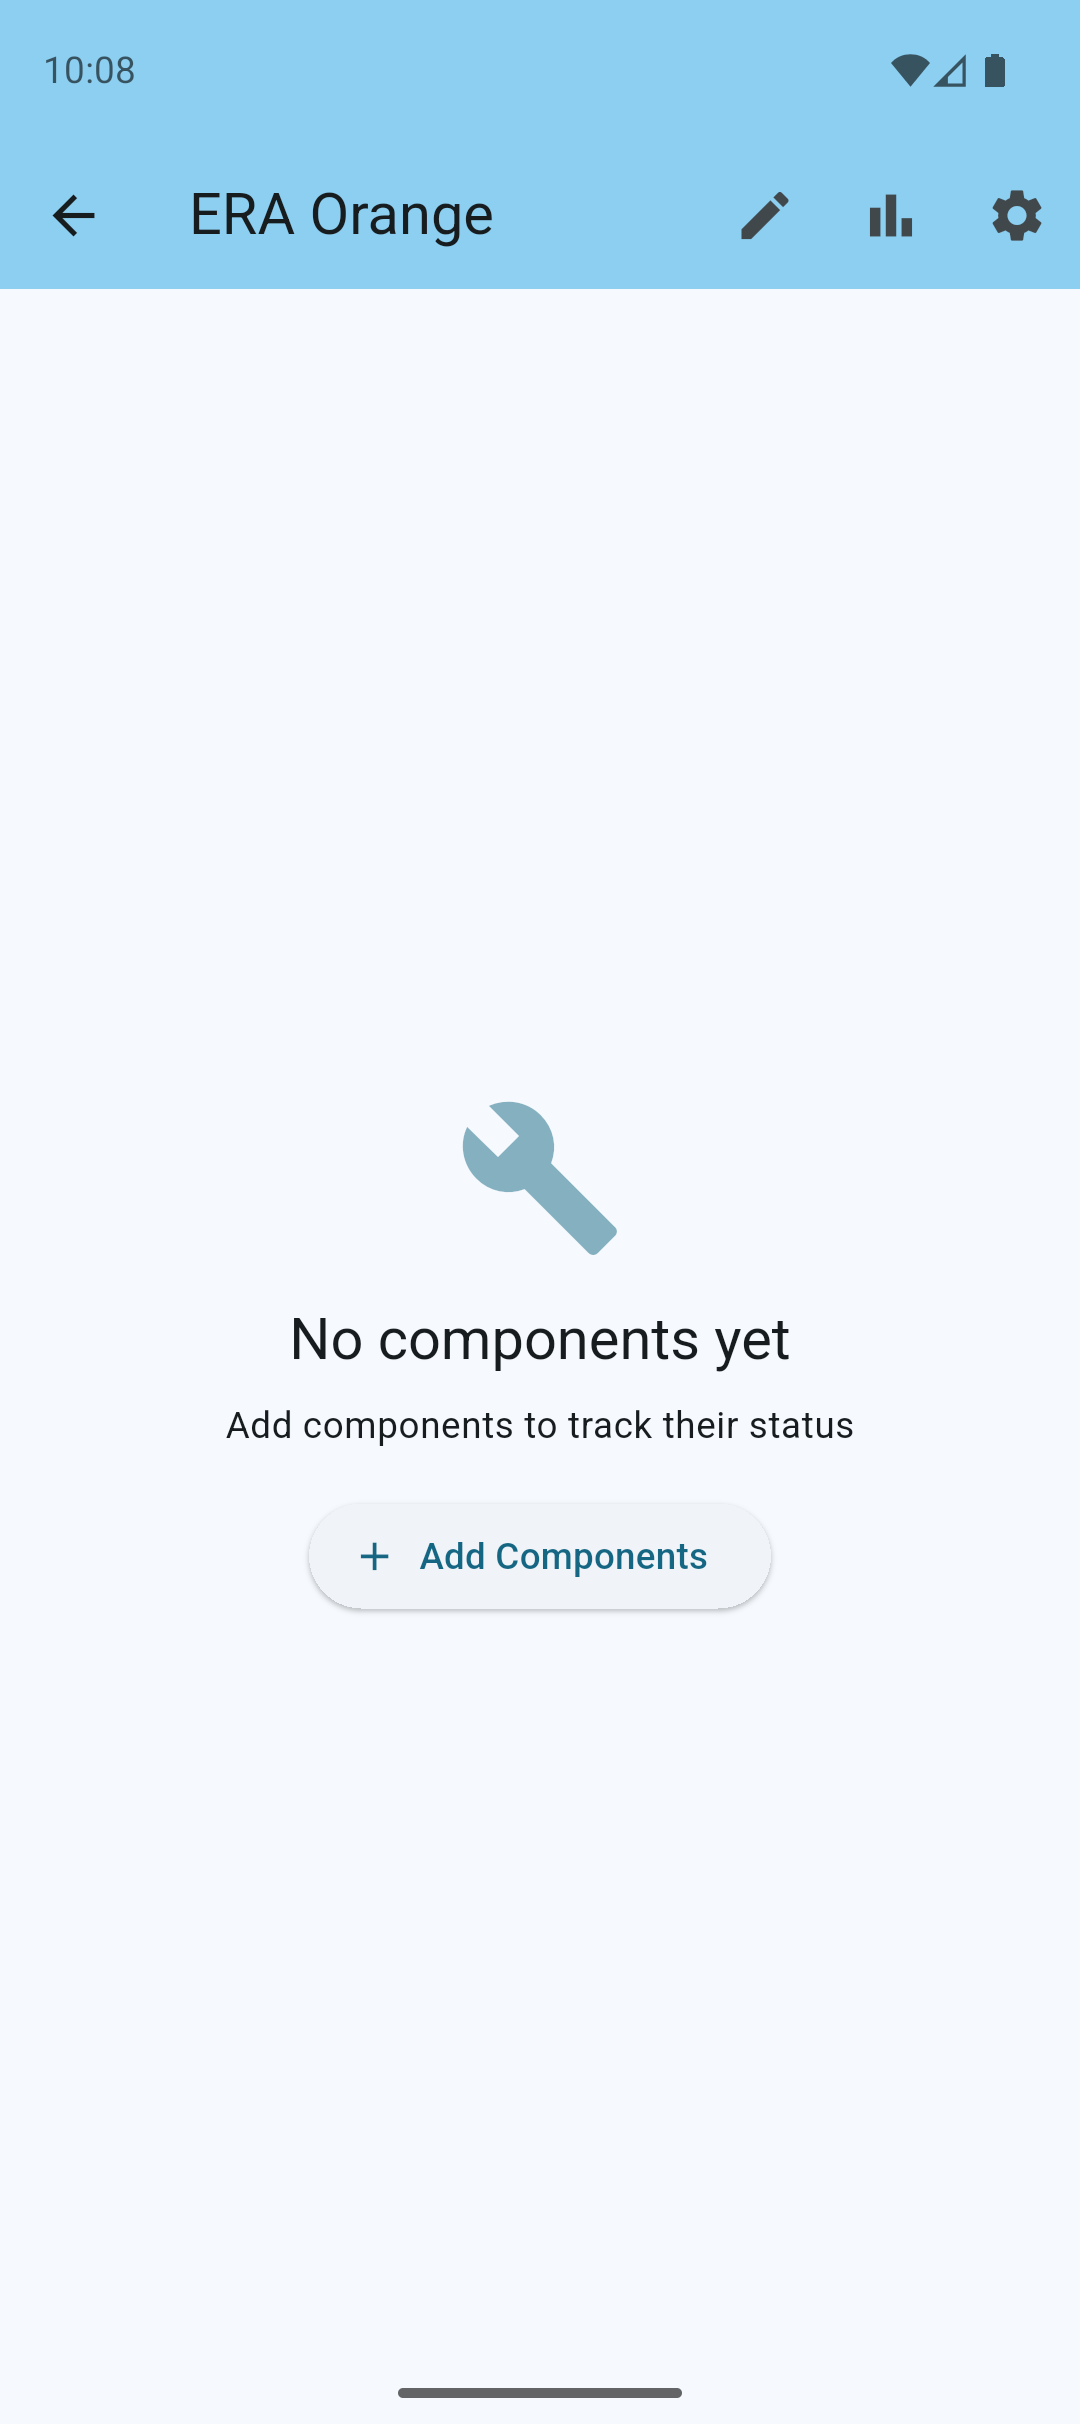
After installing, you'll be greeted by the Quad's overview. Let's dive right in and create our first quad.
Tap the + button on the quad screen to add a new quad.
Add a Quad
Enter a name for your quad and optionally add it to a category.
When you're ready, tap Save to add your quad.
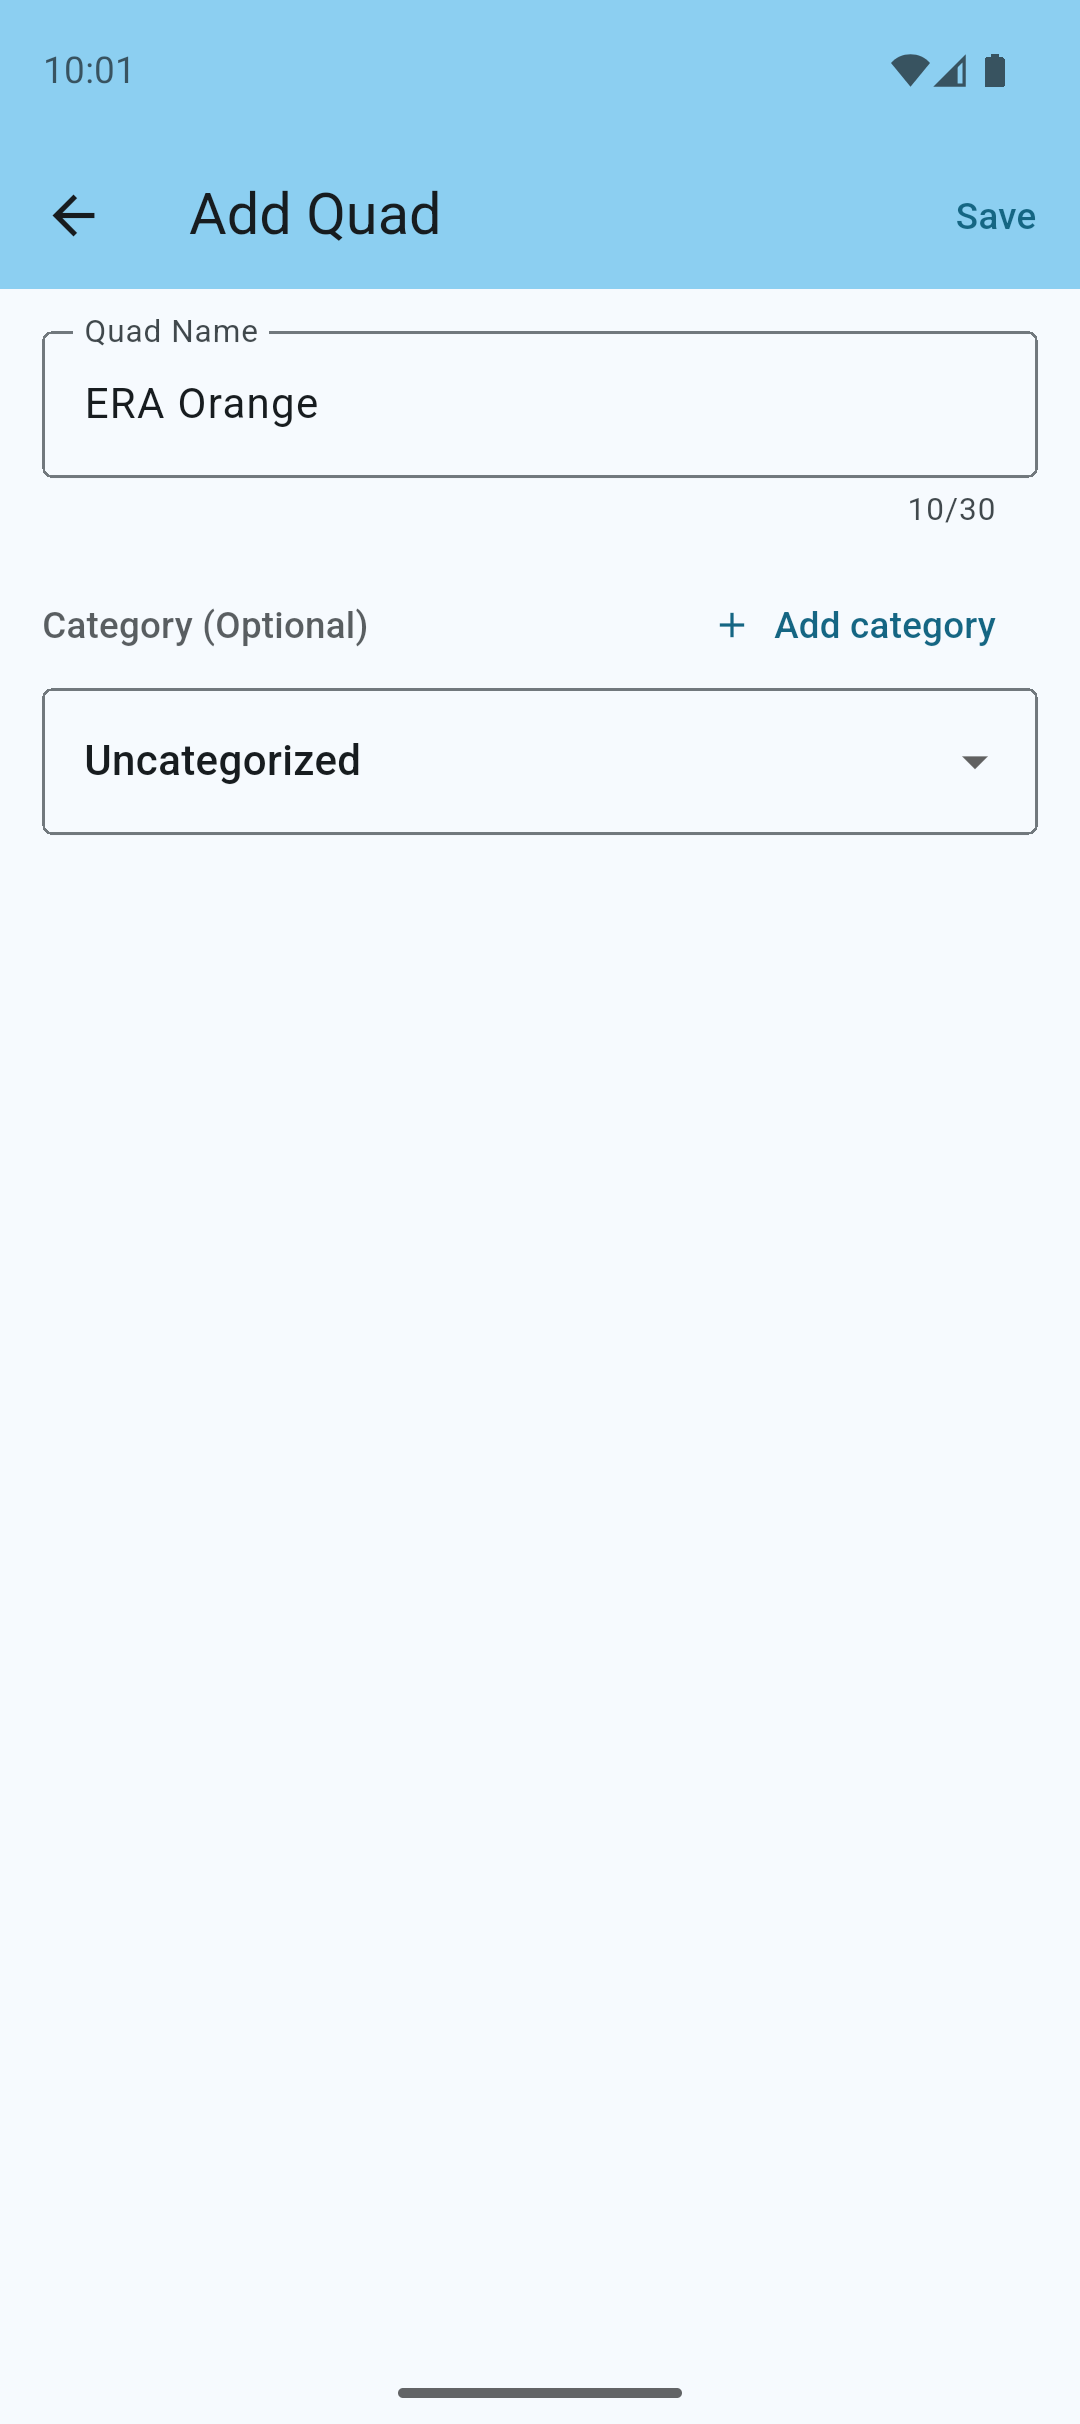
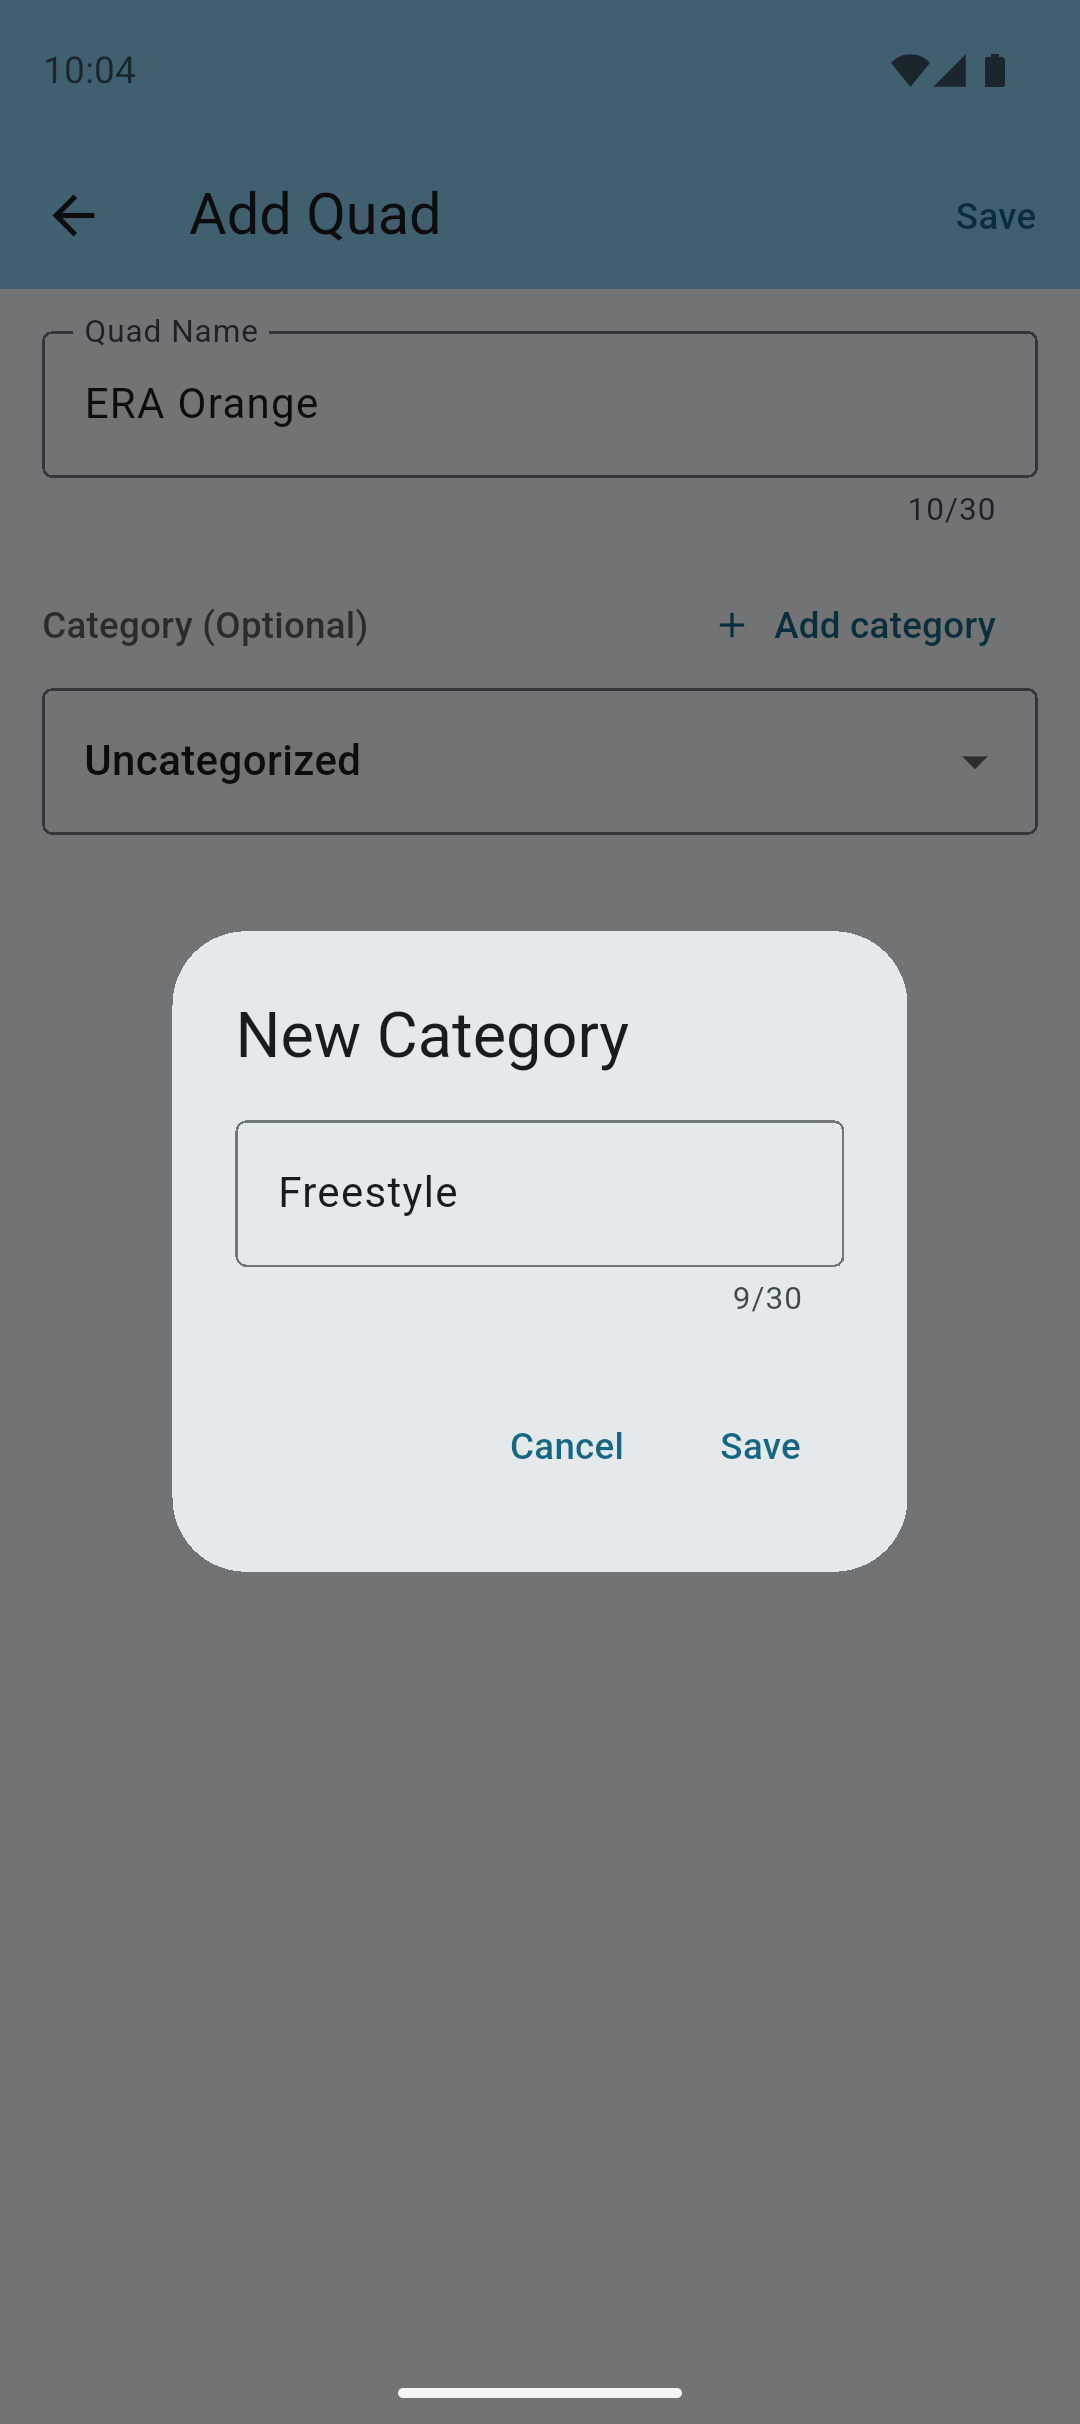
If you have no categories yet, you can create one during this step by tapping the + Add category button.
Setting Up a Quad
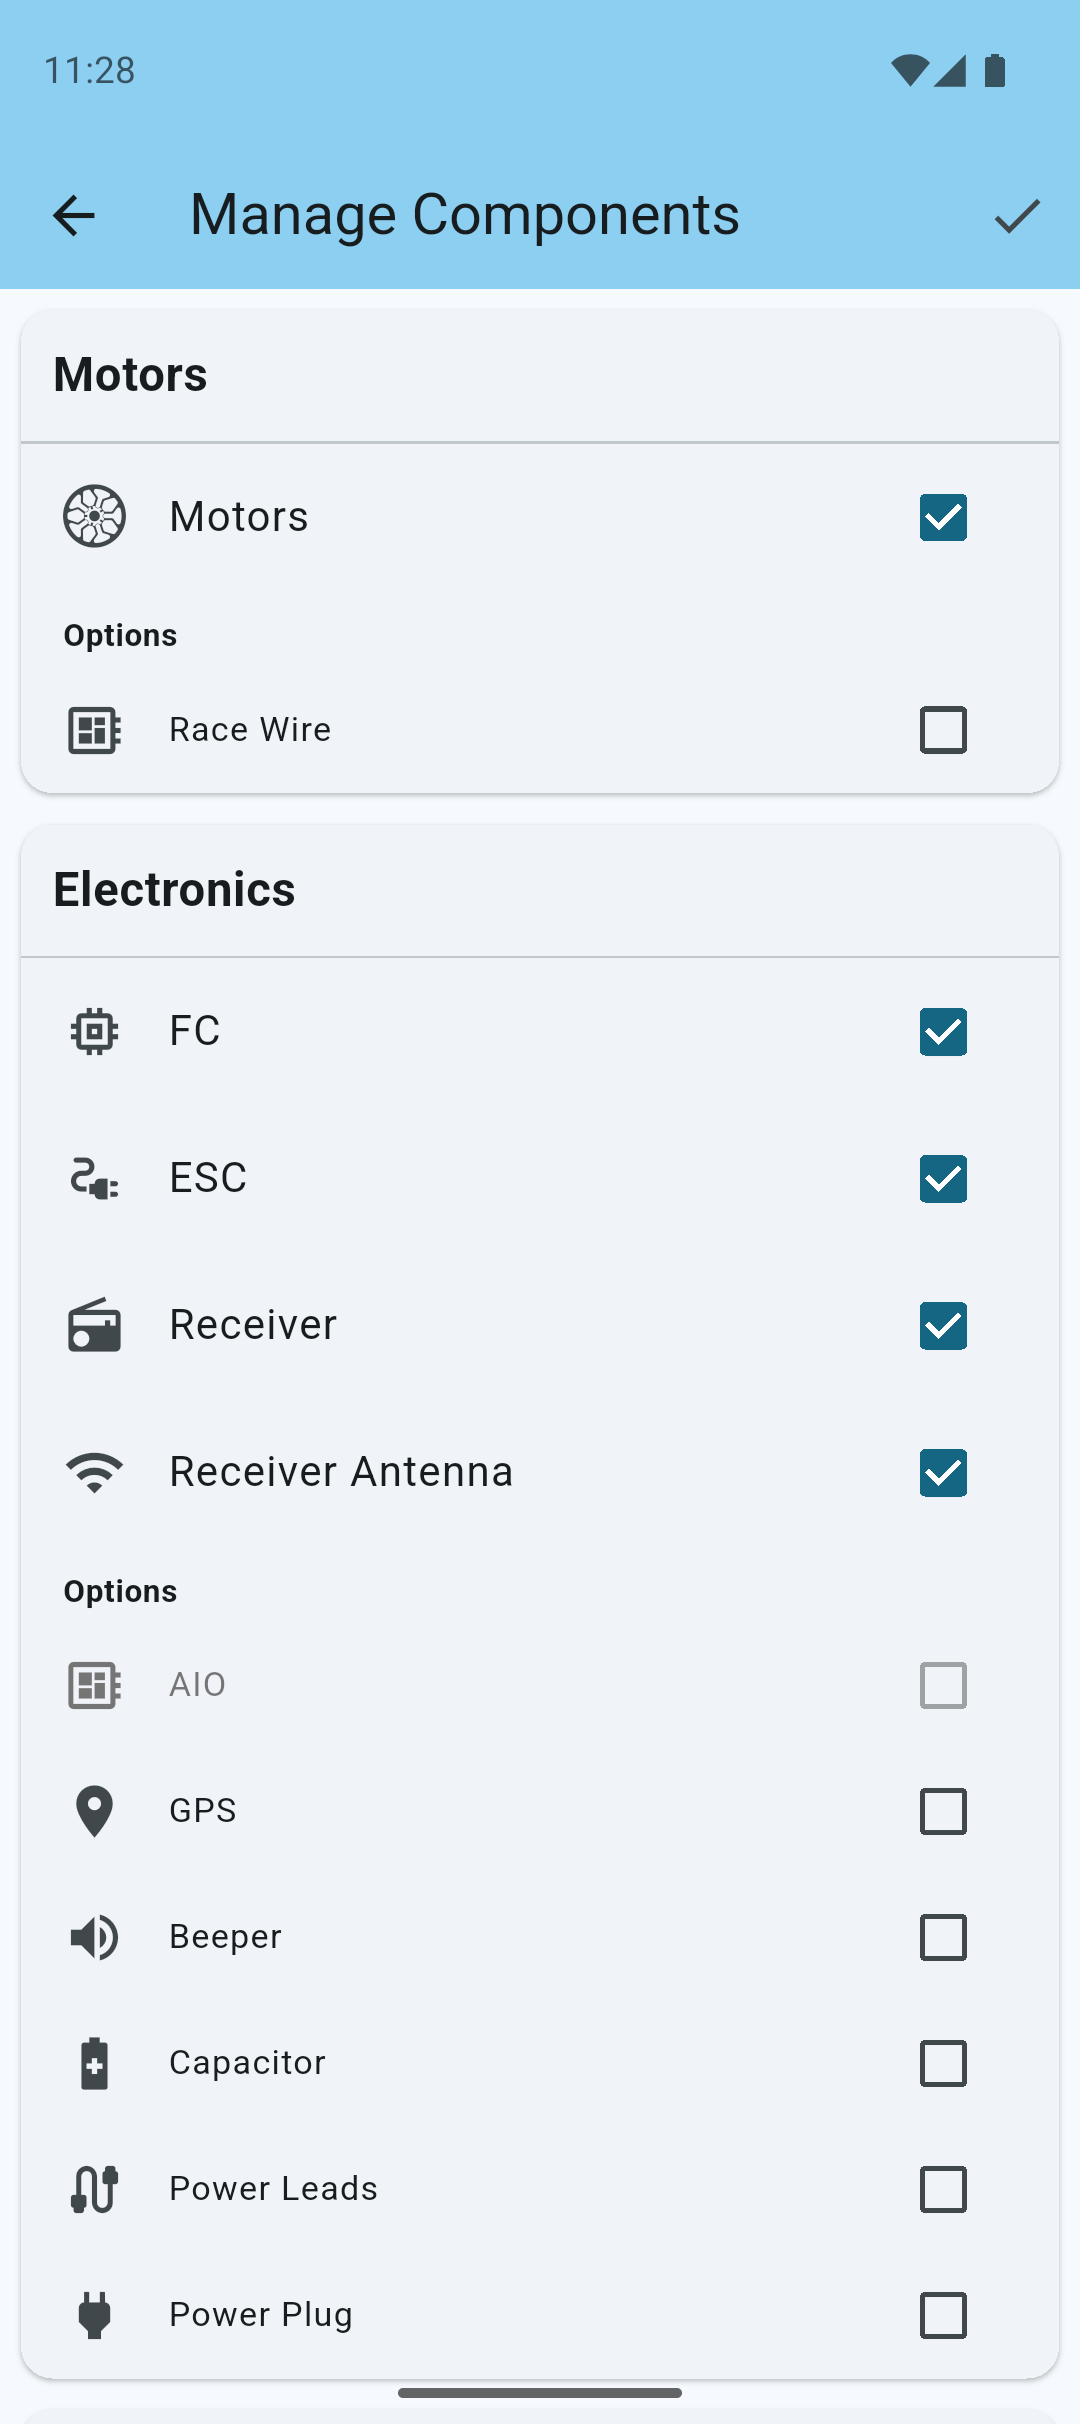
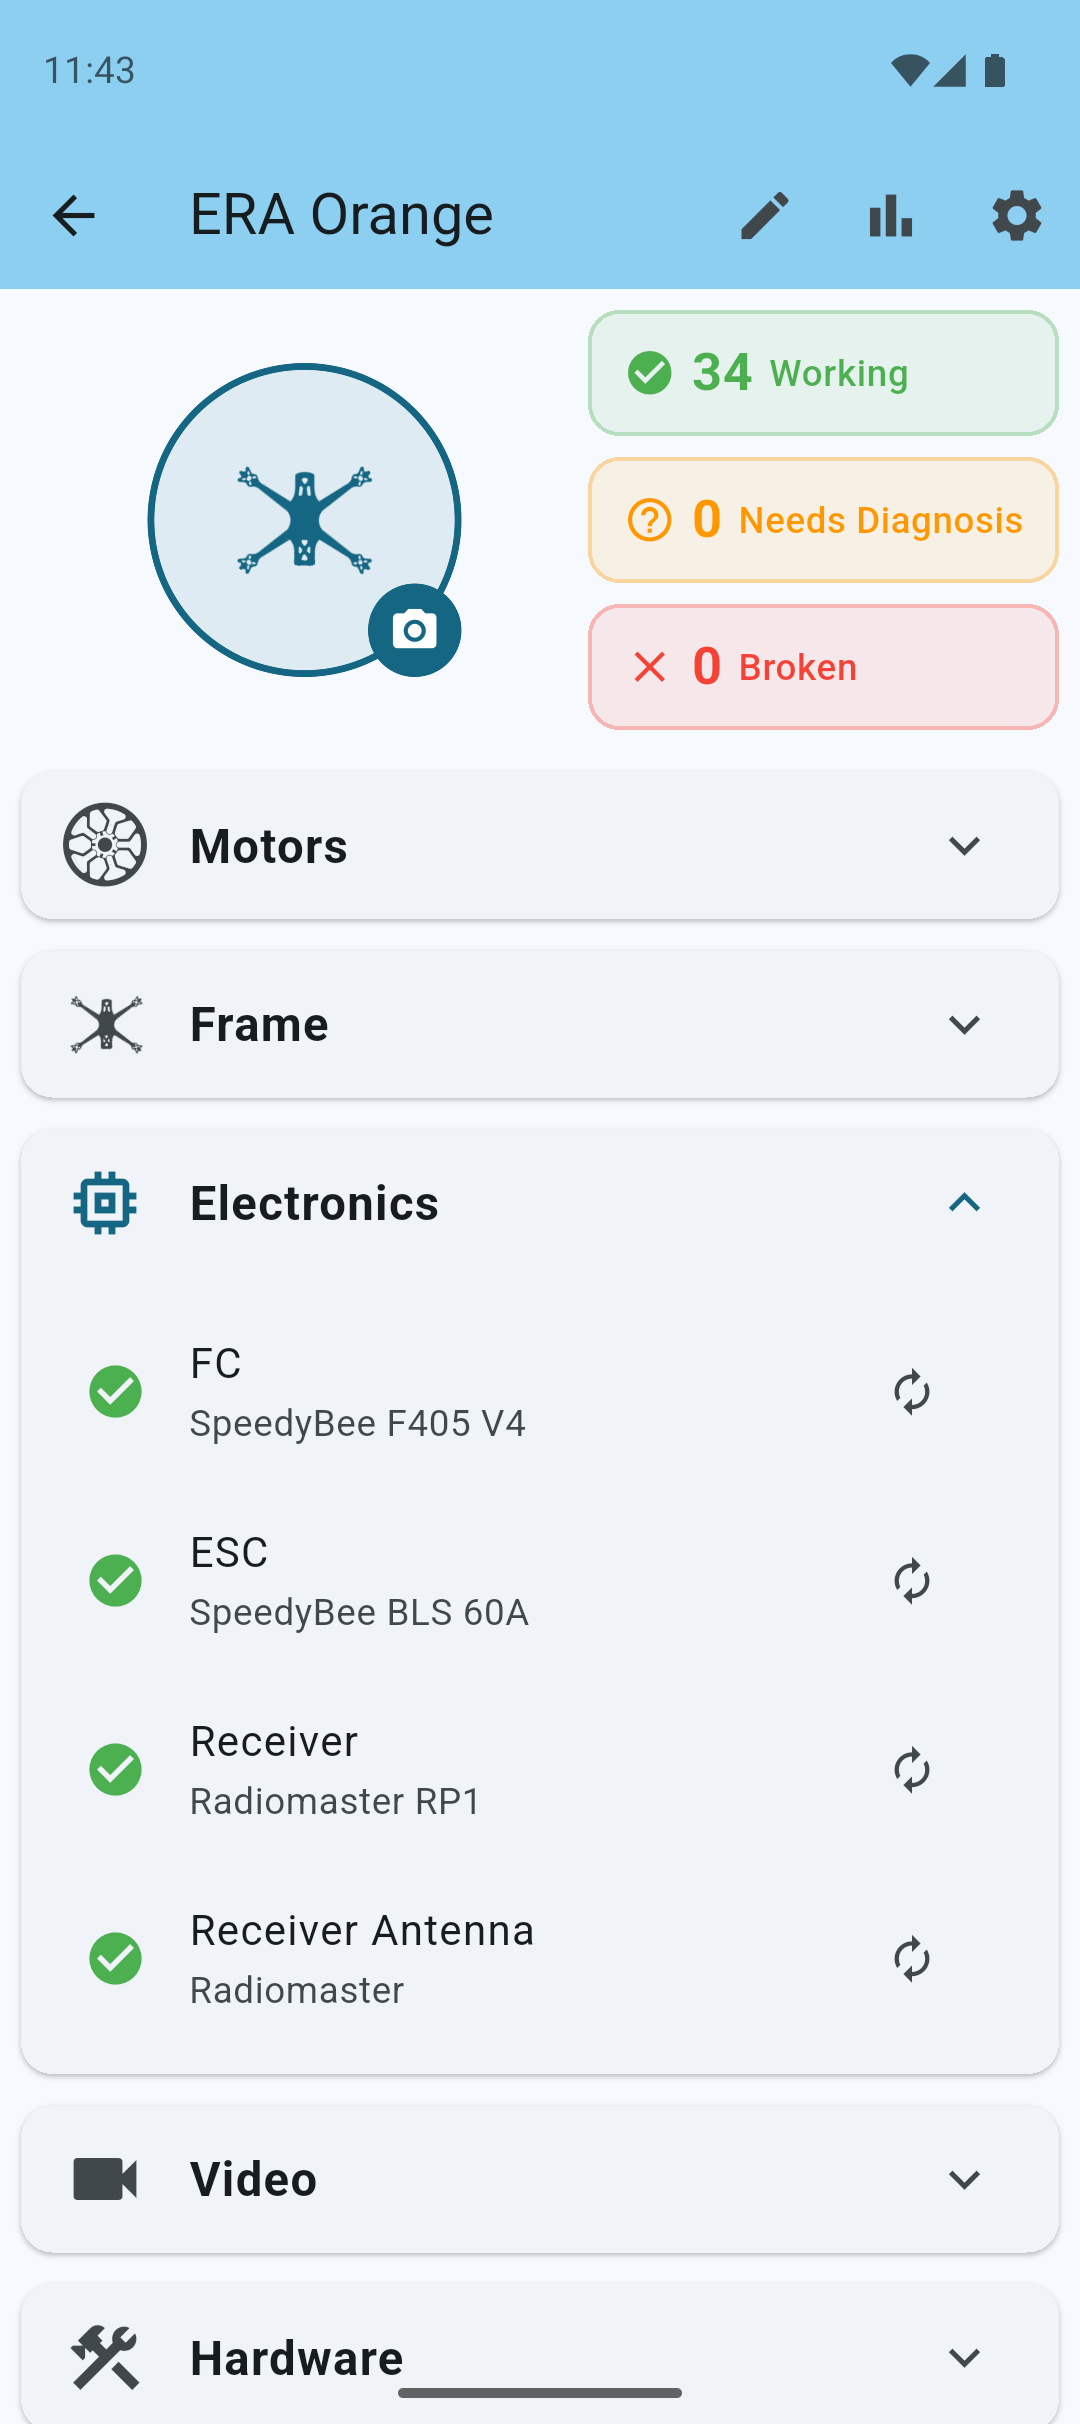
You'll need to pick the components that belong to your quad, since most quads are custom-built and have different parts.
Don't worry, you can always add or remove components later on.
Tap the + Add Components button or the cog icon in the top menu to start adding components to your quad.
Choose from over 40 components to build your quad.
Tap Done in the top menu to save your changes.
Note: You don't have to add all components your quad has. If you don't want to track a component, simply leave it out.
Your quad is now ready. Feel free to add a photo so you can easily identify it later.
Advanced Setup
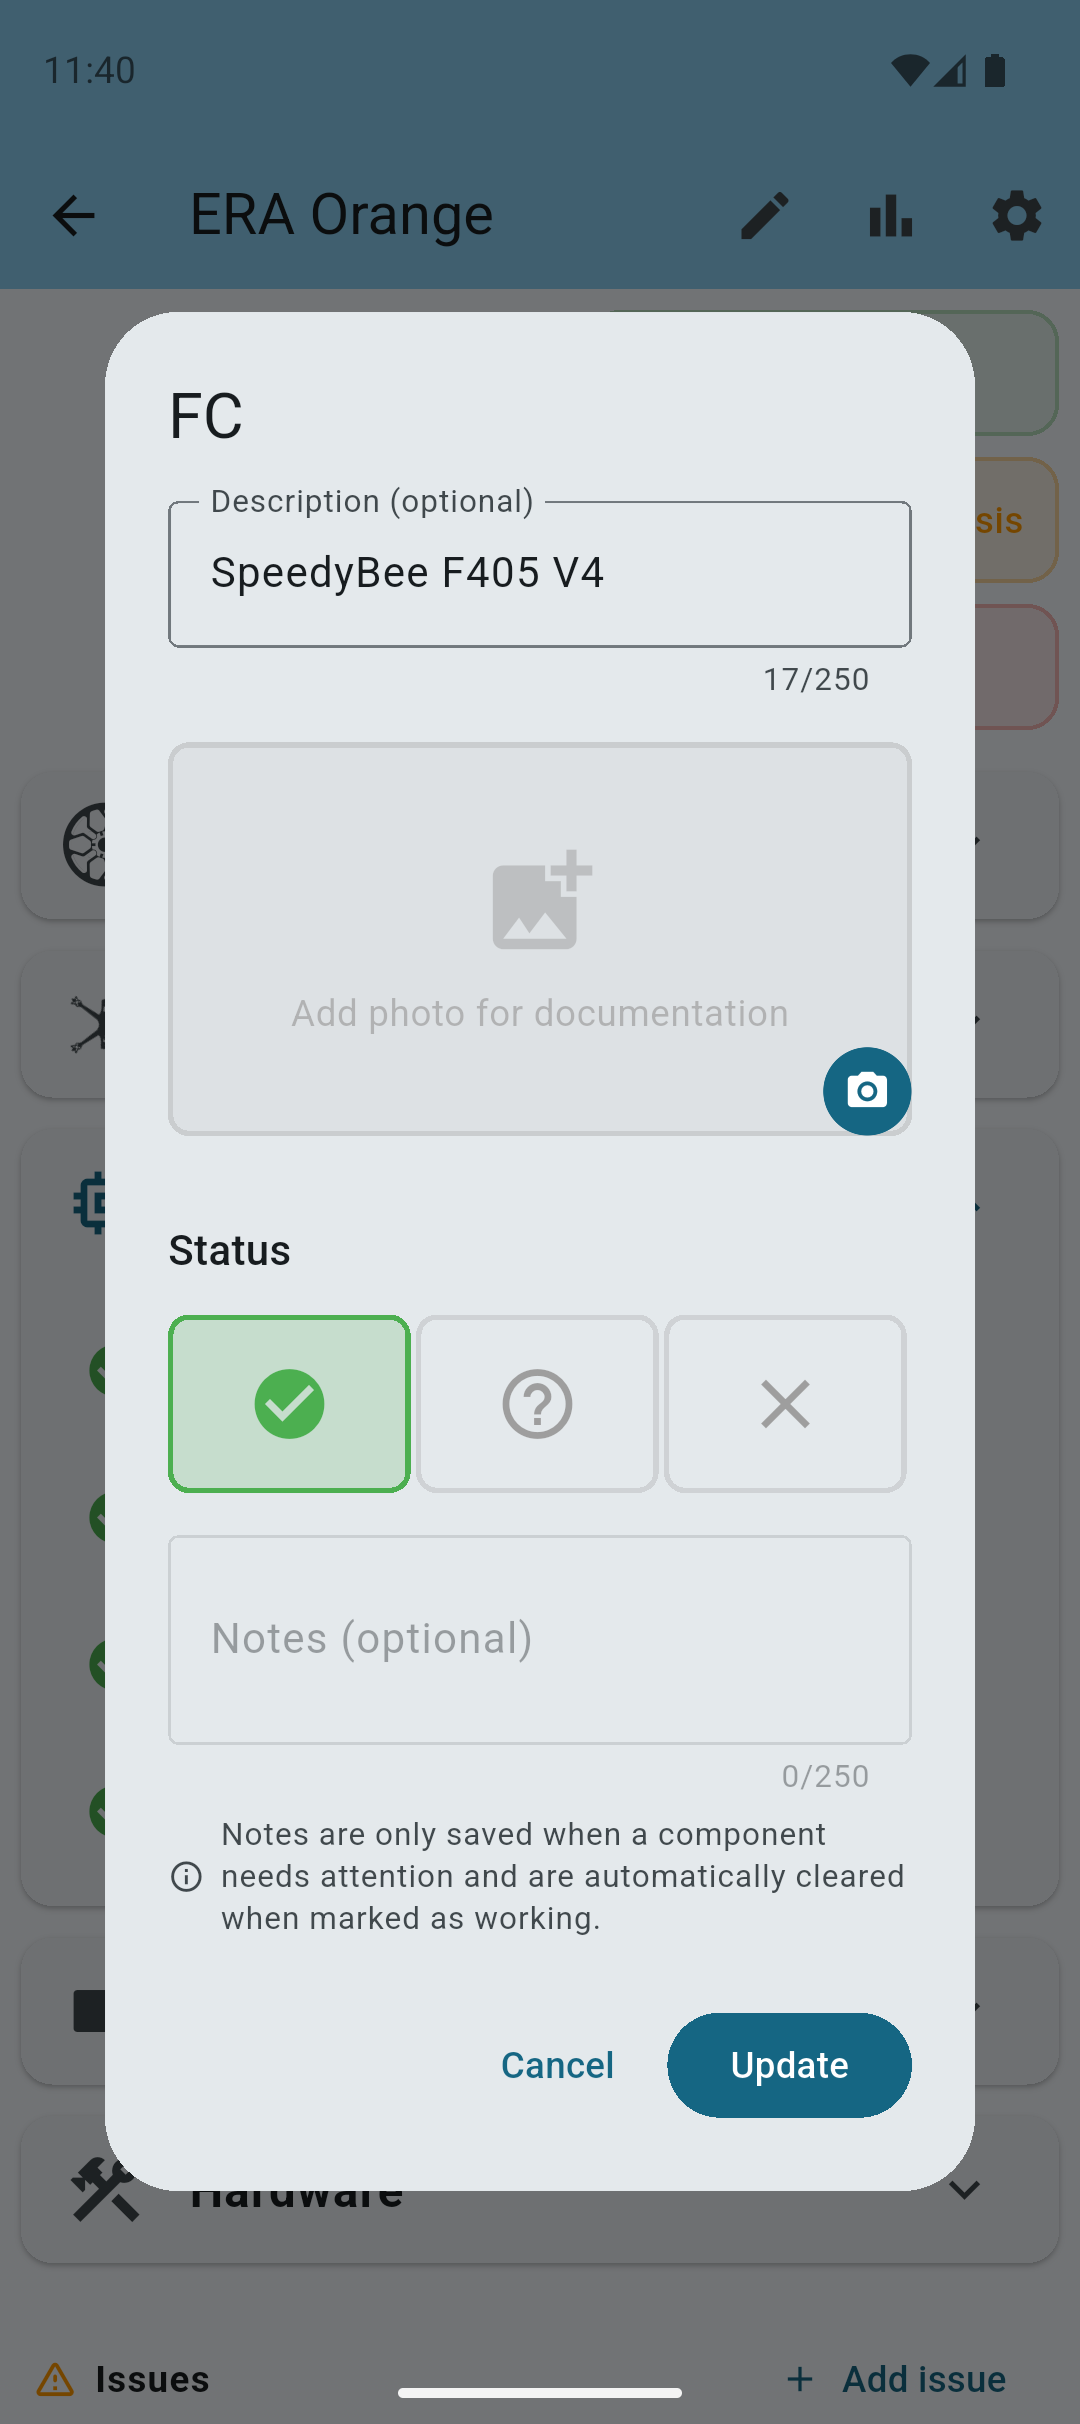
If you want to customize your quad further, you can start adding descriptions to each of the components, but you don't have to.
Simply tap on a component to edit its details.
Once you're happy with the details of your quad, you can start logging repairs and crashes. You can always come back and edit the quad's details later on.
Clone Quads
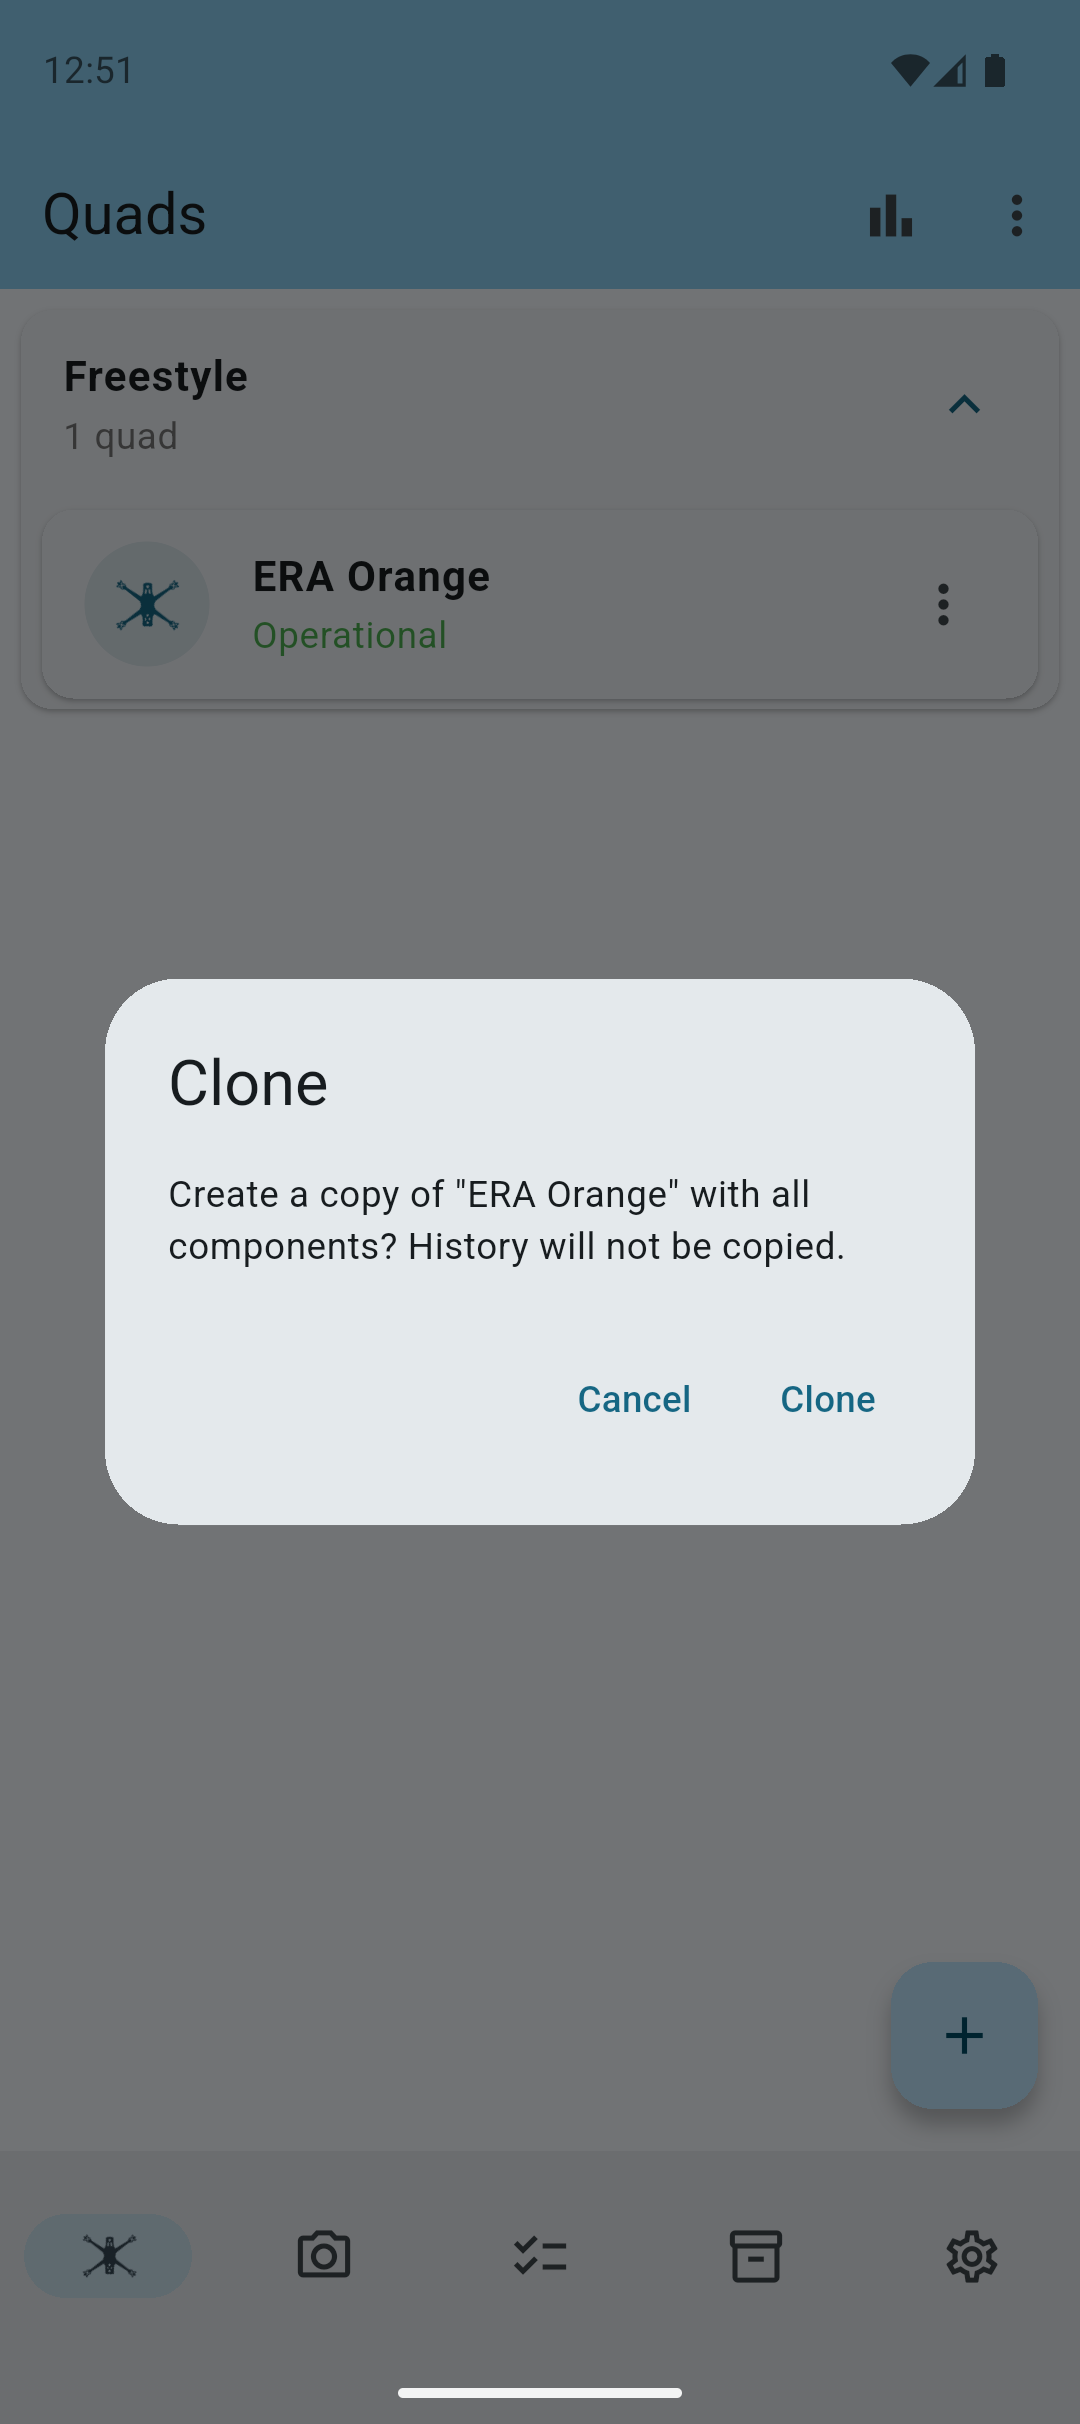
If you have multiple quads with the same or similar components, you can save time by cloning an existing quad.
This will copy all components and their details to the new quad, allowing you to quickly set up your new quad with the same components.
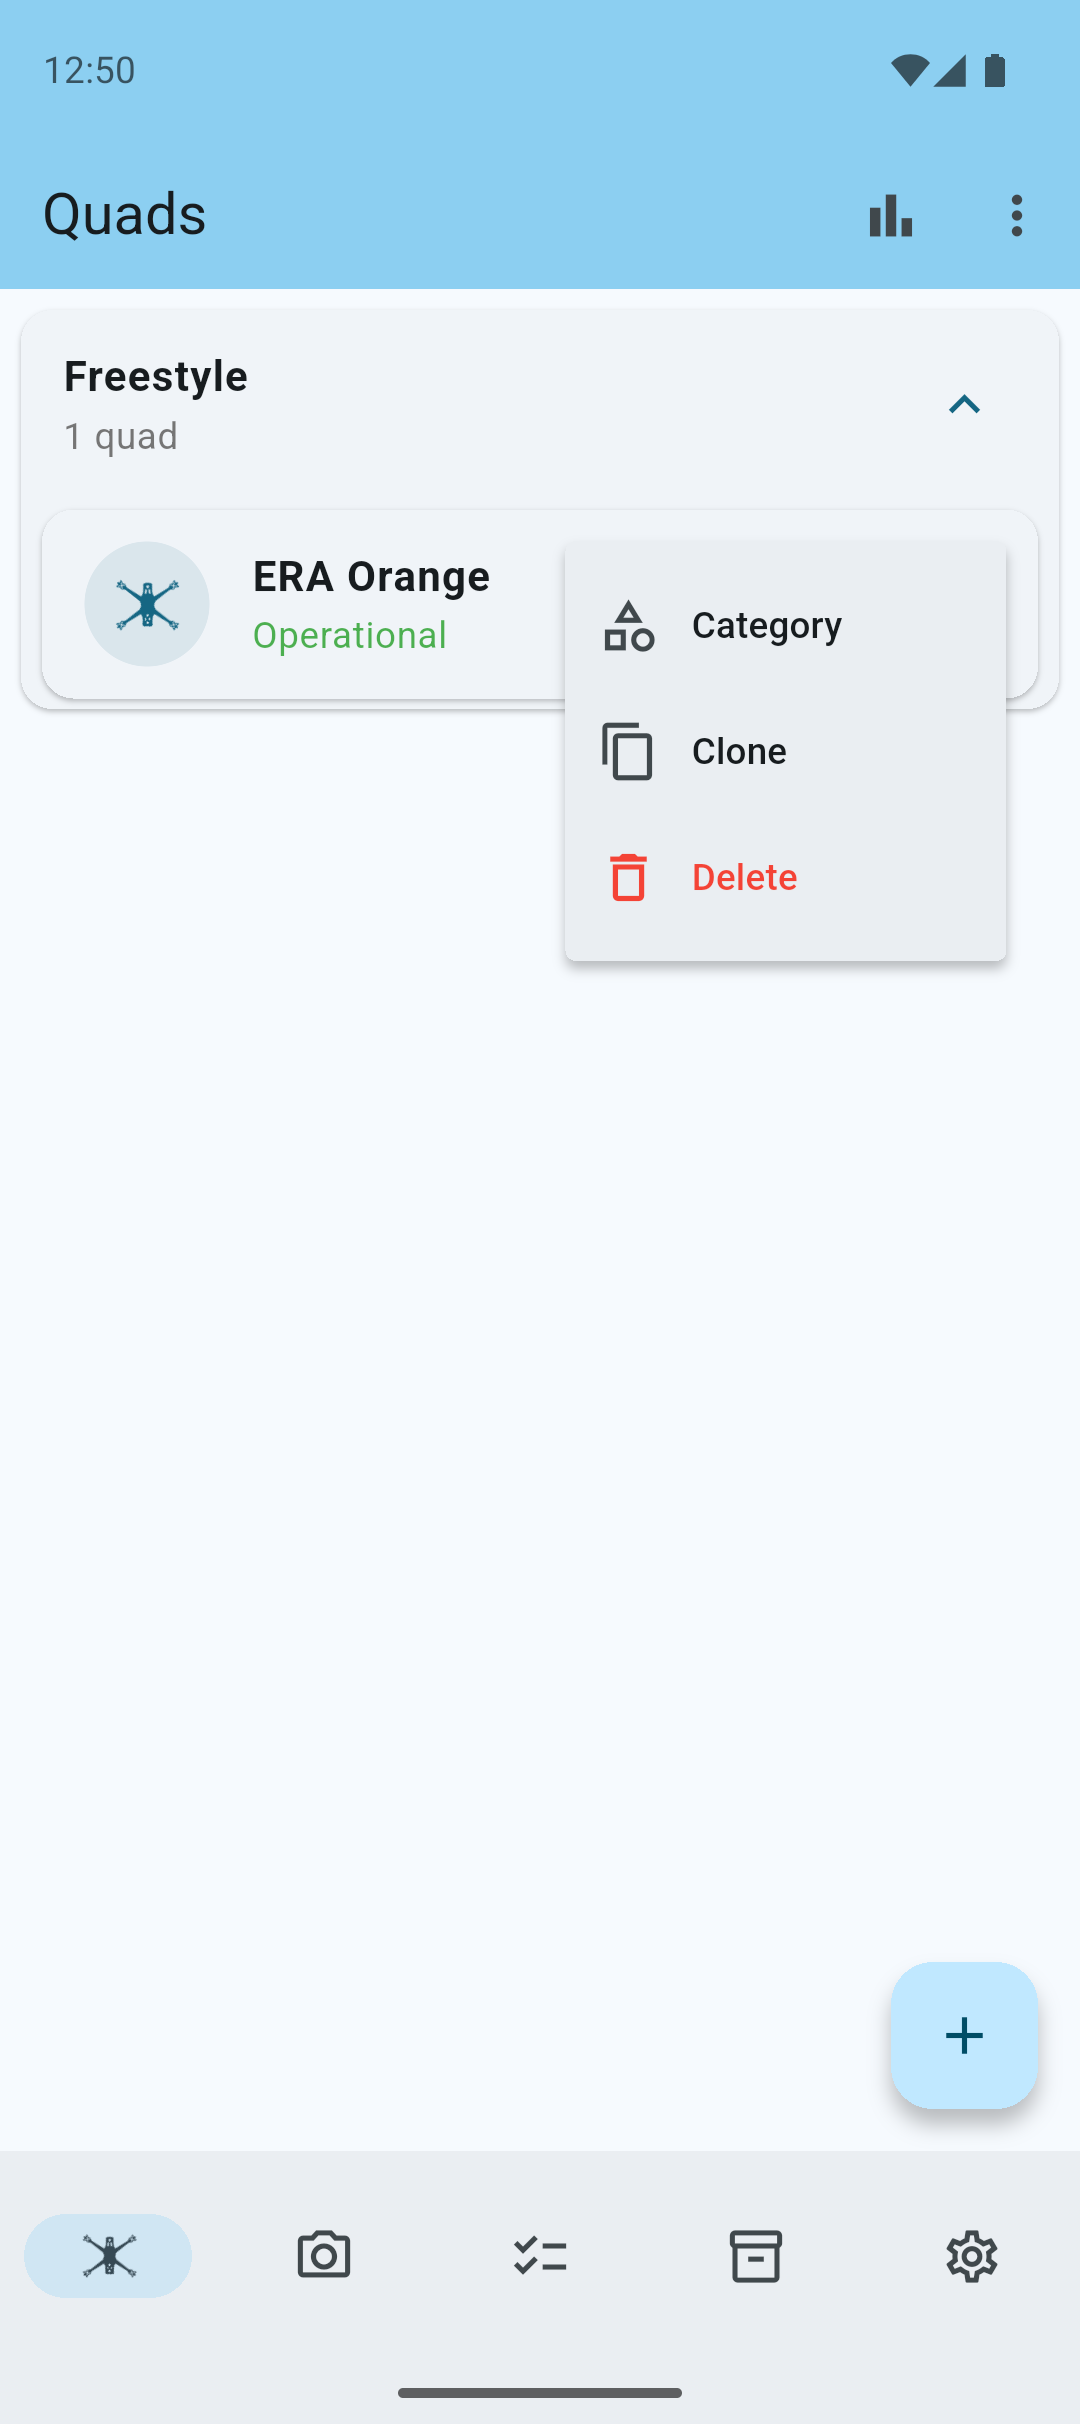
Note: If you copy a quad, the new quad will have the same components, but the history will not be copied.
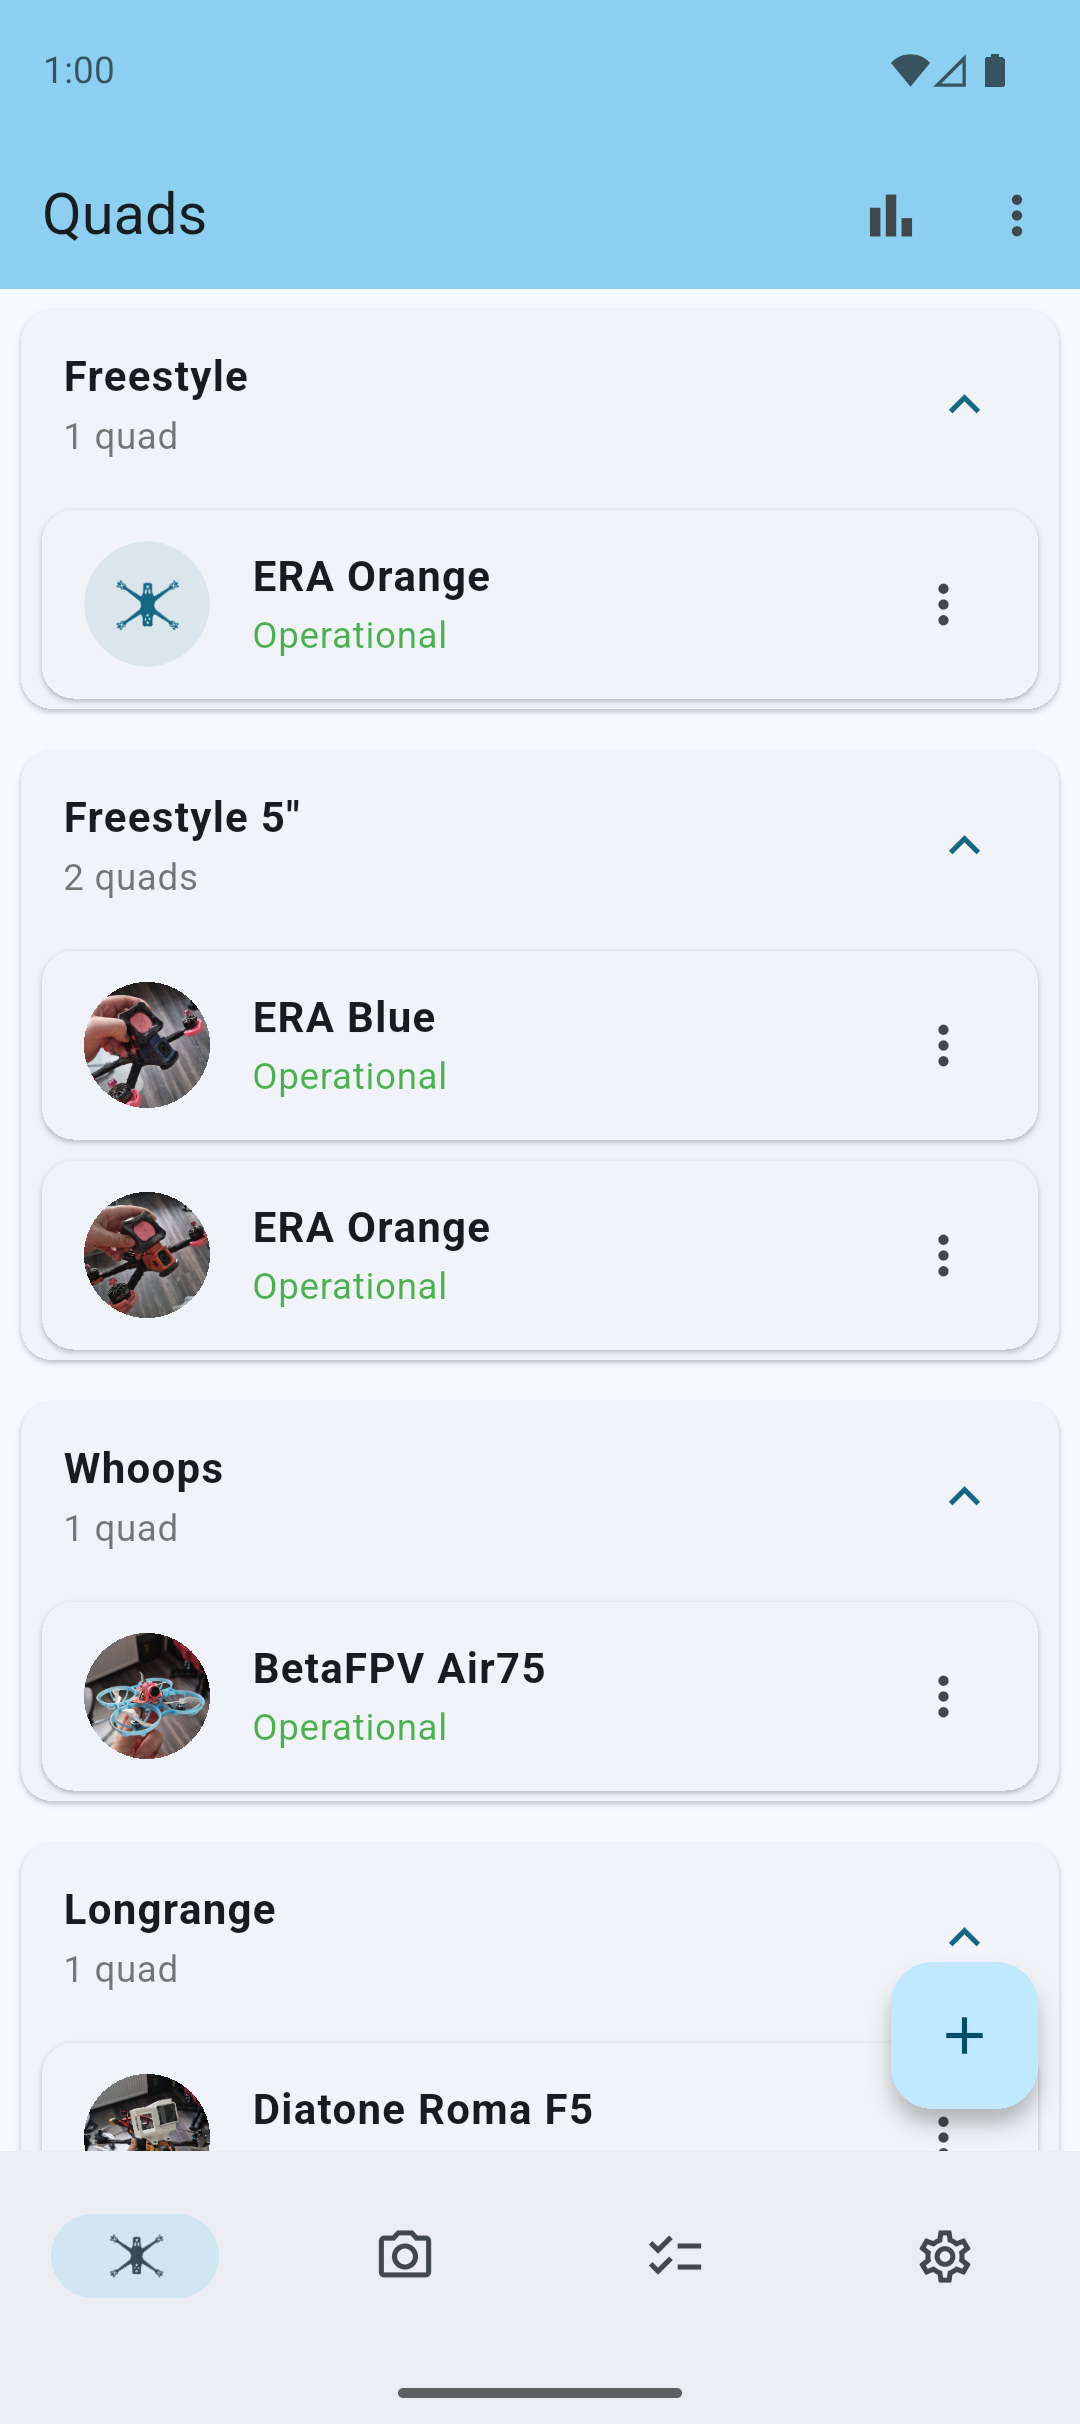
Reordering Quads
If you want to change the order of your quads, you can use the 3 dotted menu in the top navigation bar, and tap Reorder.
This will enable handles on the quads which allow you to drag and drop your quads to rearrange their order.
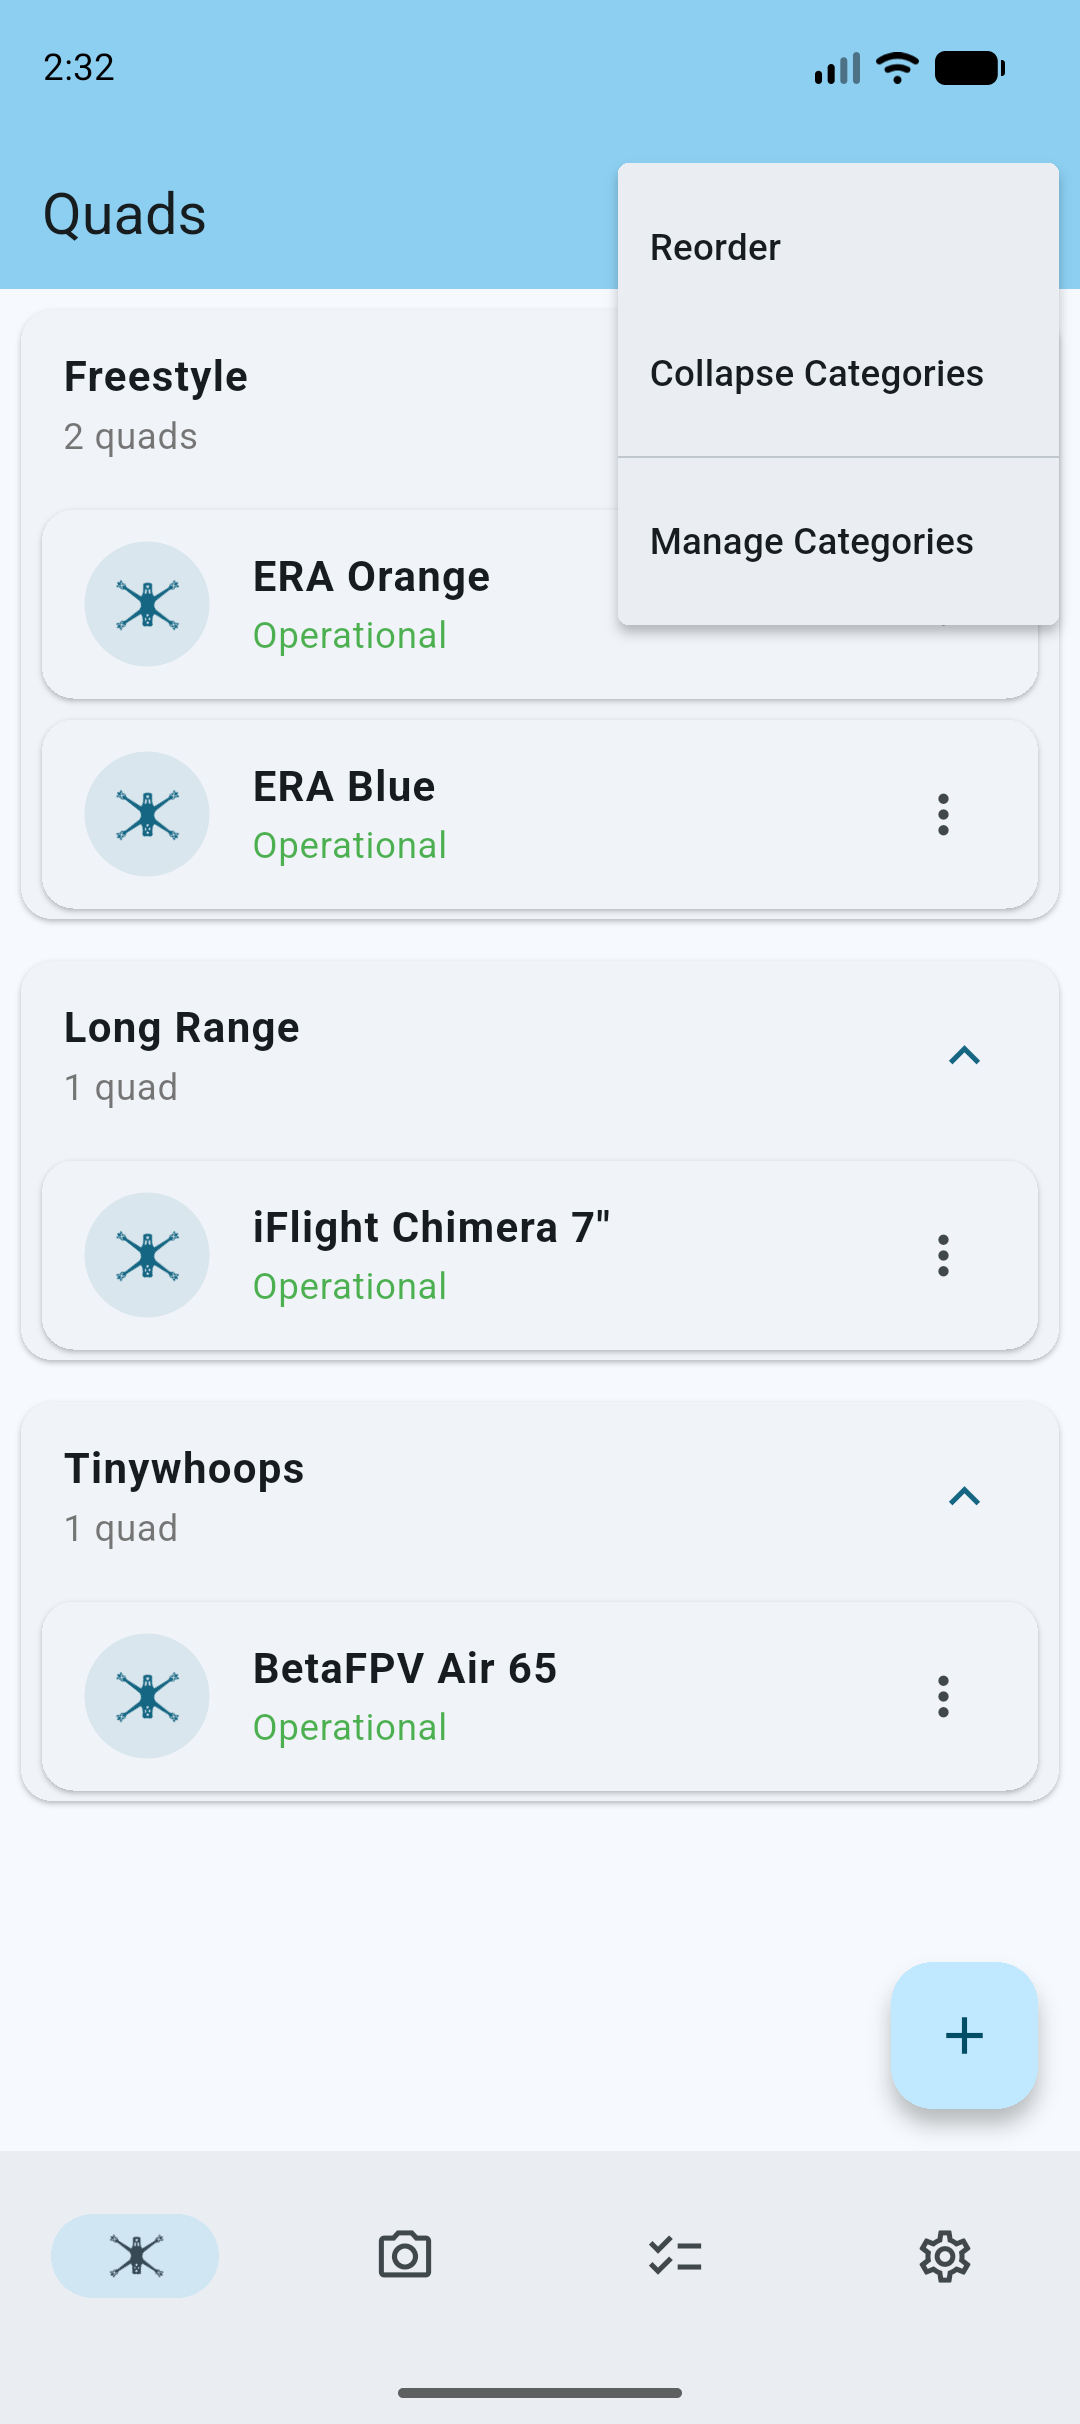
Drag and drop the quads to rearrange their order.
Tap the Done button to save the new order.
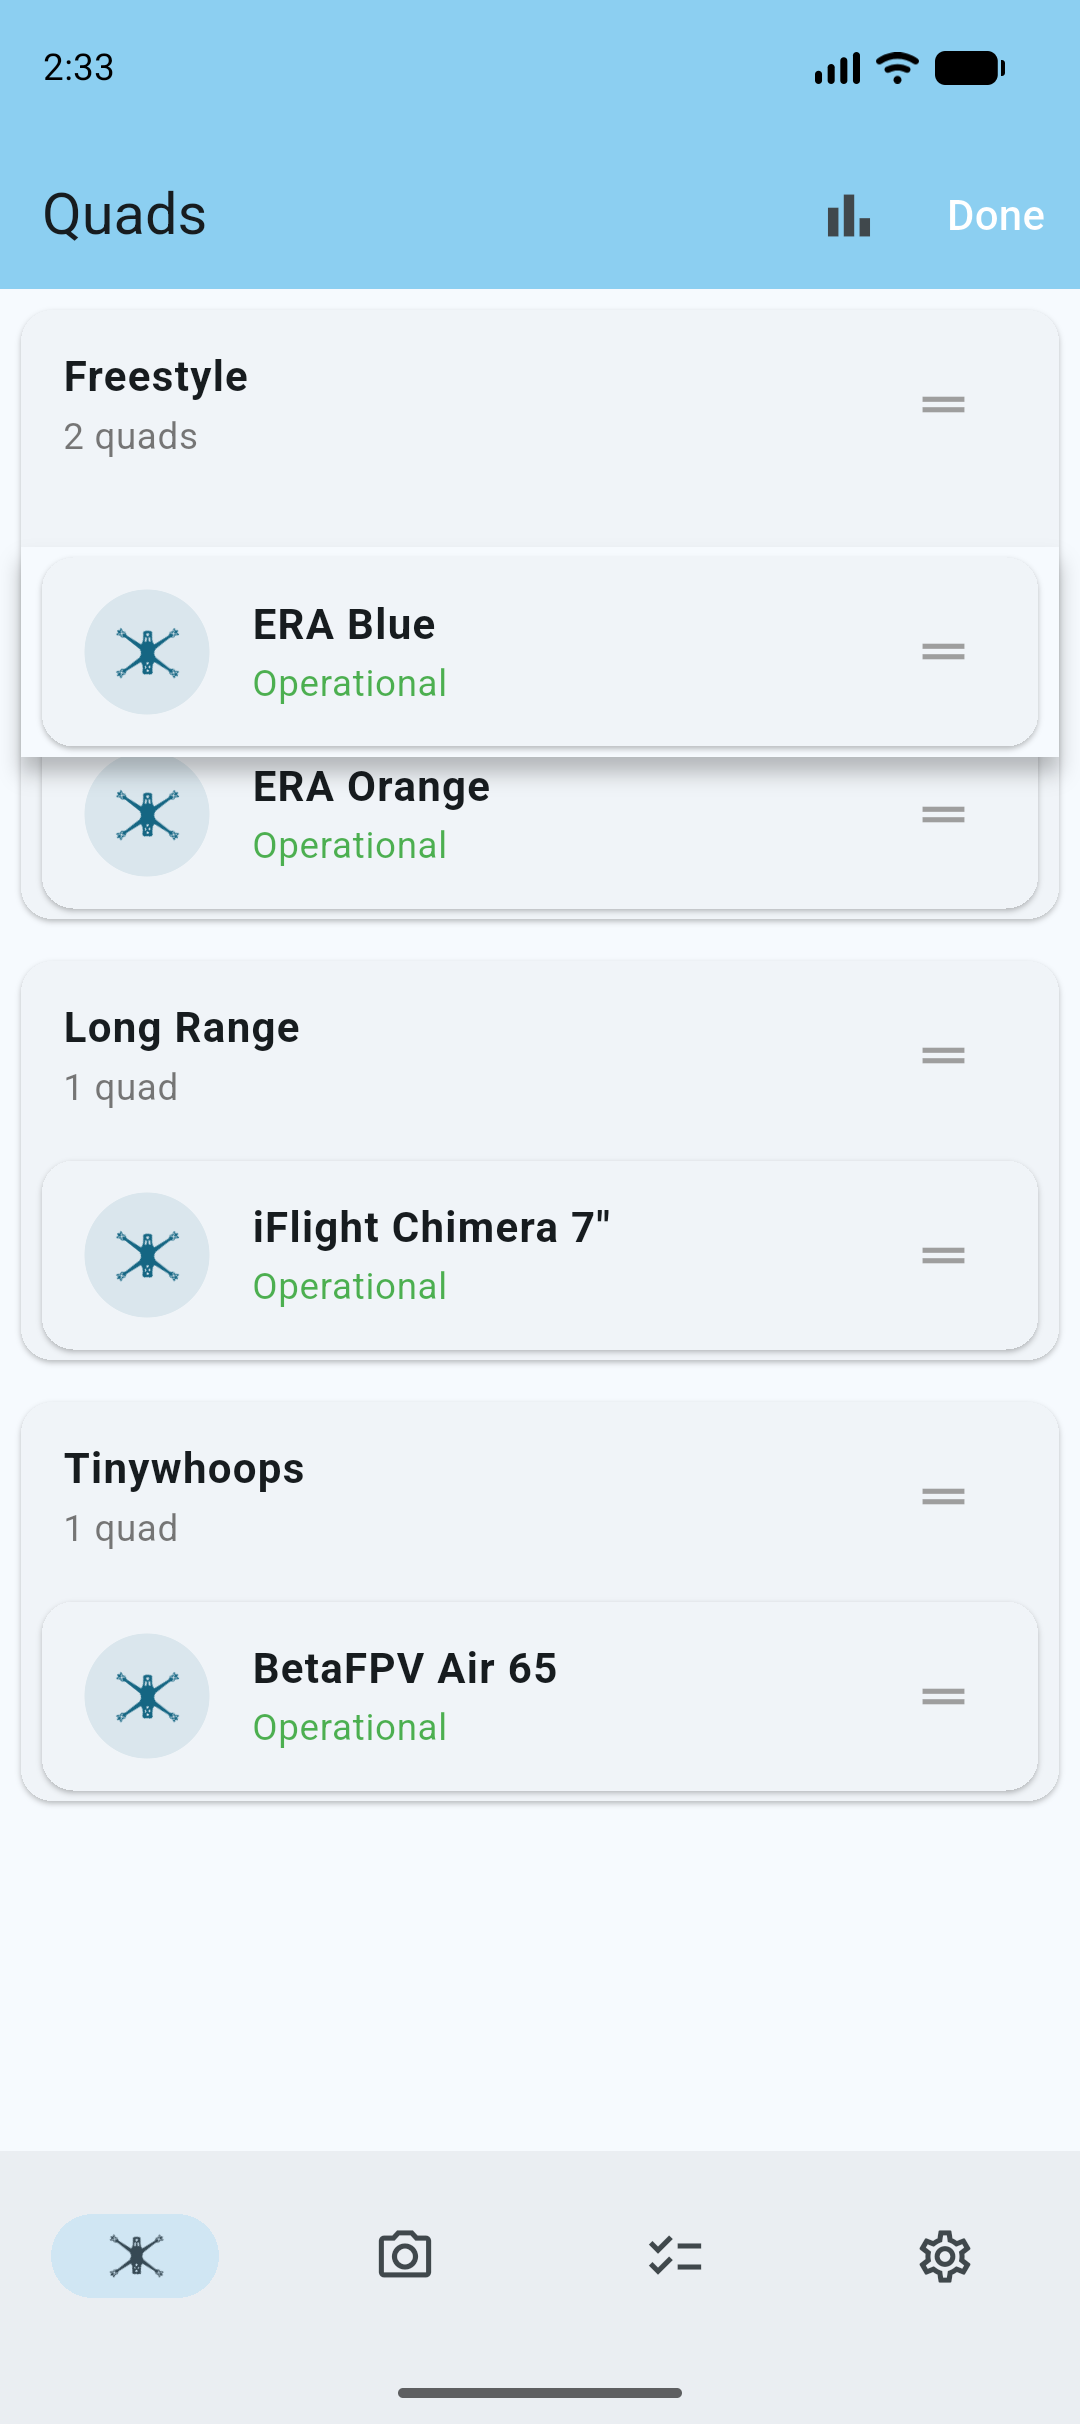
Long press on a quad during reordering, to enable cross-dragging into different categories.

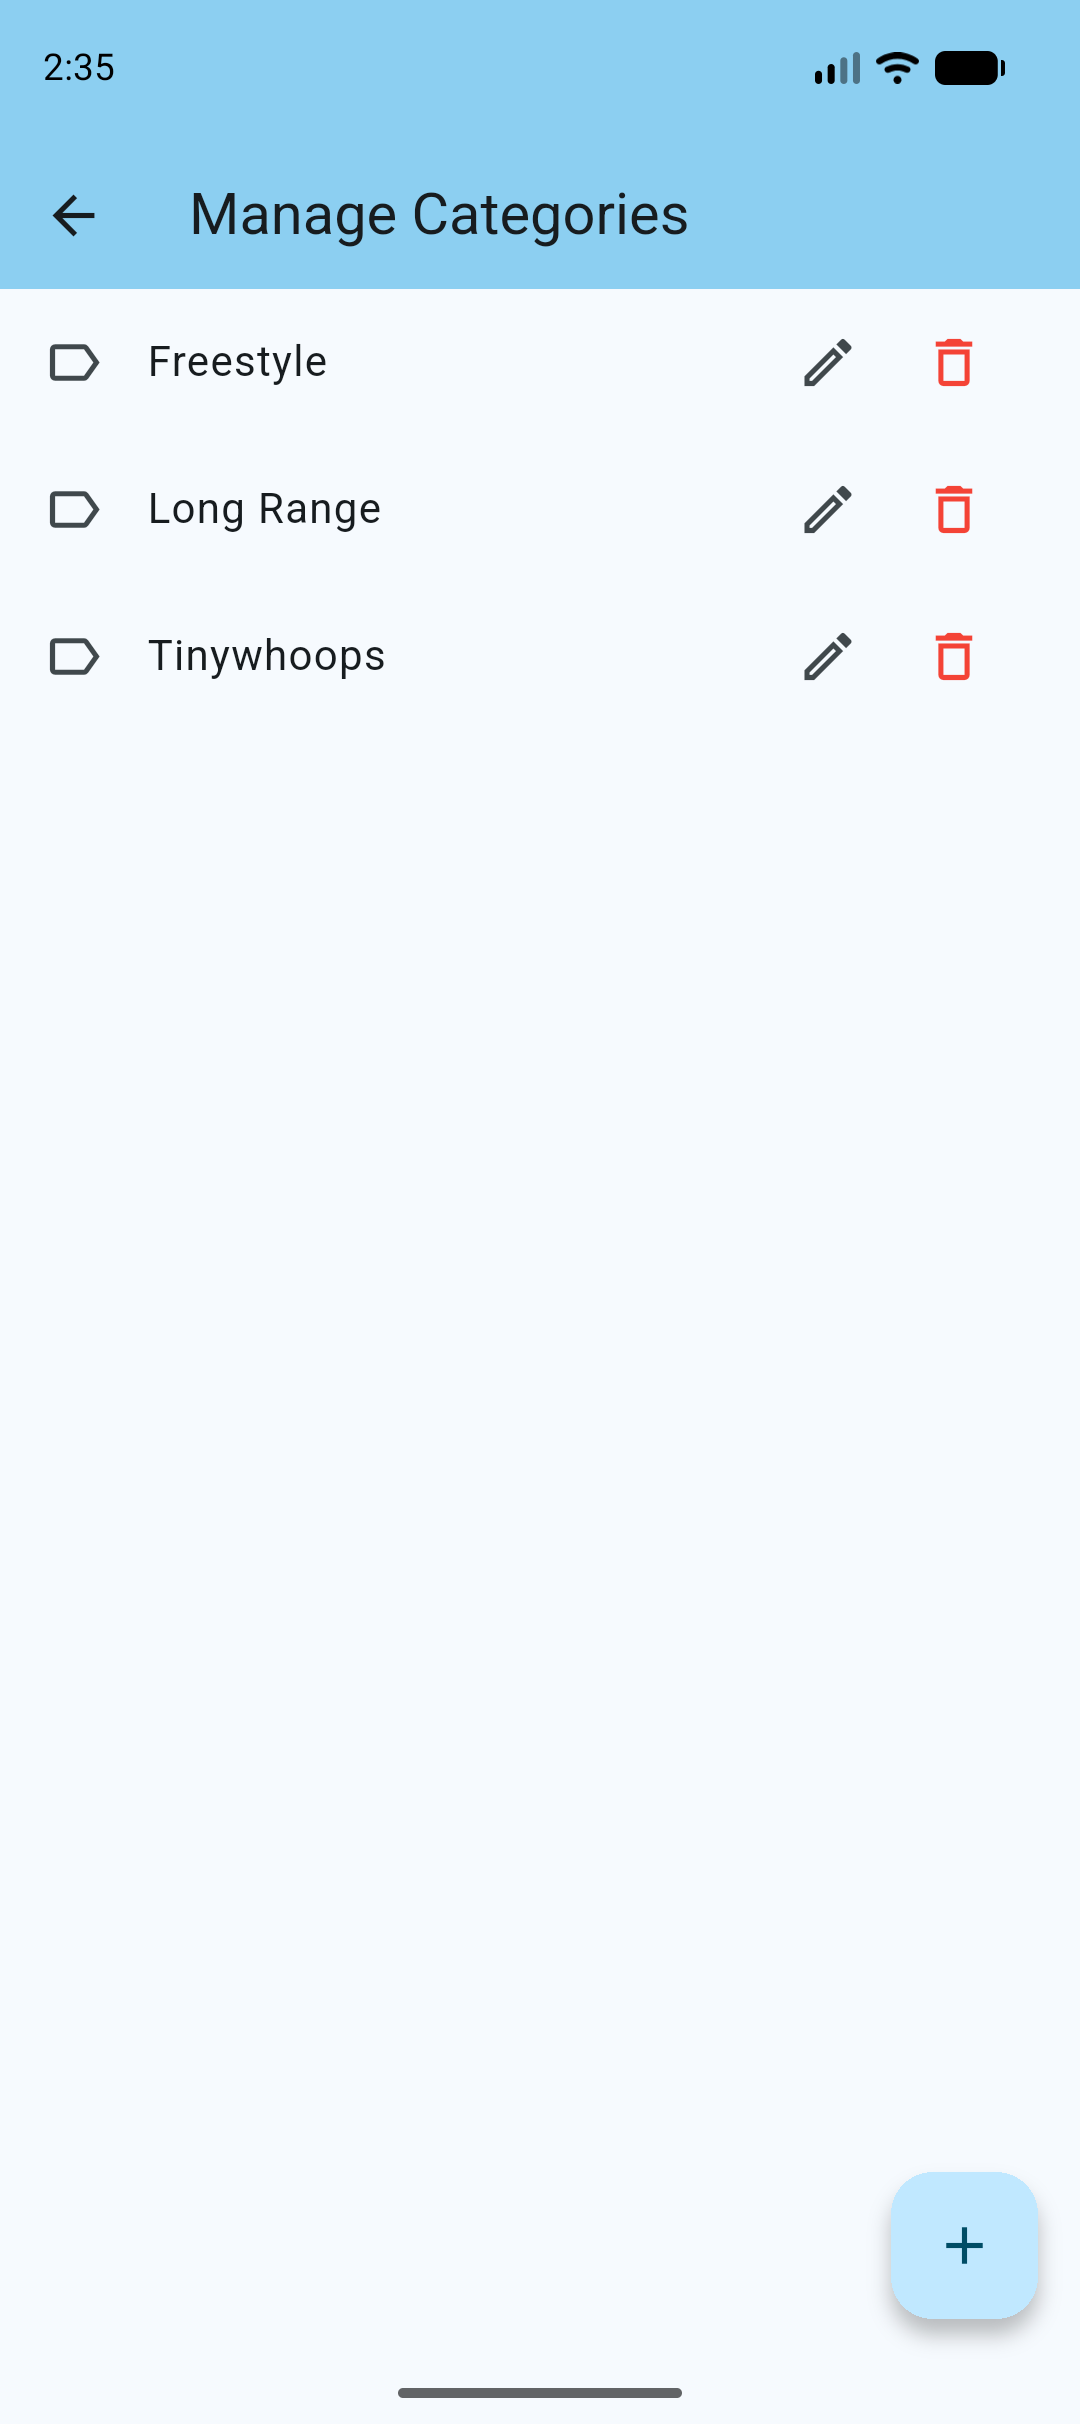
Manage Categories
If you want to manage categories of your quads, you can use the 3 dotted menu in the top navigation bar, and tap Manage Categories.
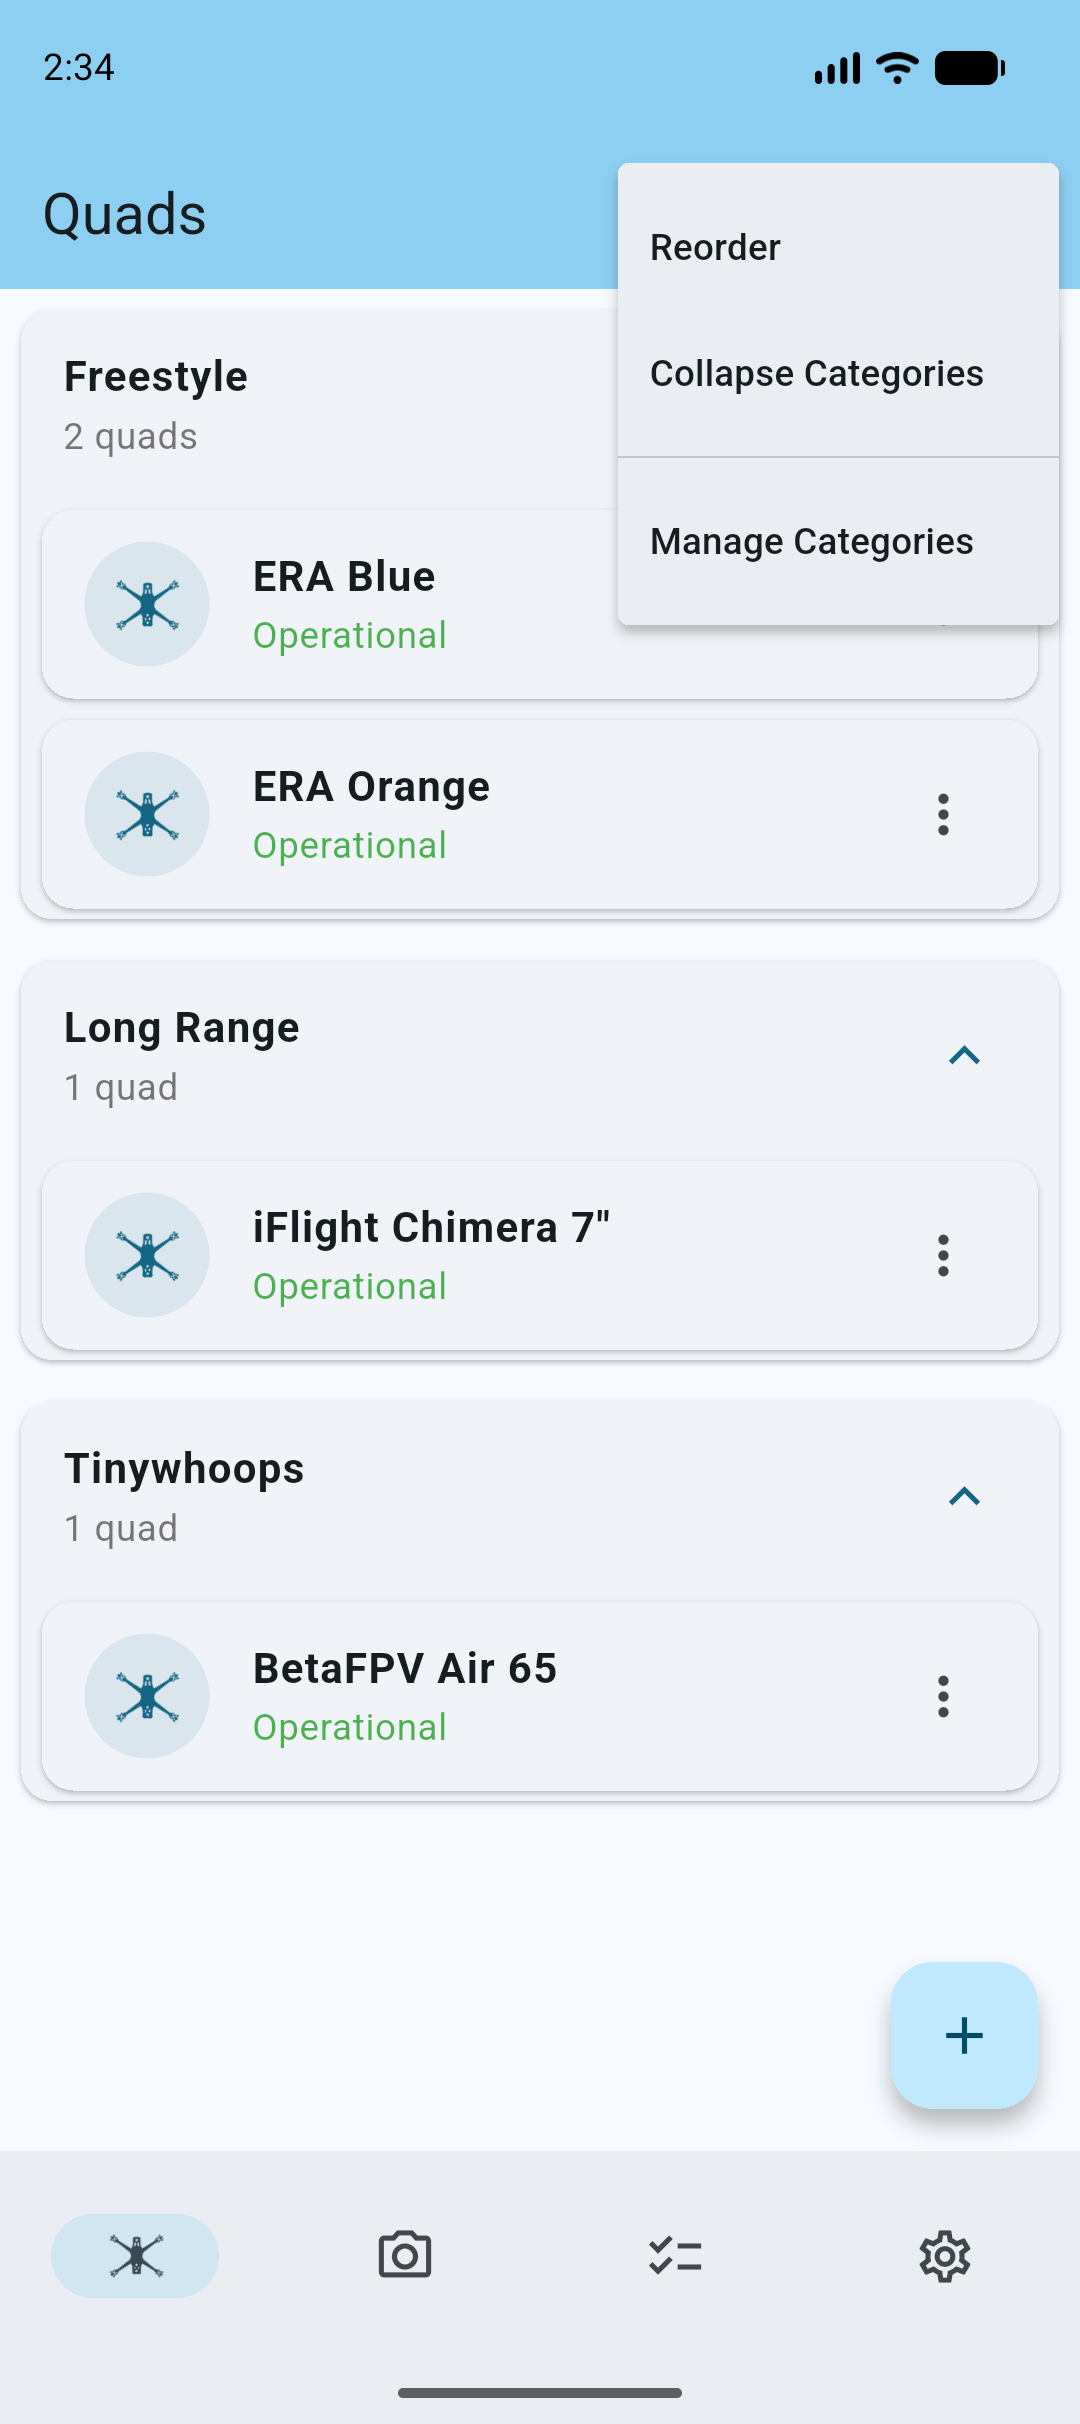
Add, edit and delete categories as needed.
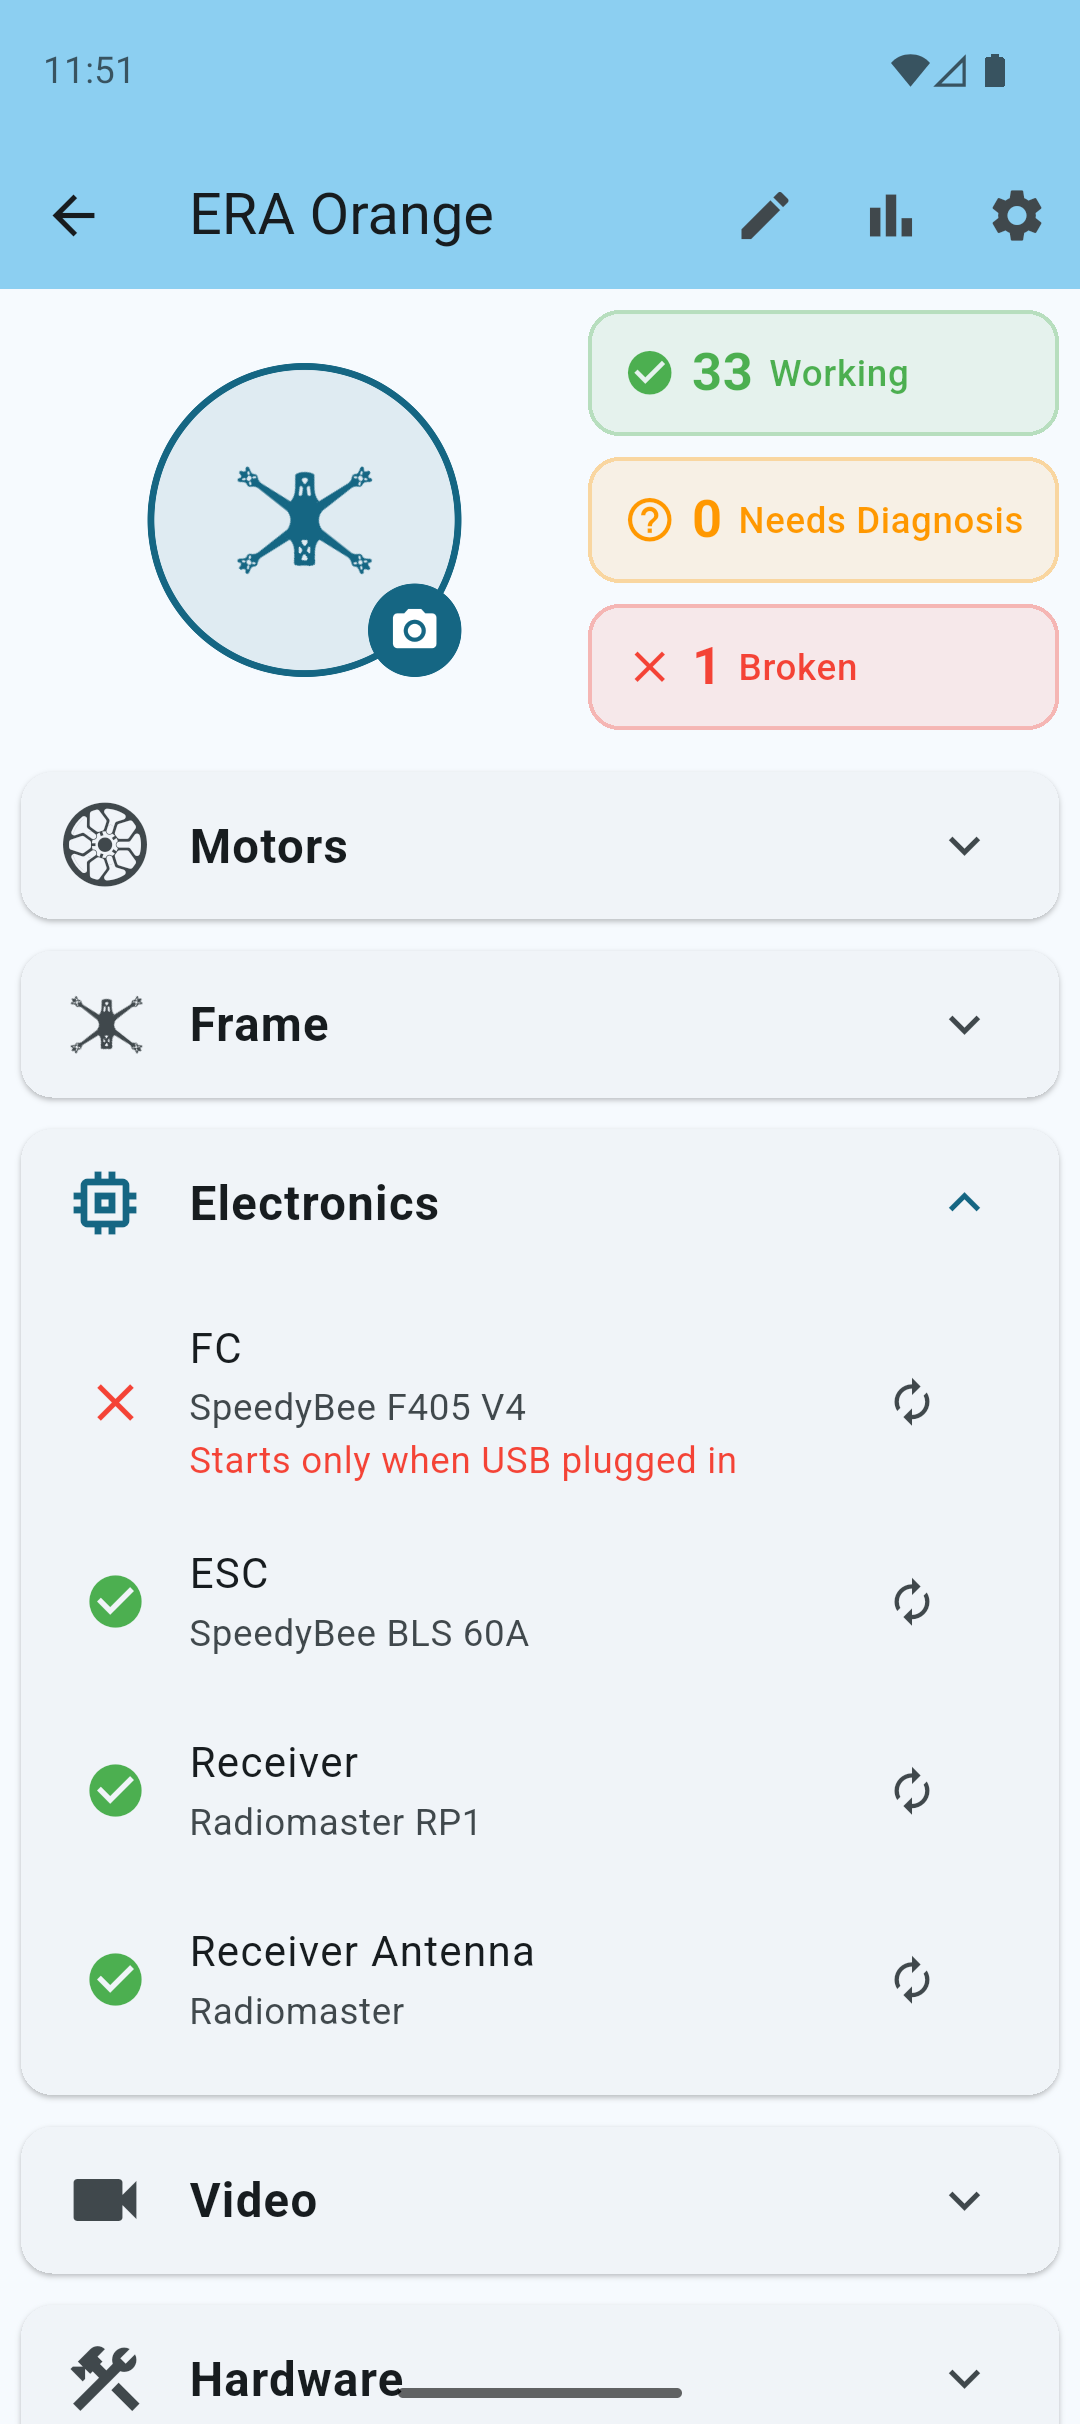
Track Damages
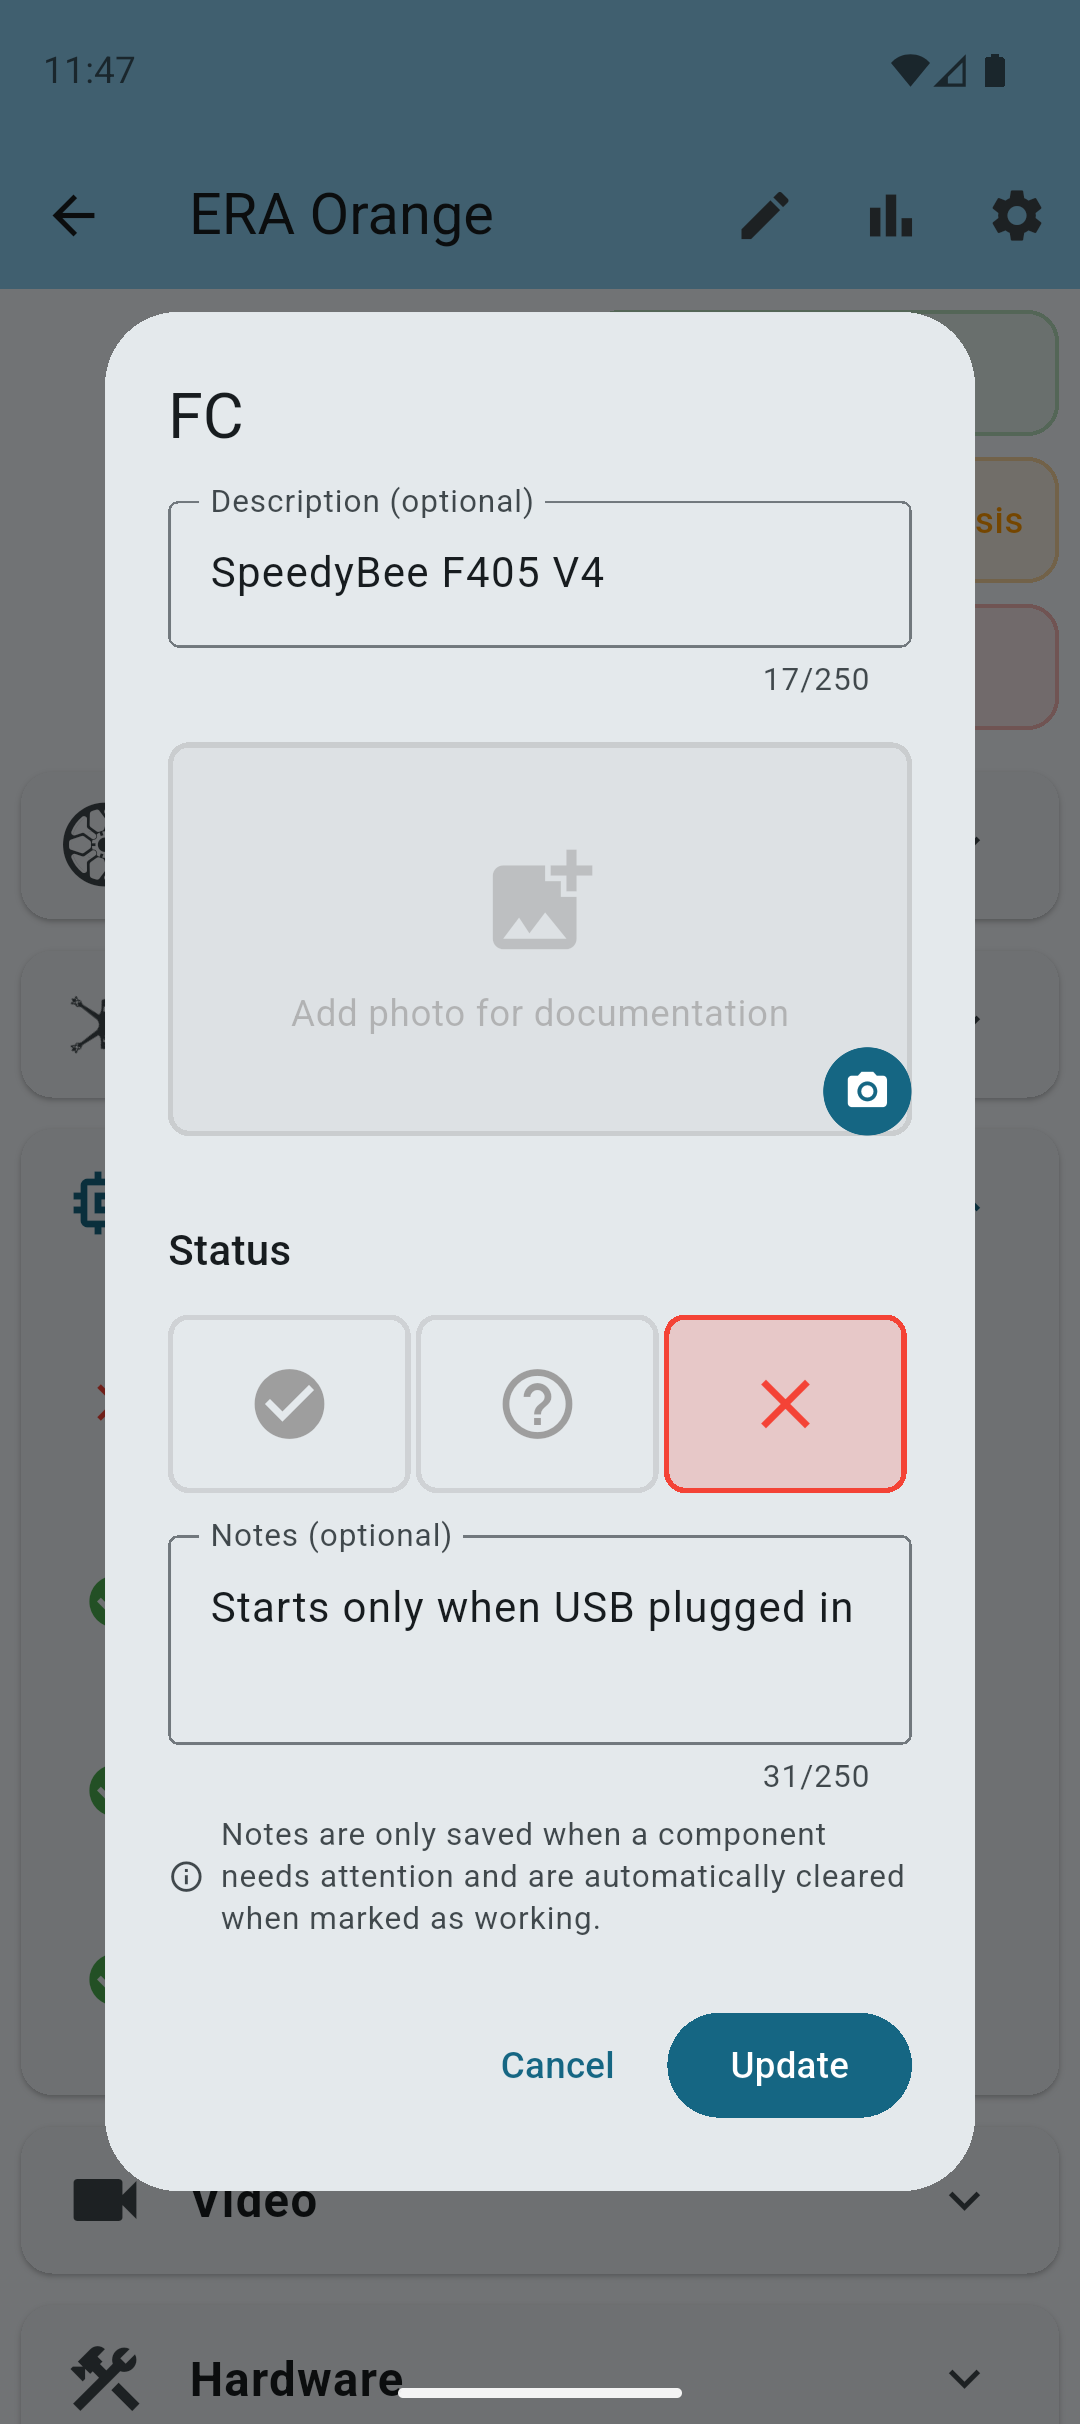
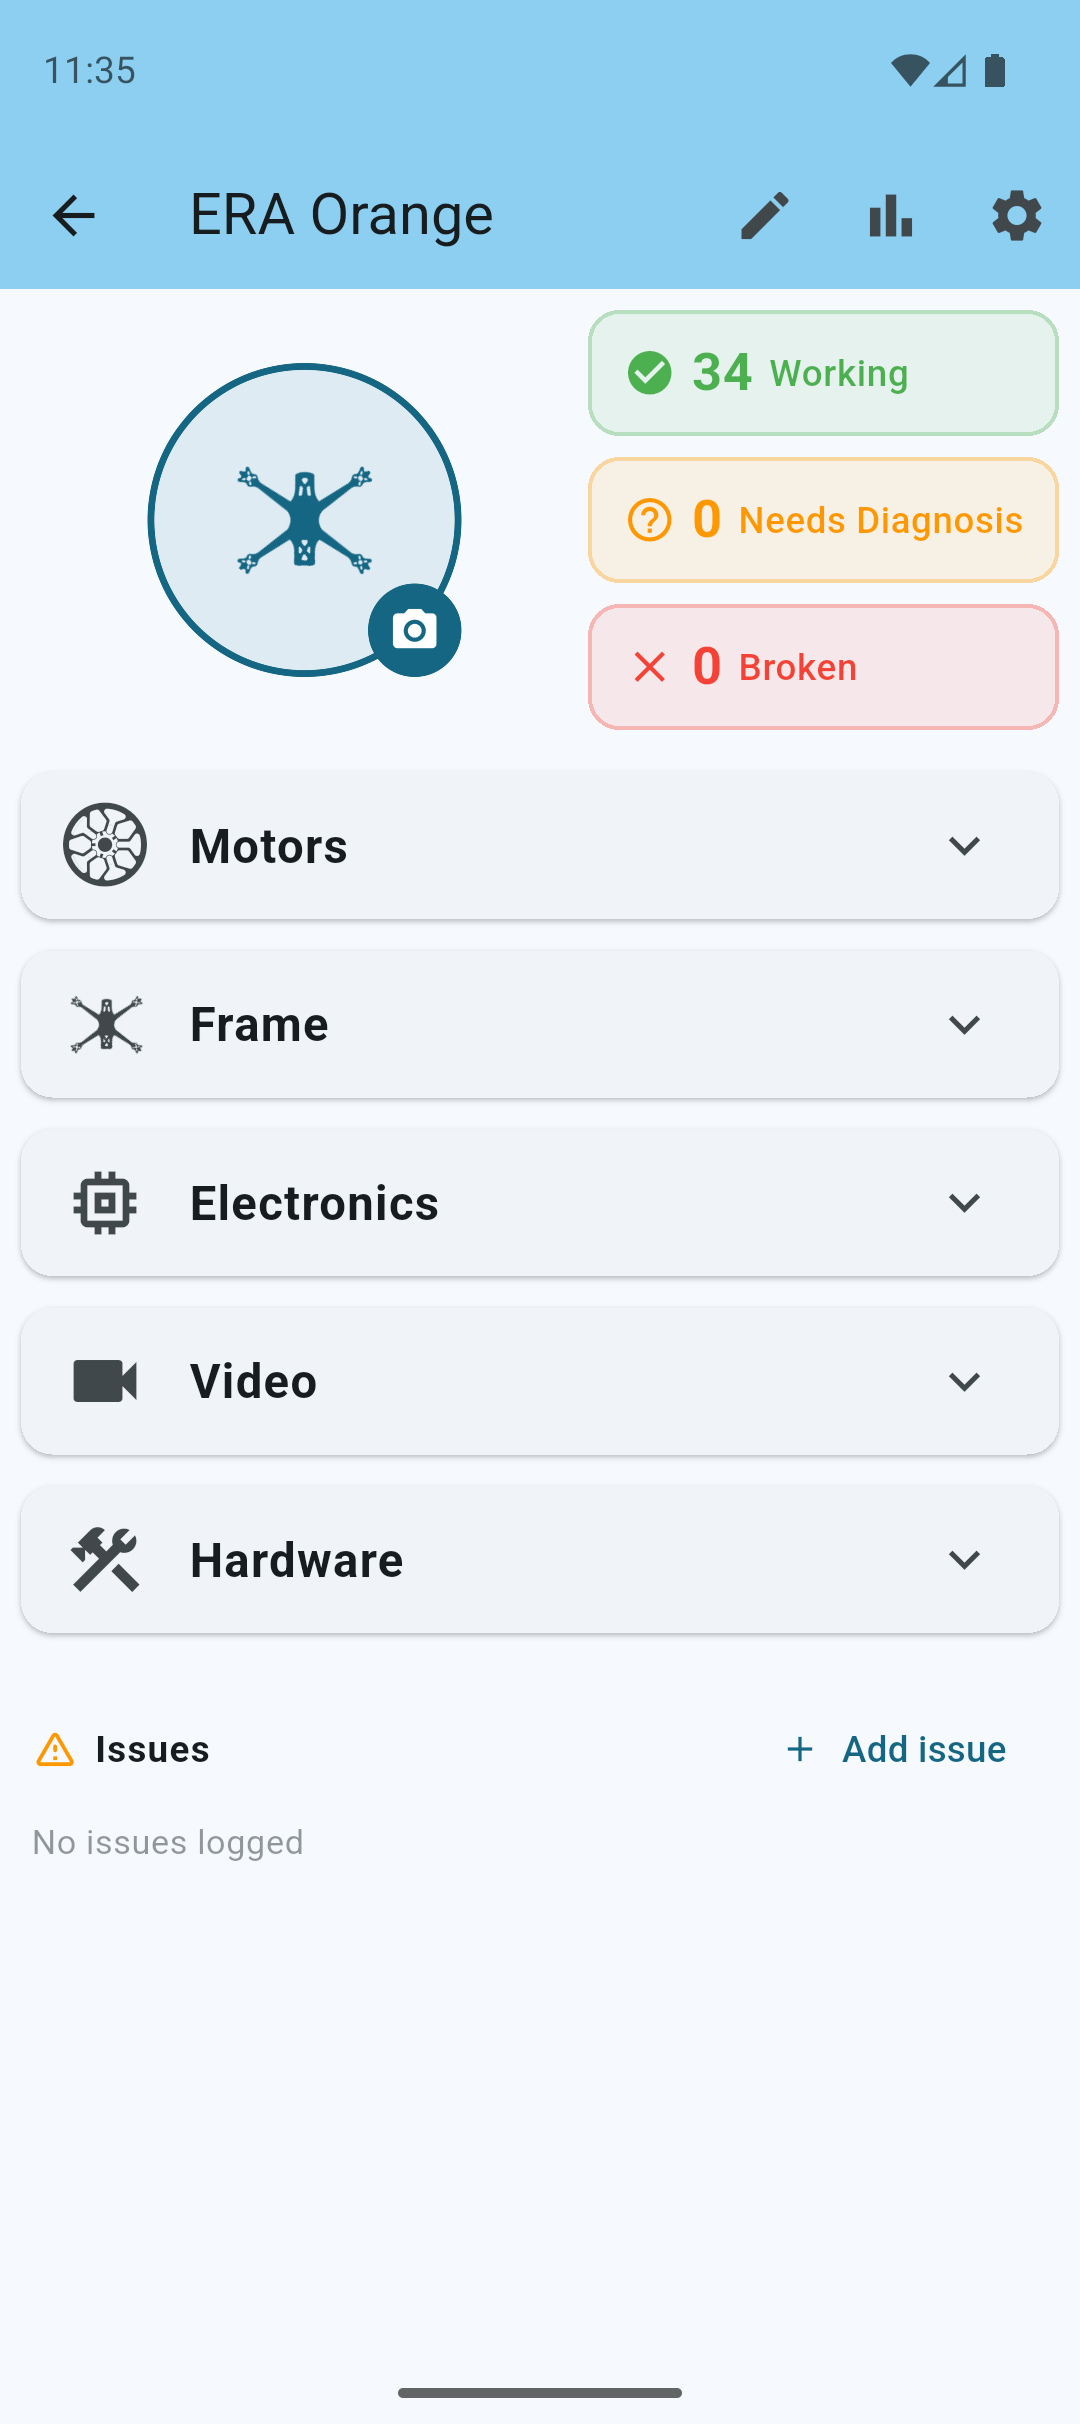
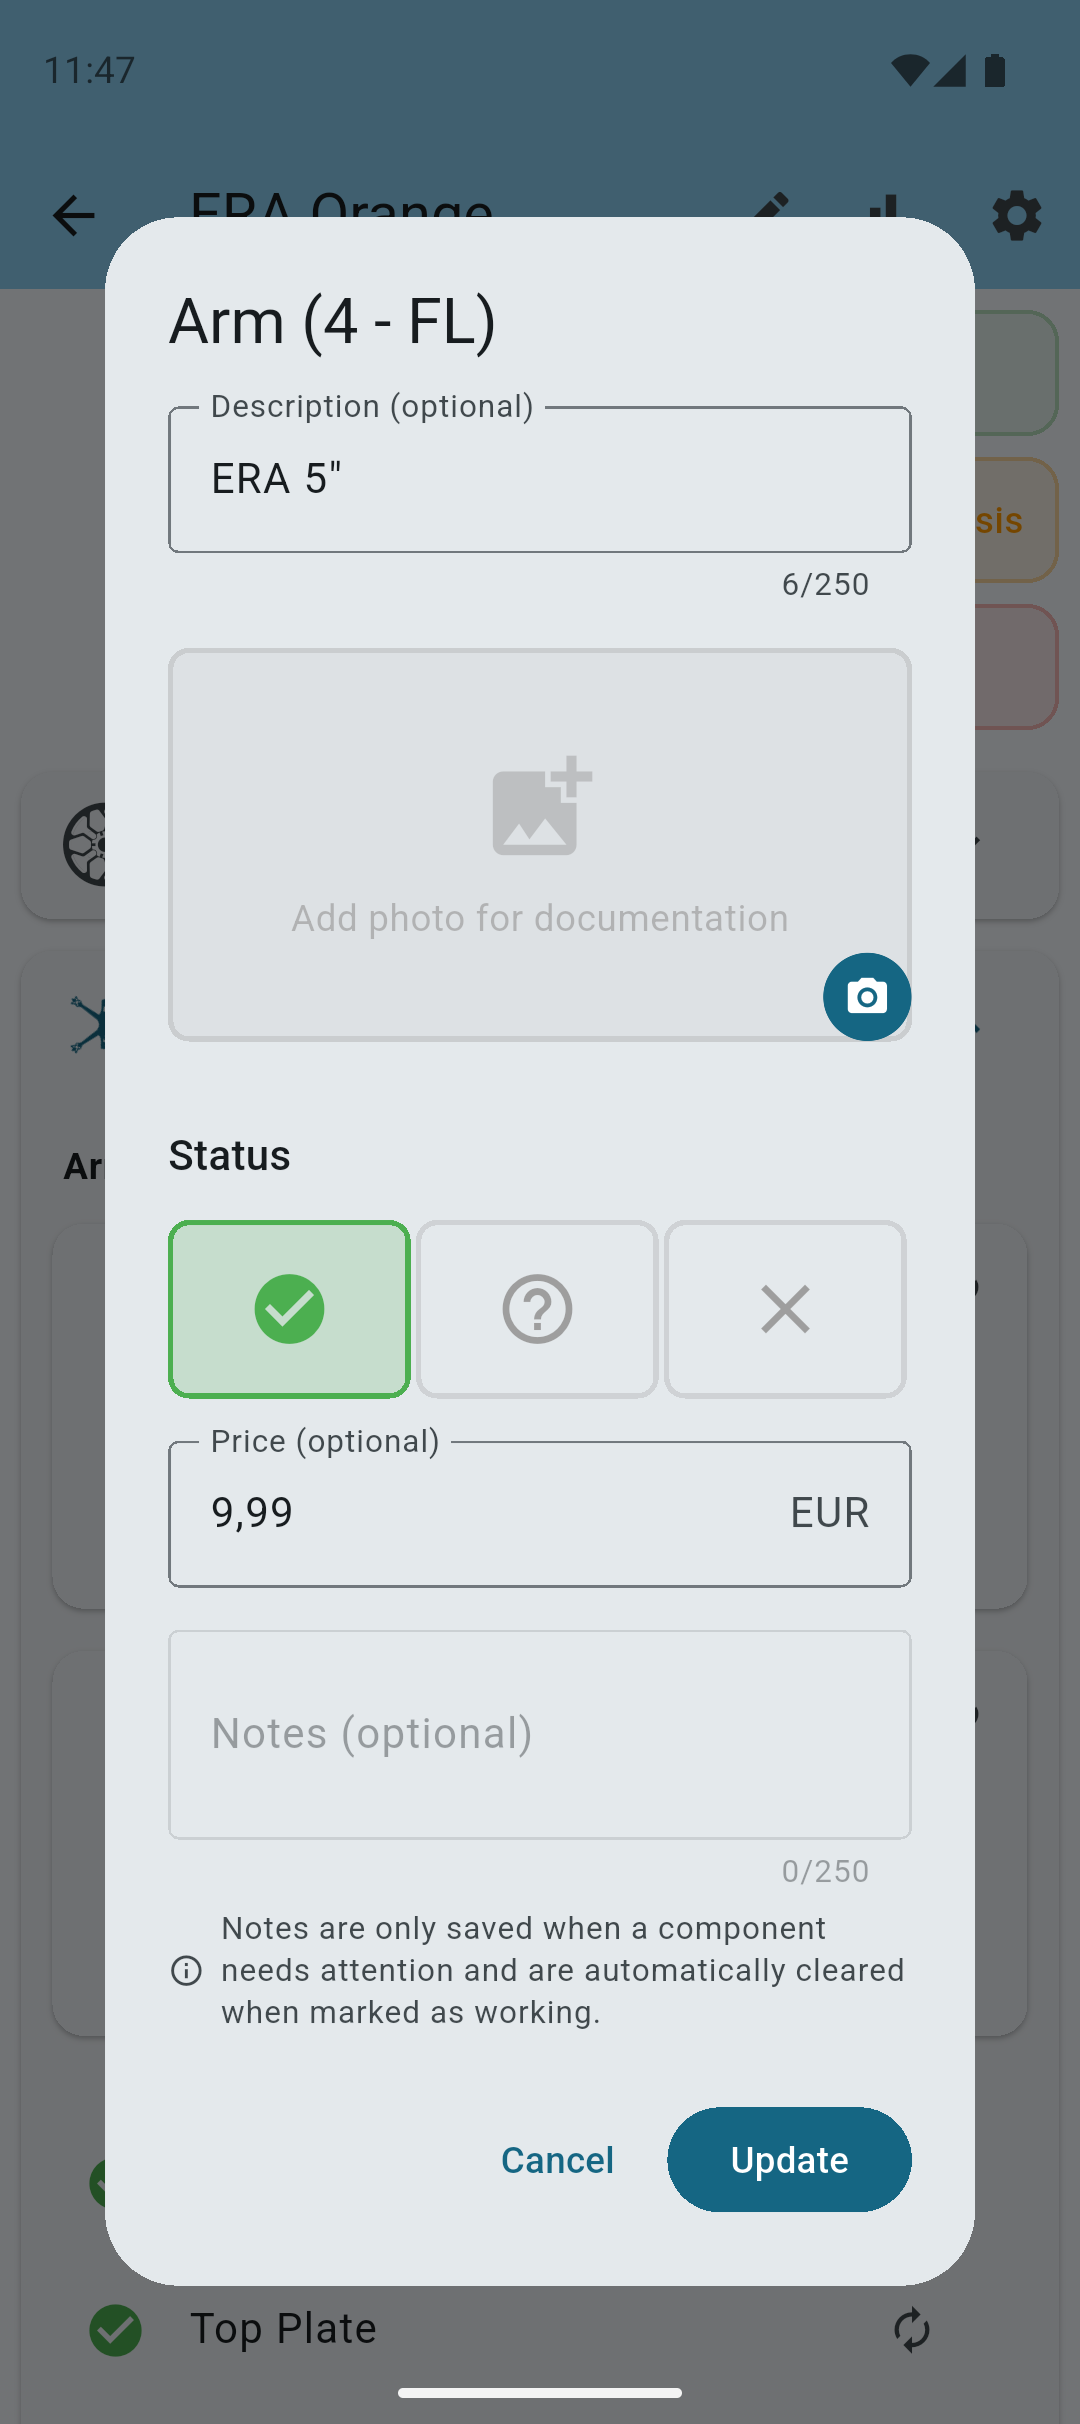
To track your first damages, tap on a component and use the 3 status buttons to change its status.
- OK - The component is in good condition.
- Needs diagnosis - The component needs further diagnosis.
- Broken - The component is broken and needs replacement.
Use the notes field to add any additional information about the damage.
Note: There's no right or wrong. The app is designed to help you keep track of your quad's condition.
Track Replacements
To track your first replacement, tap on the change icon on the right side of the damaged component.
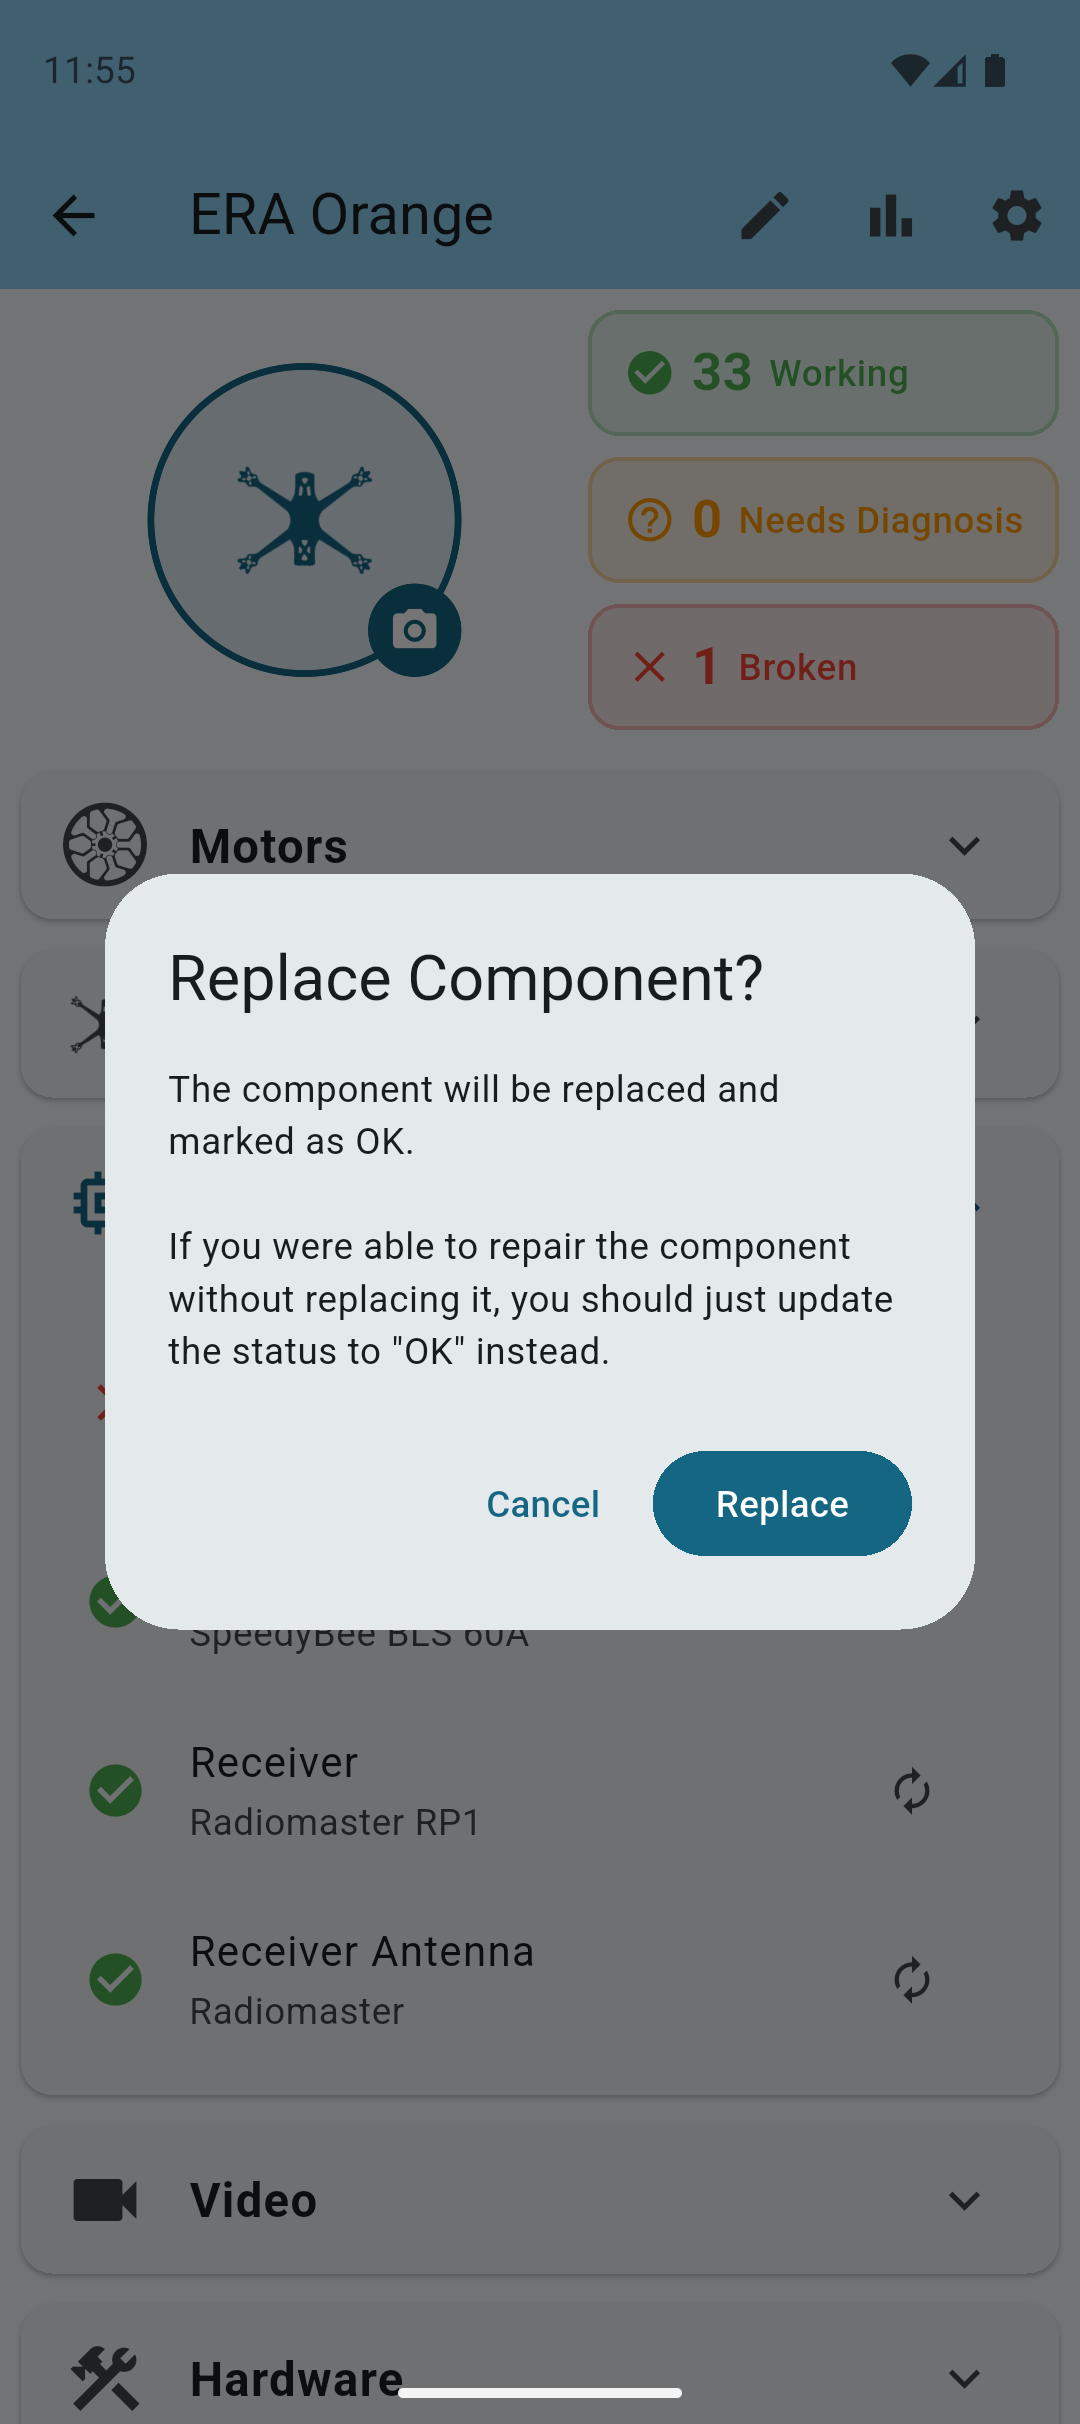
A new dialog will appear, explaining what the replacement action does.
Tap Replace to proceed with the replacement. This will create a new repair entry in the component's history, and update the component's status to OK.
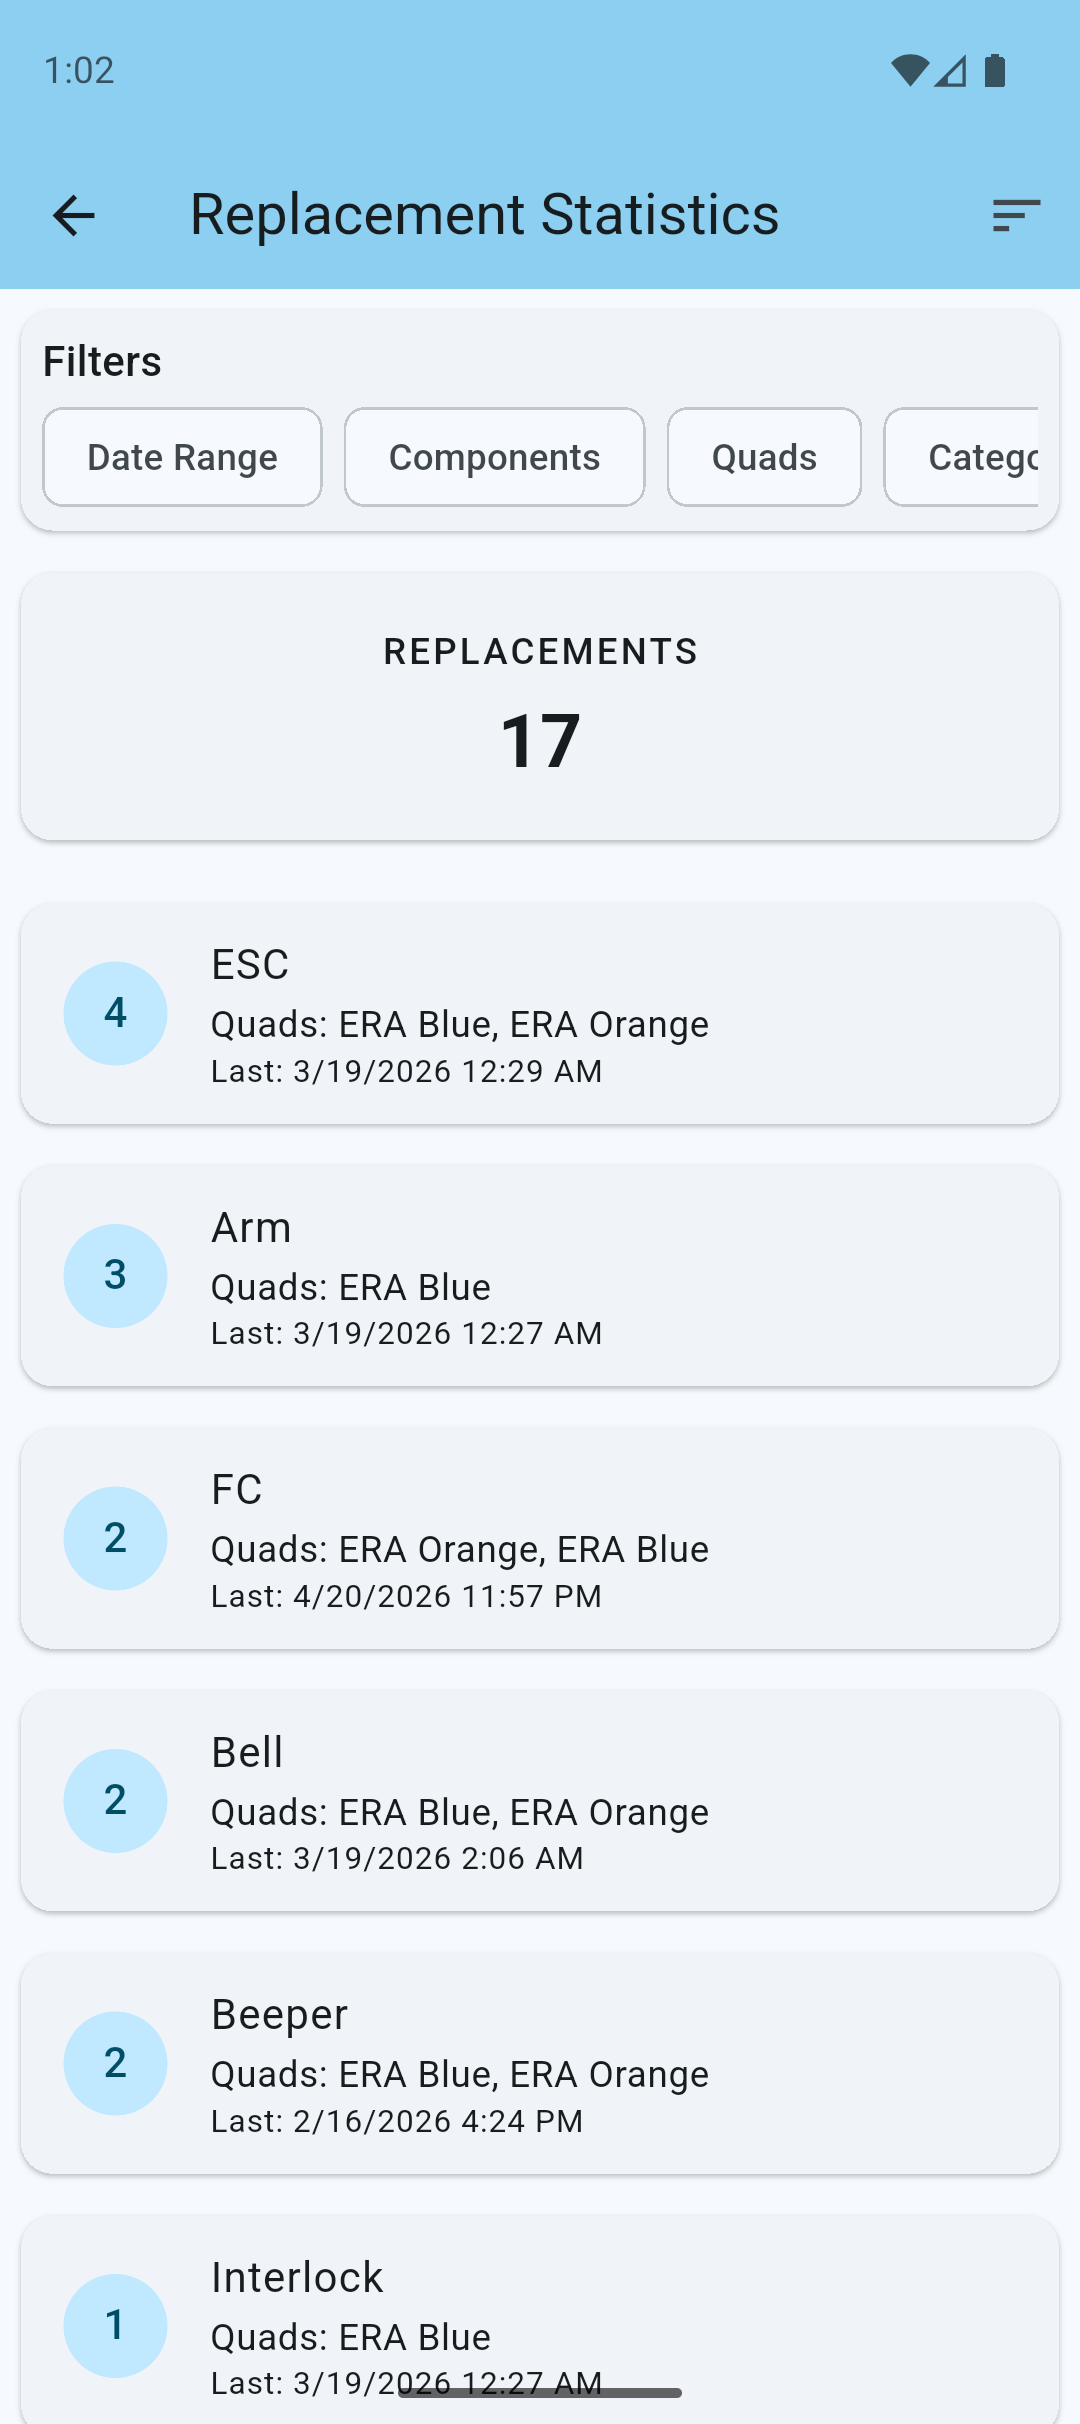
Replacement History
To view the replacement history of your quad, tap on the statistics icon at the top navigation bar.

Here you can see all components and their replacement history. Each entry represents a component replacement you've tracked.
Tap on the Top Replacements tab to see an overview of the most frequently replaced components.
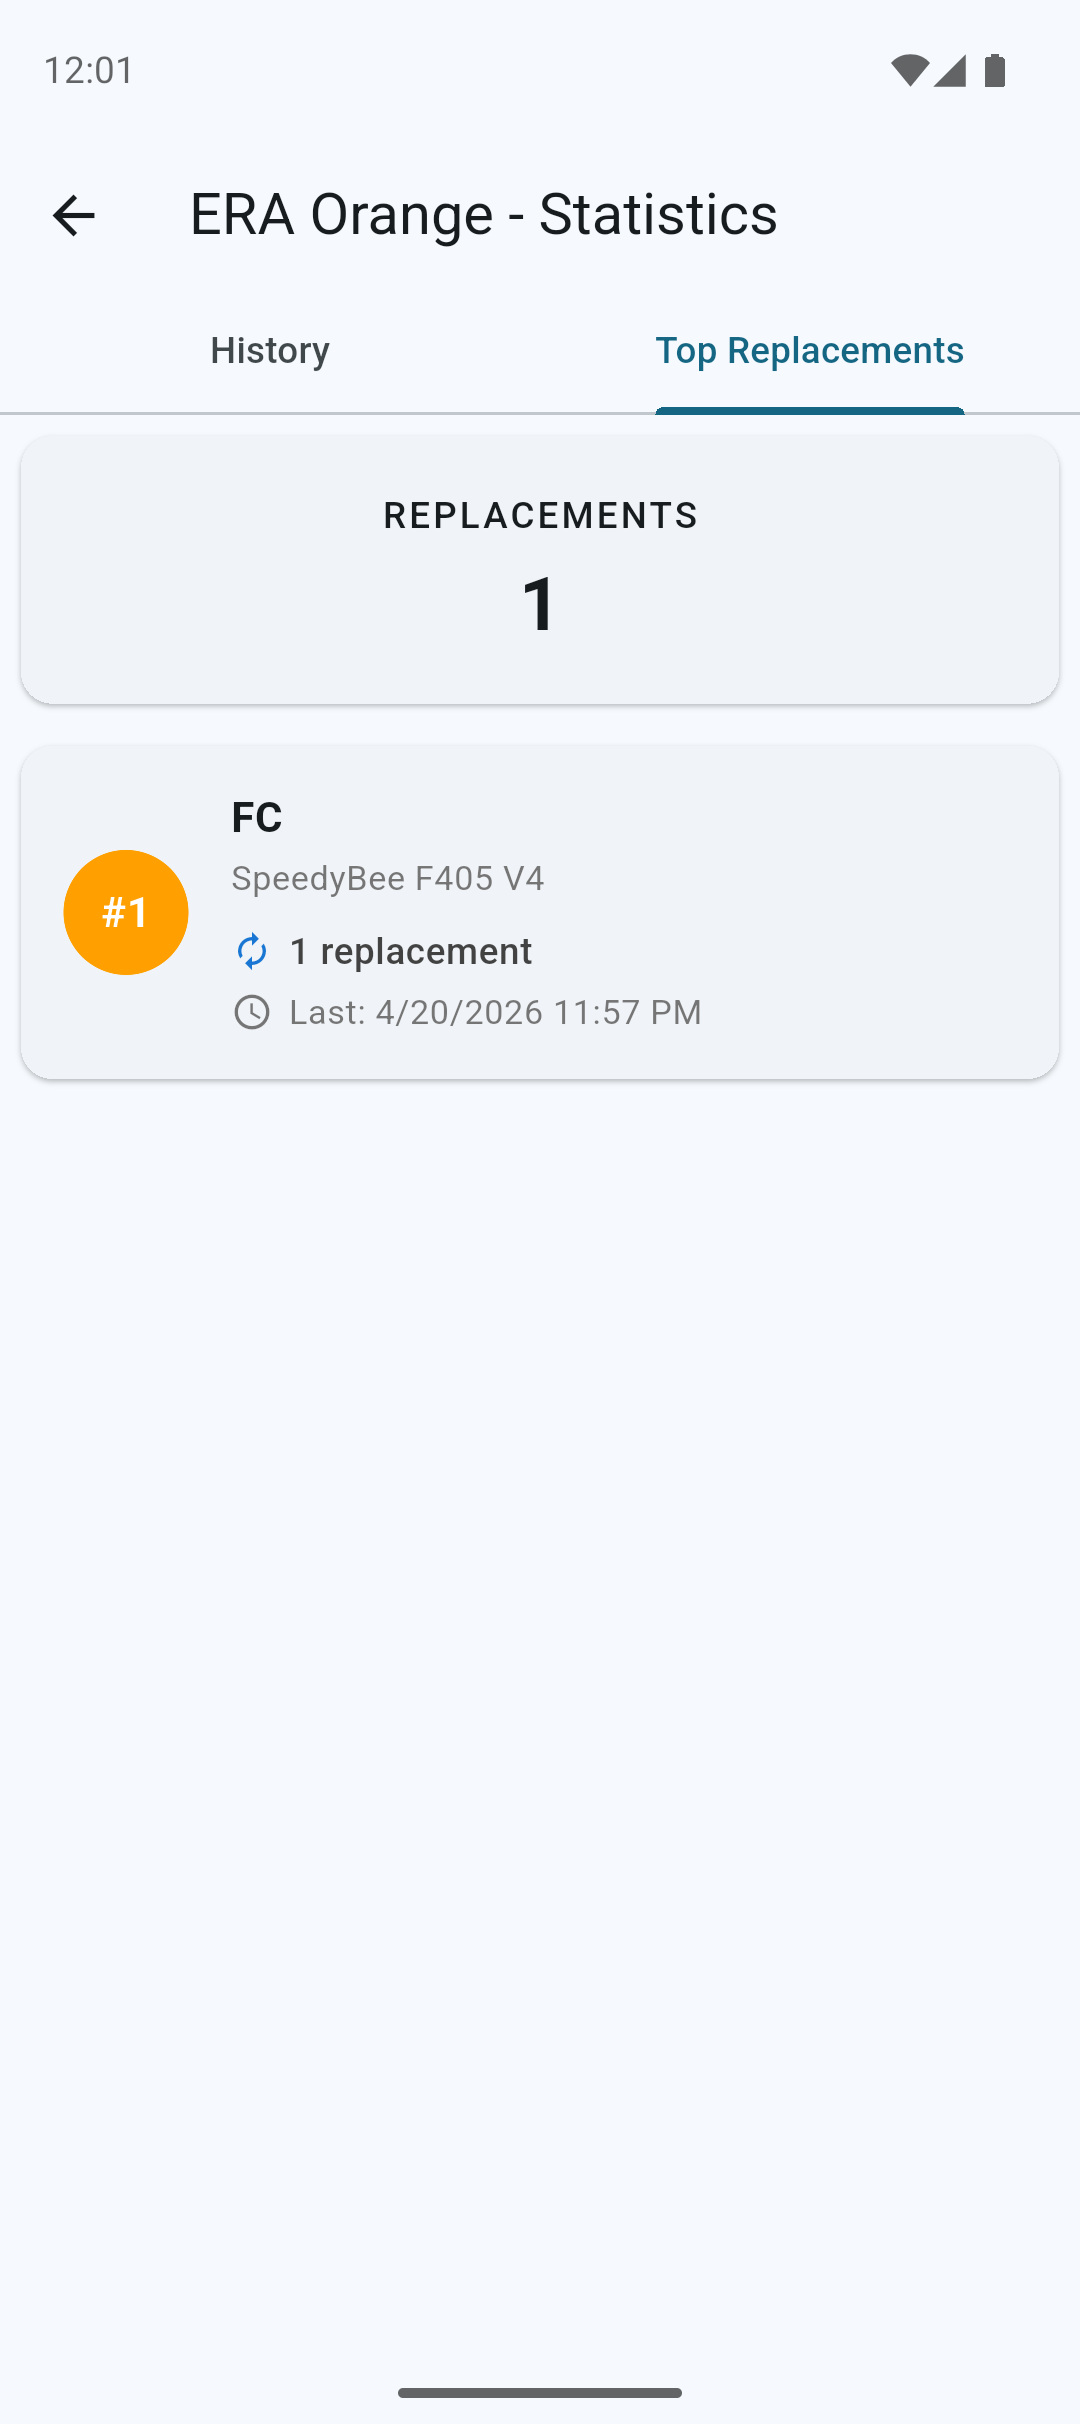
Here you can see an overview of the most frequently replaced components to quickly identify potential issues.
Statistics
To view the statistics of all your quads, tap on the statistics icon at the top navigation bar.
In the statistics screen you can view detailed statistics of all your quads in a single place, including replacement history across your entire fleet. Use filters to narrow down the data and focus on specific quads, categories, or time periods.
Quad Issues
Sometimes it is not immediately clear what the issue is, or which component is damaged.
In these cases, you can use the + Add Issue button below the components to create a new issue.
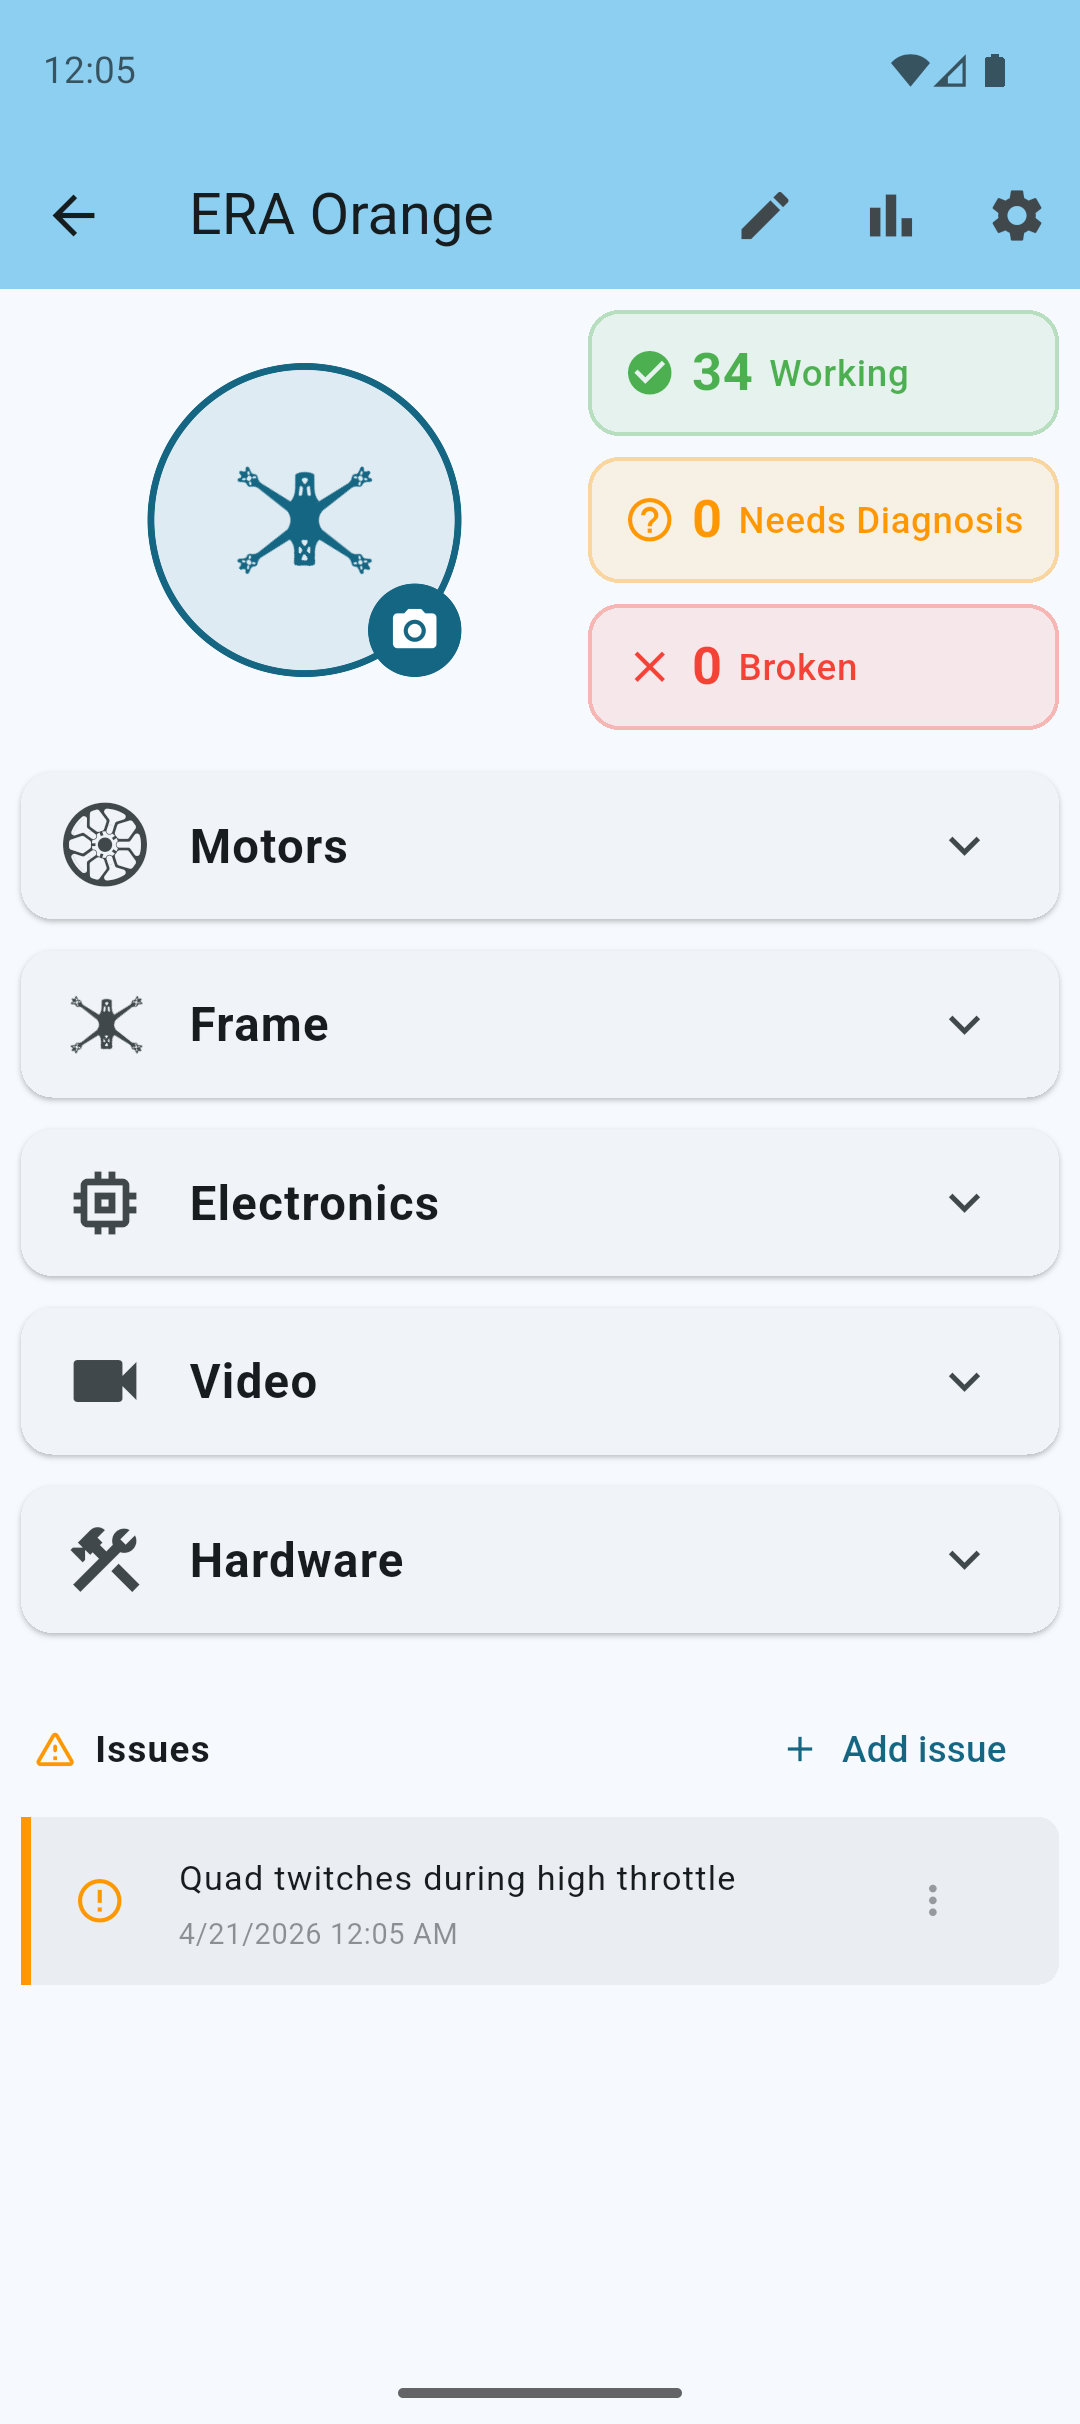
Issues are dead simple. It is just a text note to remind you that something needs attention.
Once you've resolved an issue, you can mark it as resolved by using the 3 dots menu.
Note: If you needed to repair or replace a component, you will have to manually update the status of the component, or do a full replacement.
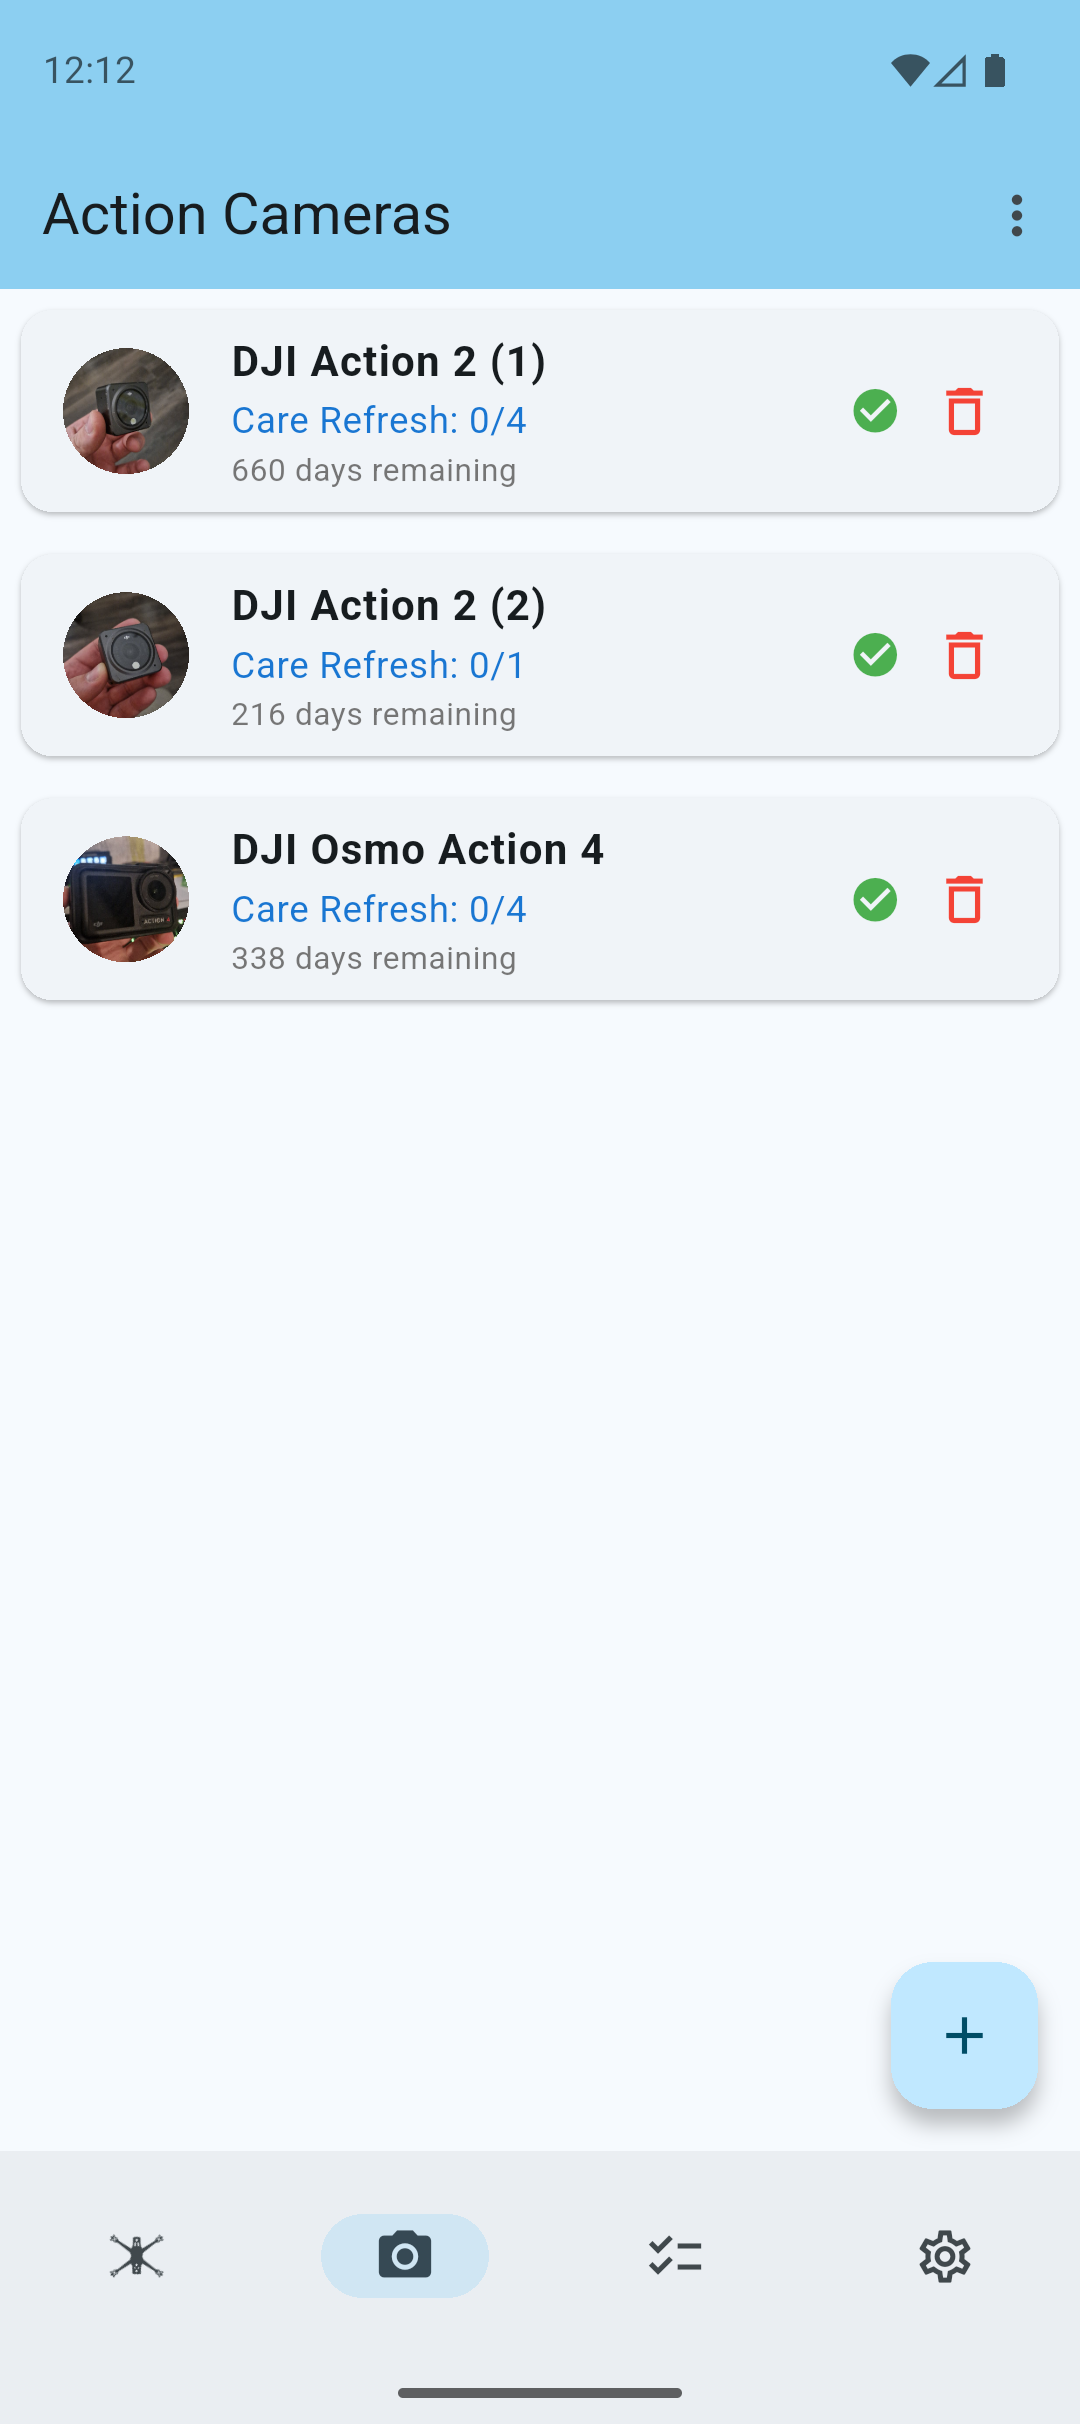
Action Cams
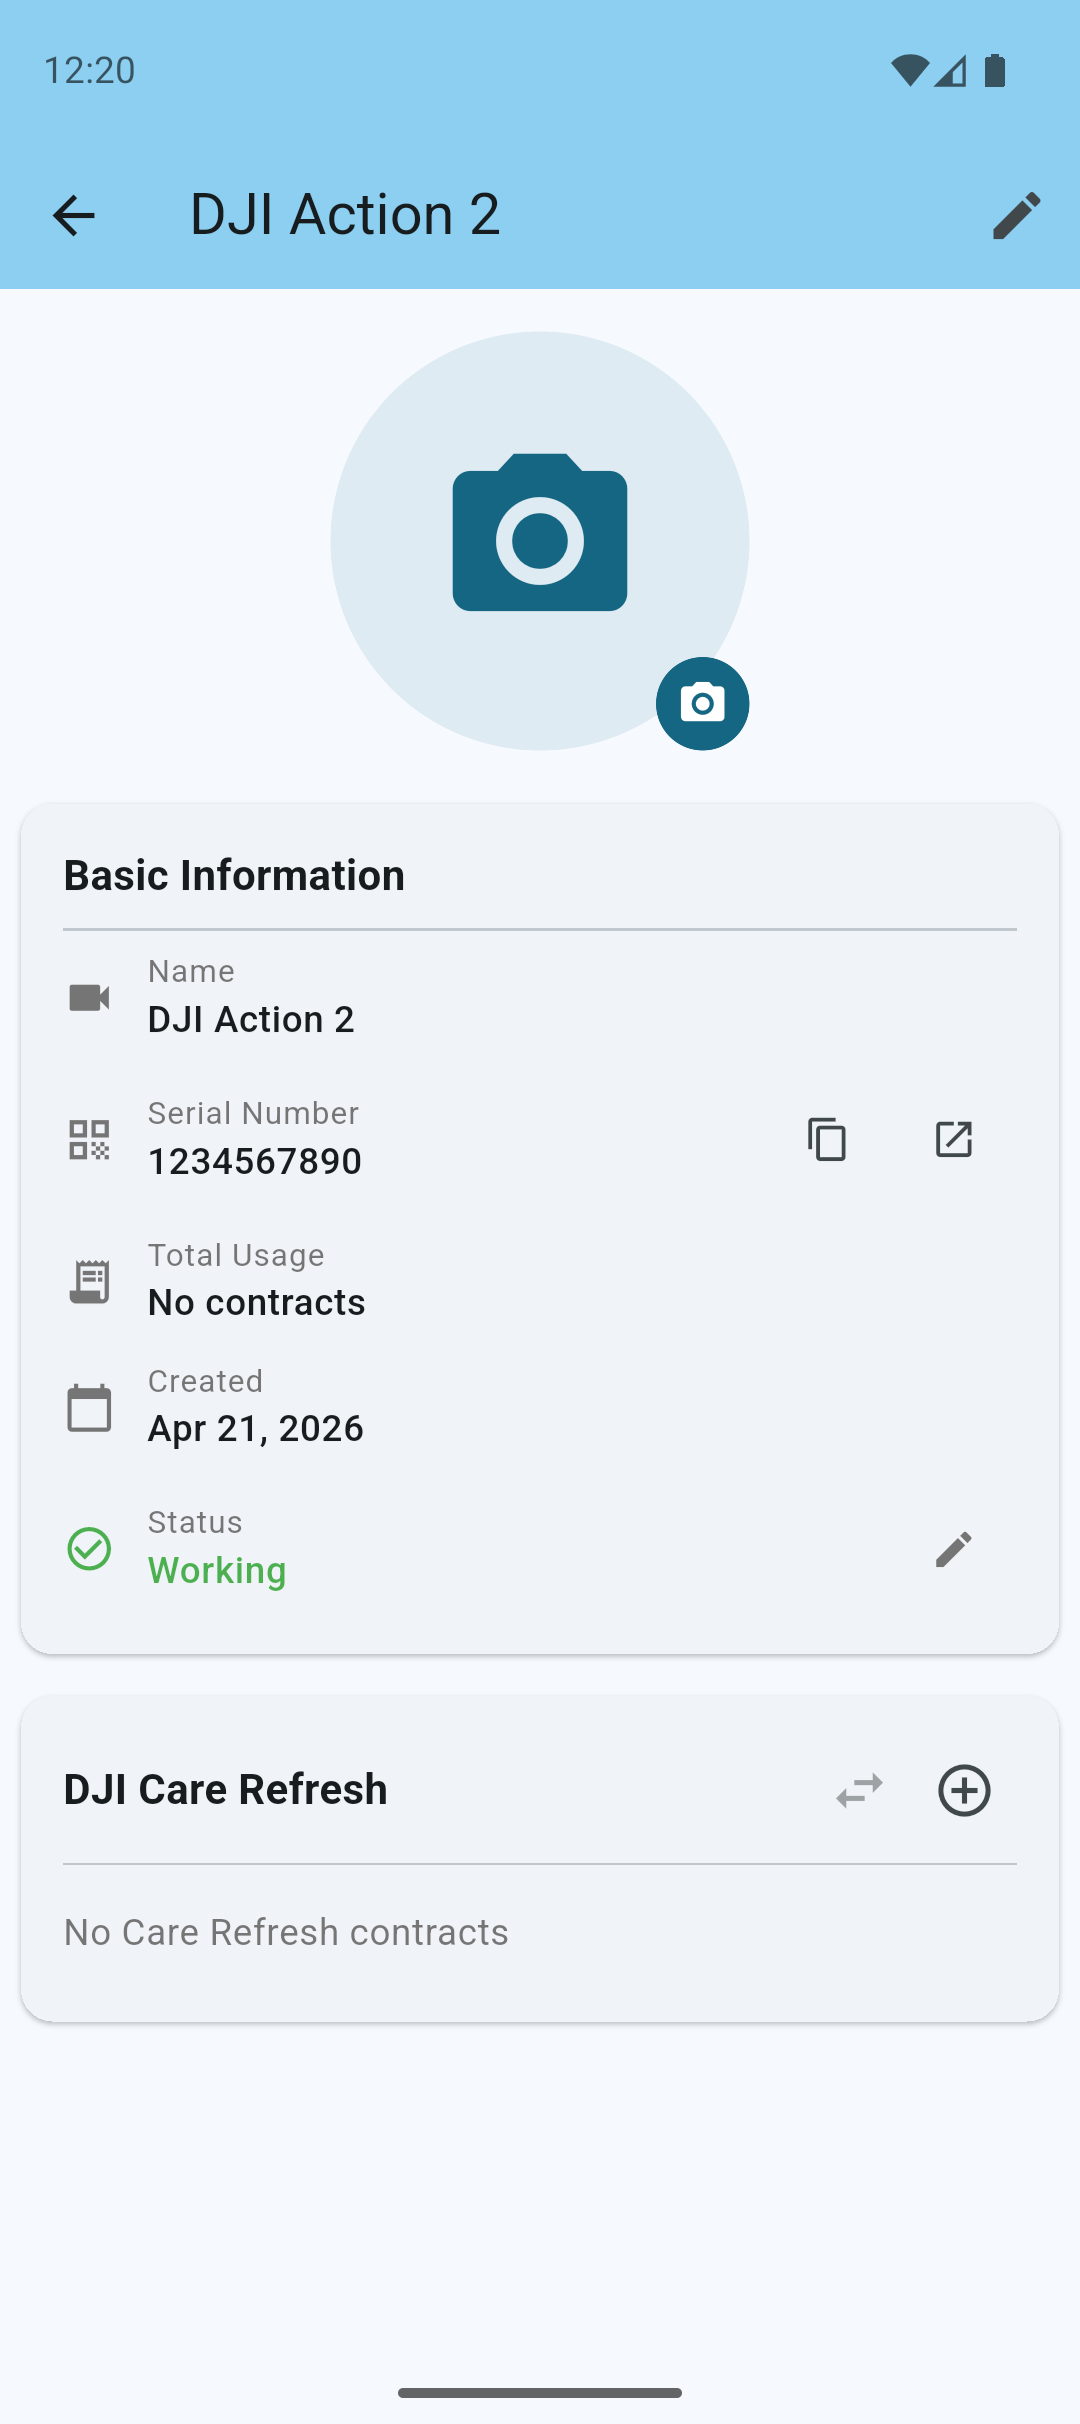
To track your action cams, go to the action cams page in the app.
Here you can add your action cams, and track DJI Care Refresh Contracts and issues just like you do with your quads.
Tap the + button on the camera screen to add a new action cam.
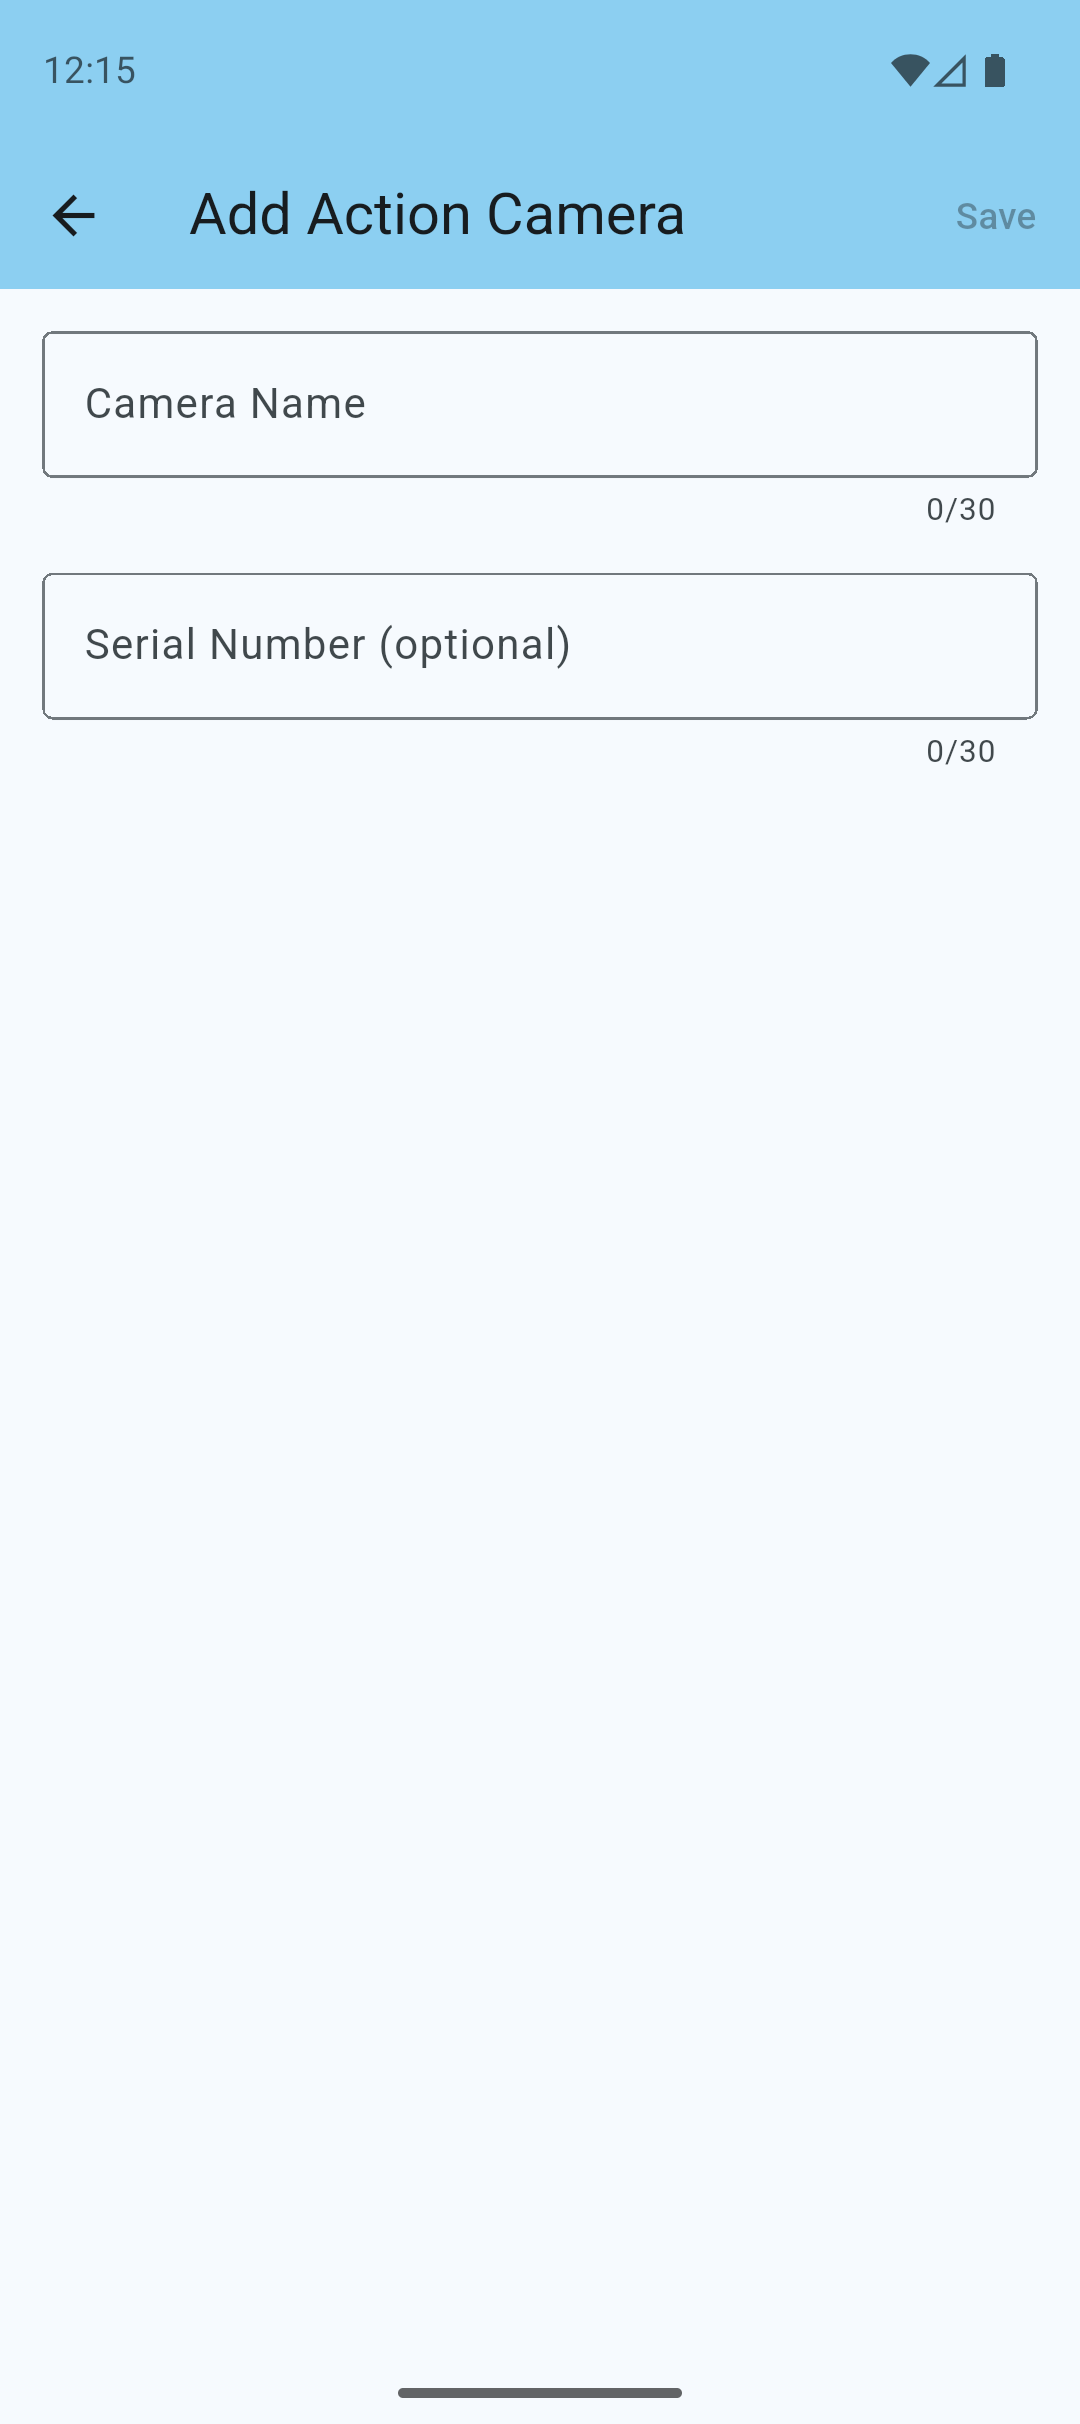
Adding an Action Cam
Enter a camera name and optionally a serial number. A serial number helps you identify your camera uniquely, and is also used for DJI Care Refresh Contracts.
When you're ready, tap Save to add your action cam.
Adding a DJI Care Refresh Contract
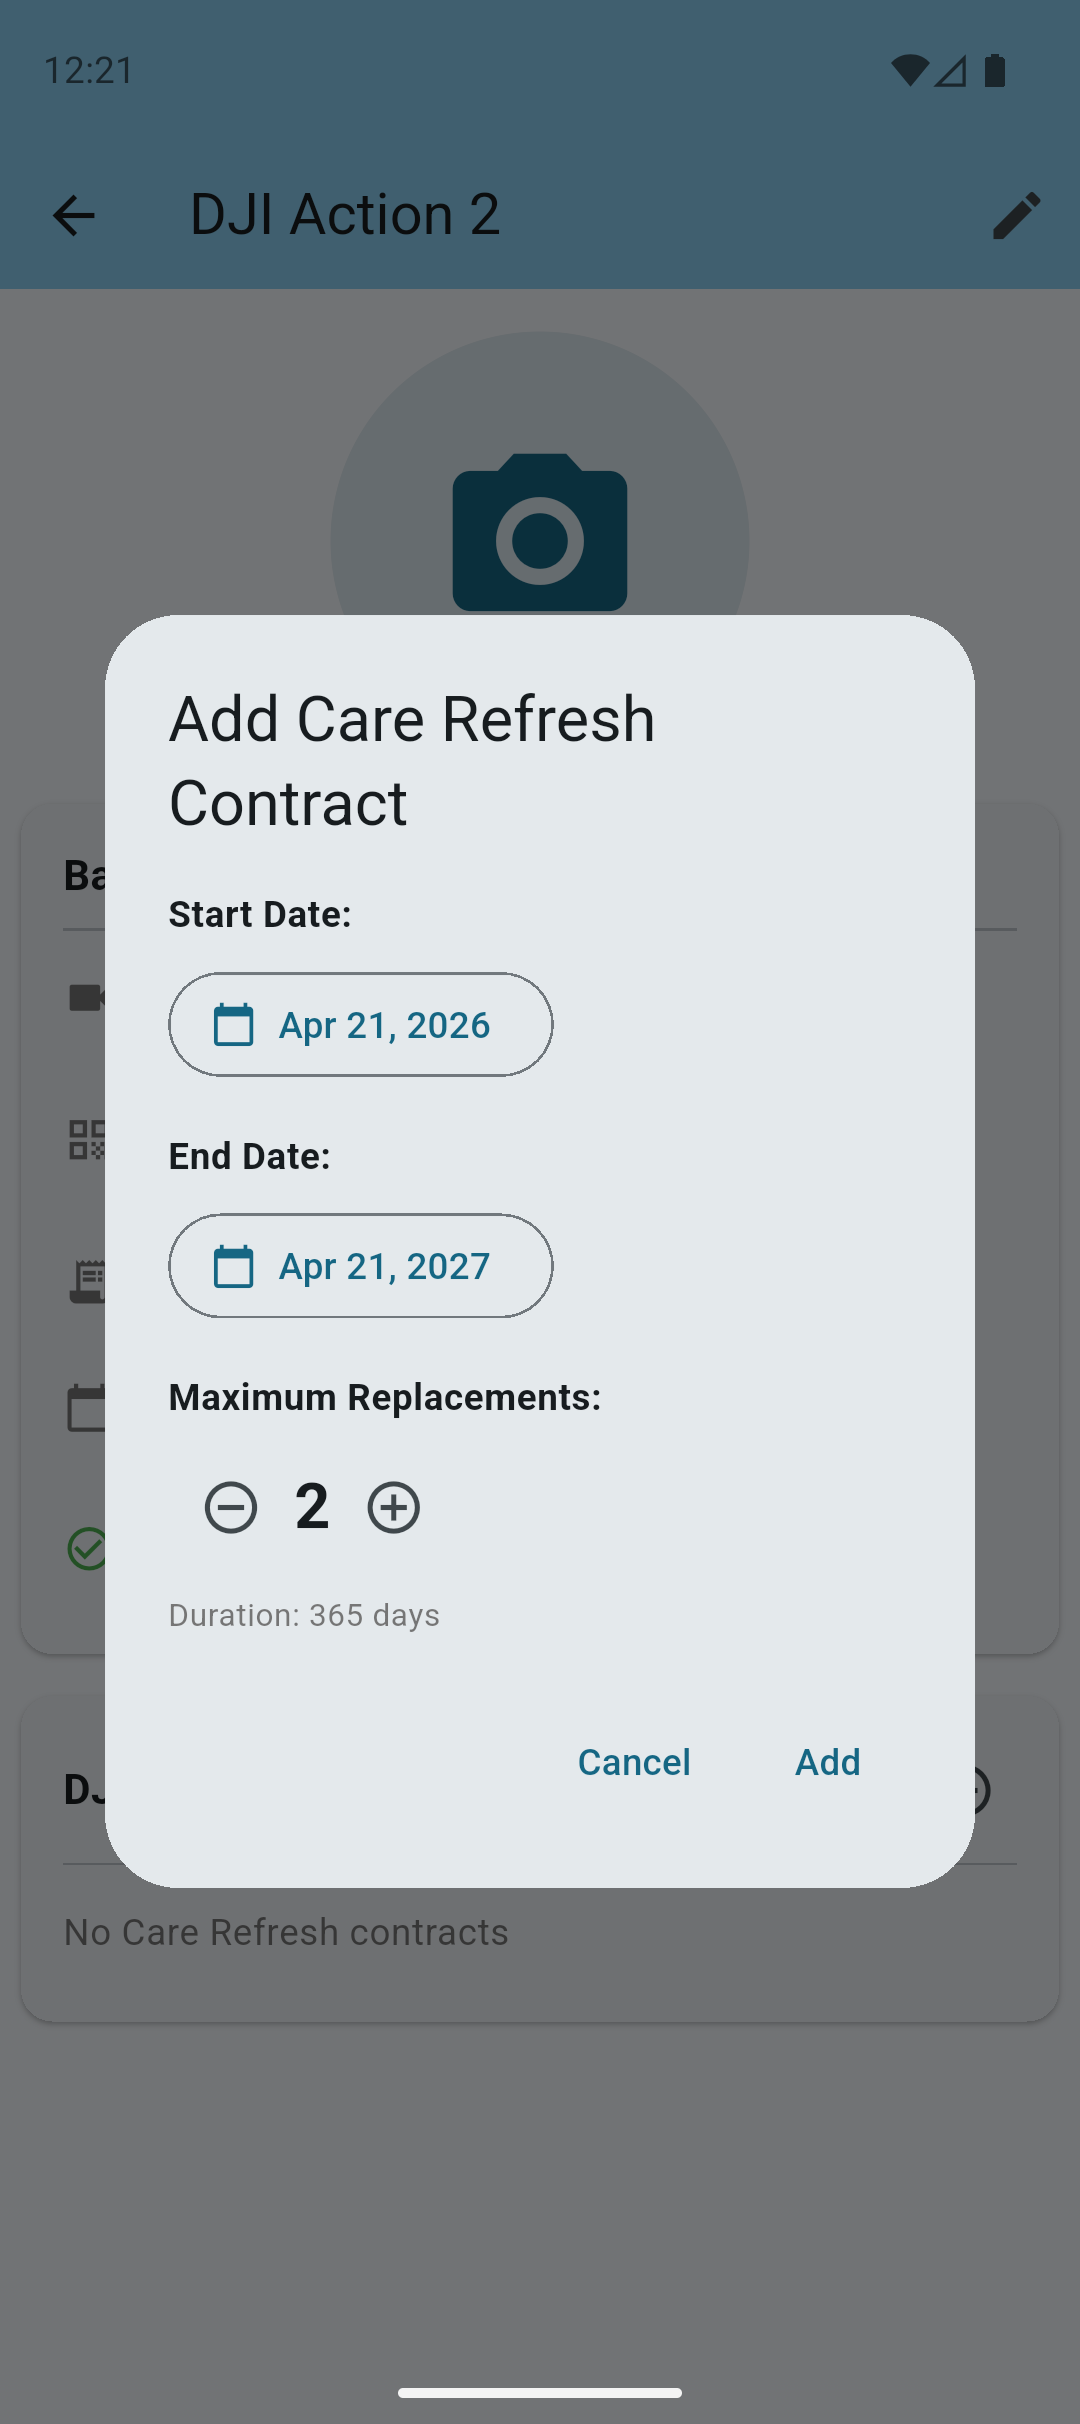
Open the newly created action cam, and tap the + icon in the DJI Care Refresh section to add your first contract.
Enter the contract's serial number, purchase date, and expiration date. The serial number is usually found on the DJI Care Refresh card that came with your camera.
When you're ready, tap Save to add your DJI Care Refresh contract.
Enter the start and end date and choose the number of replacements as per your contract with DJI.
When you're ready, tap Add to add your DJI Care Refresh contract.
Note: If you have multiple DJI Care Refresh contracts, you can add them all. You will most likely have the 2 replacements per year over a span of 2 years.
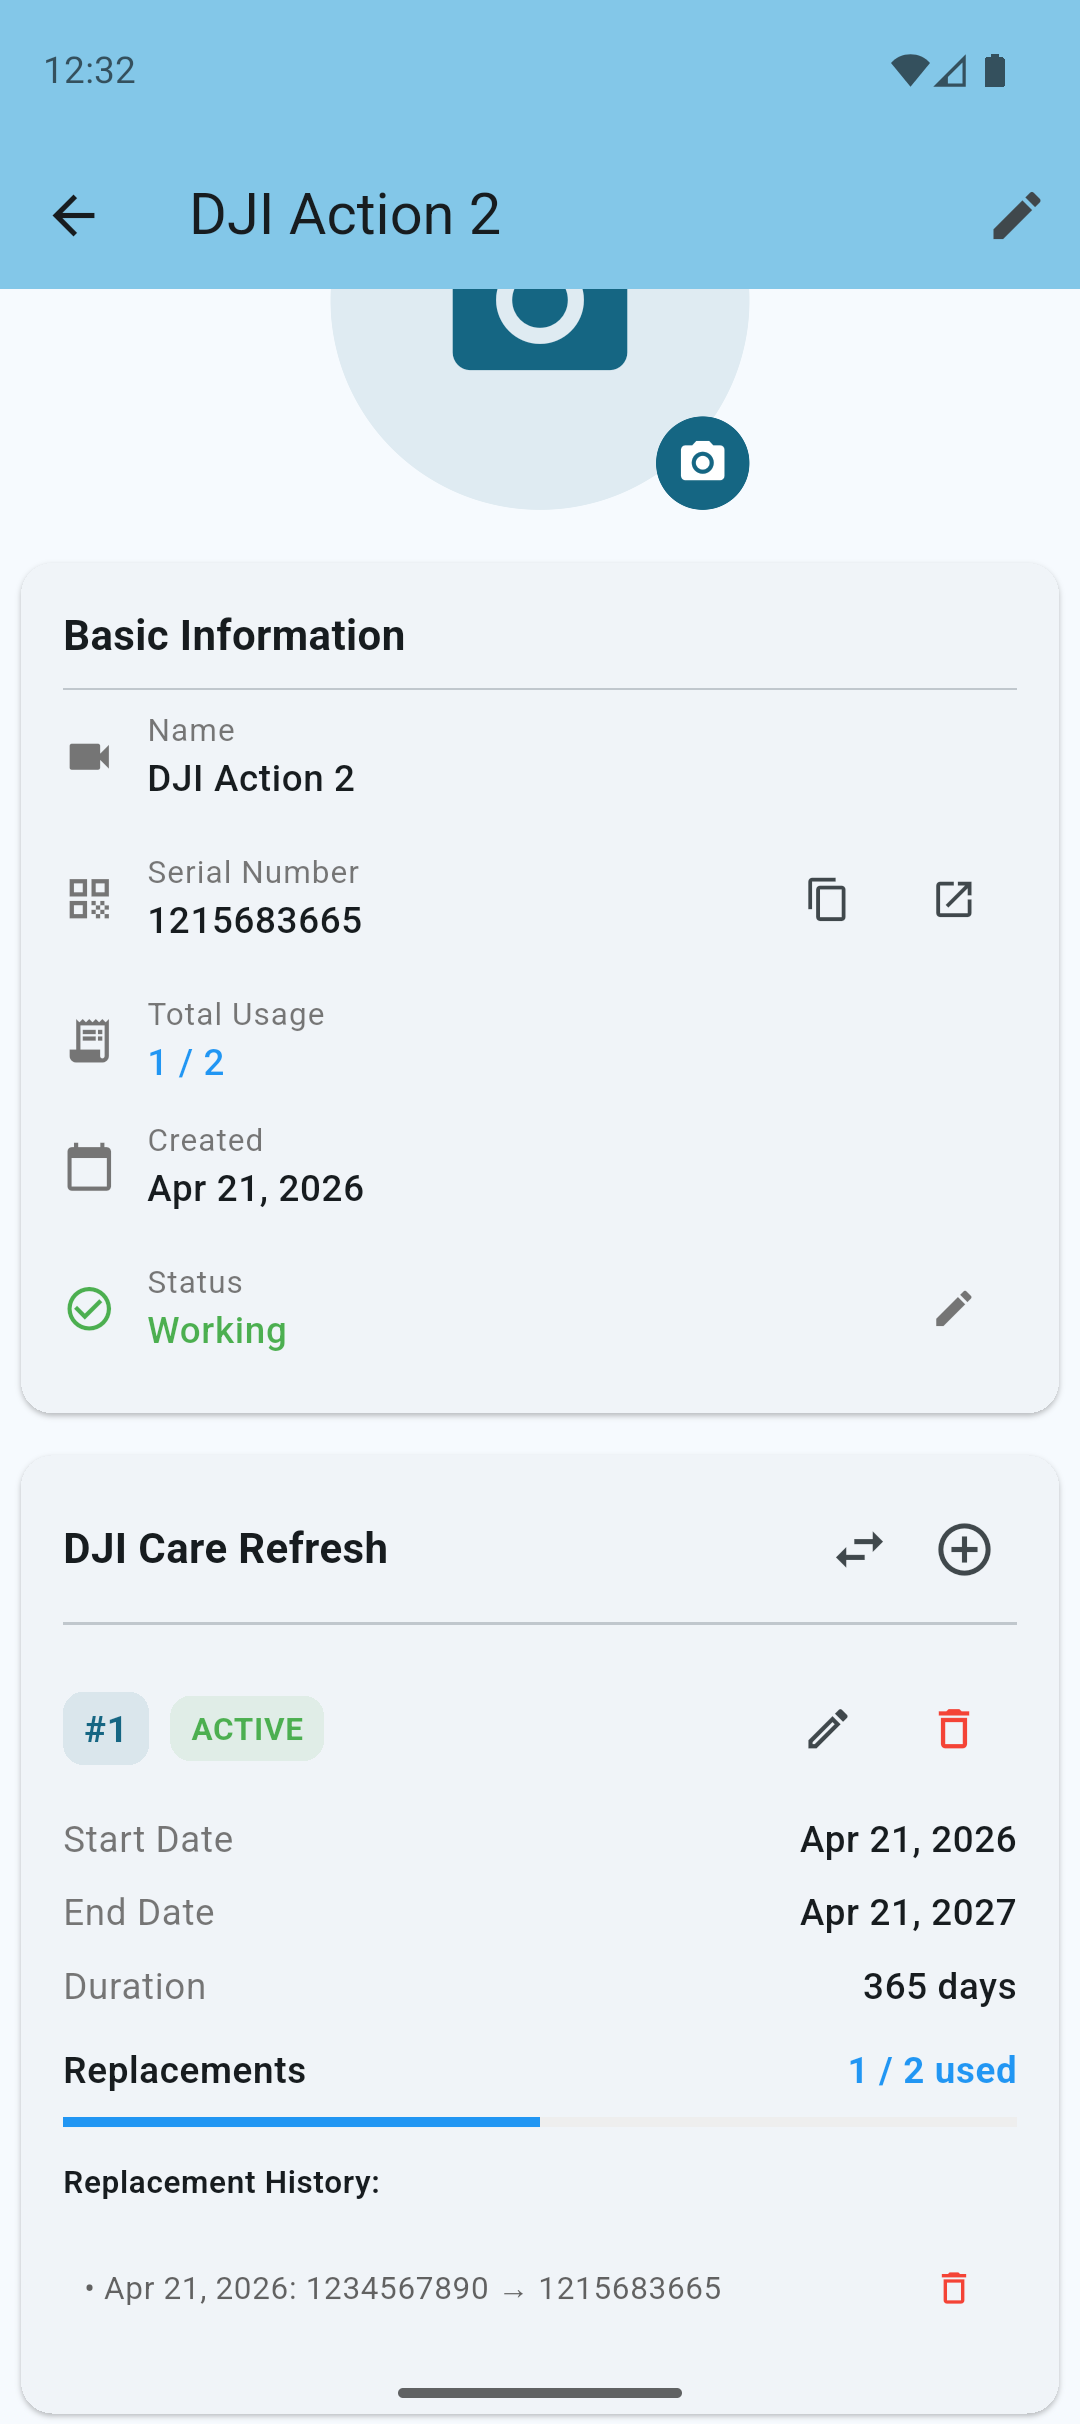
Action Cam Replacement
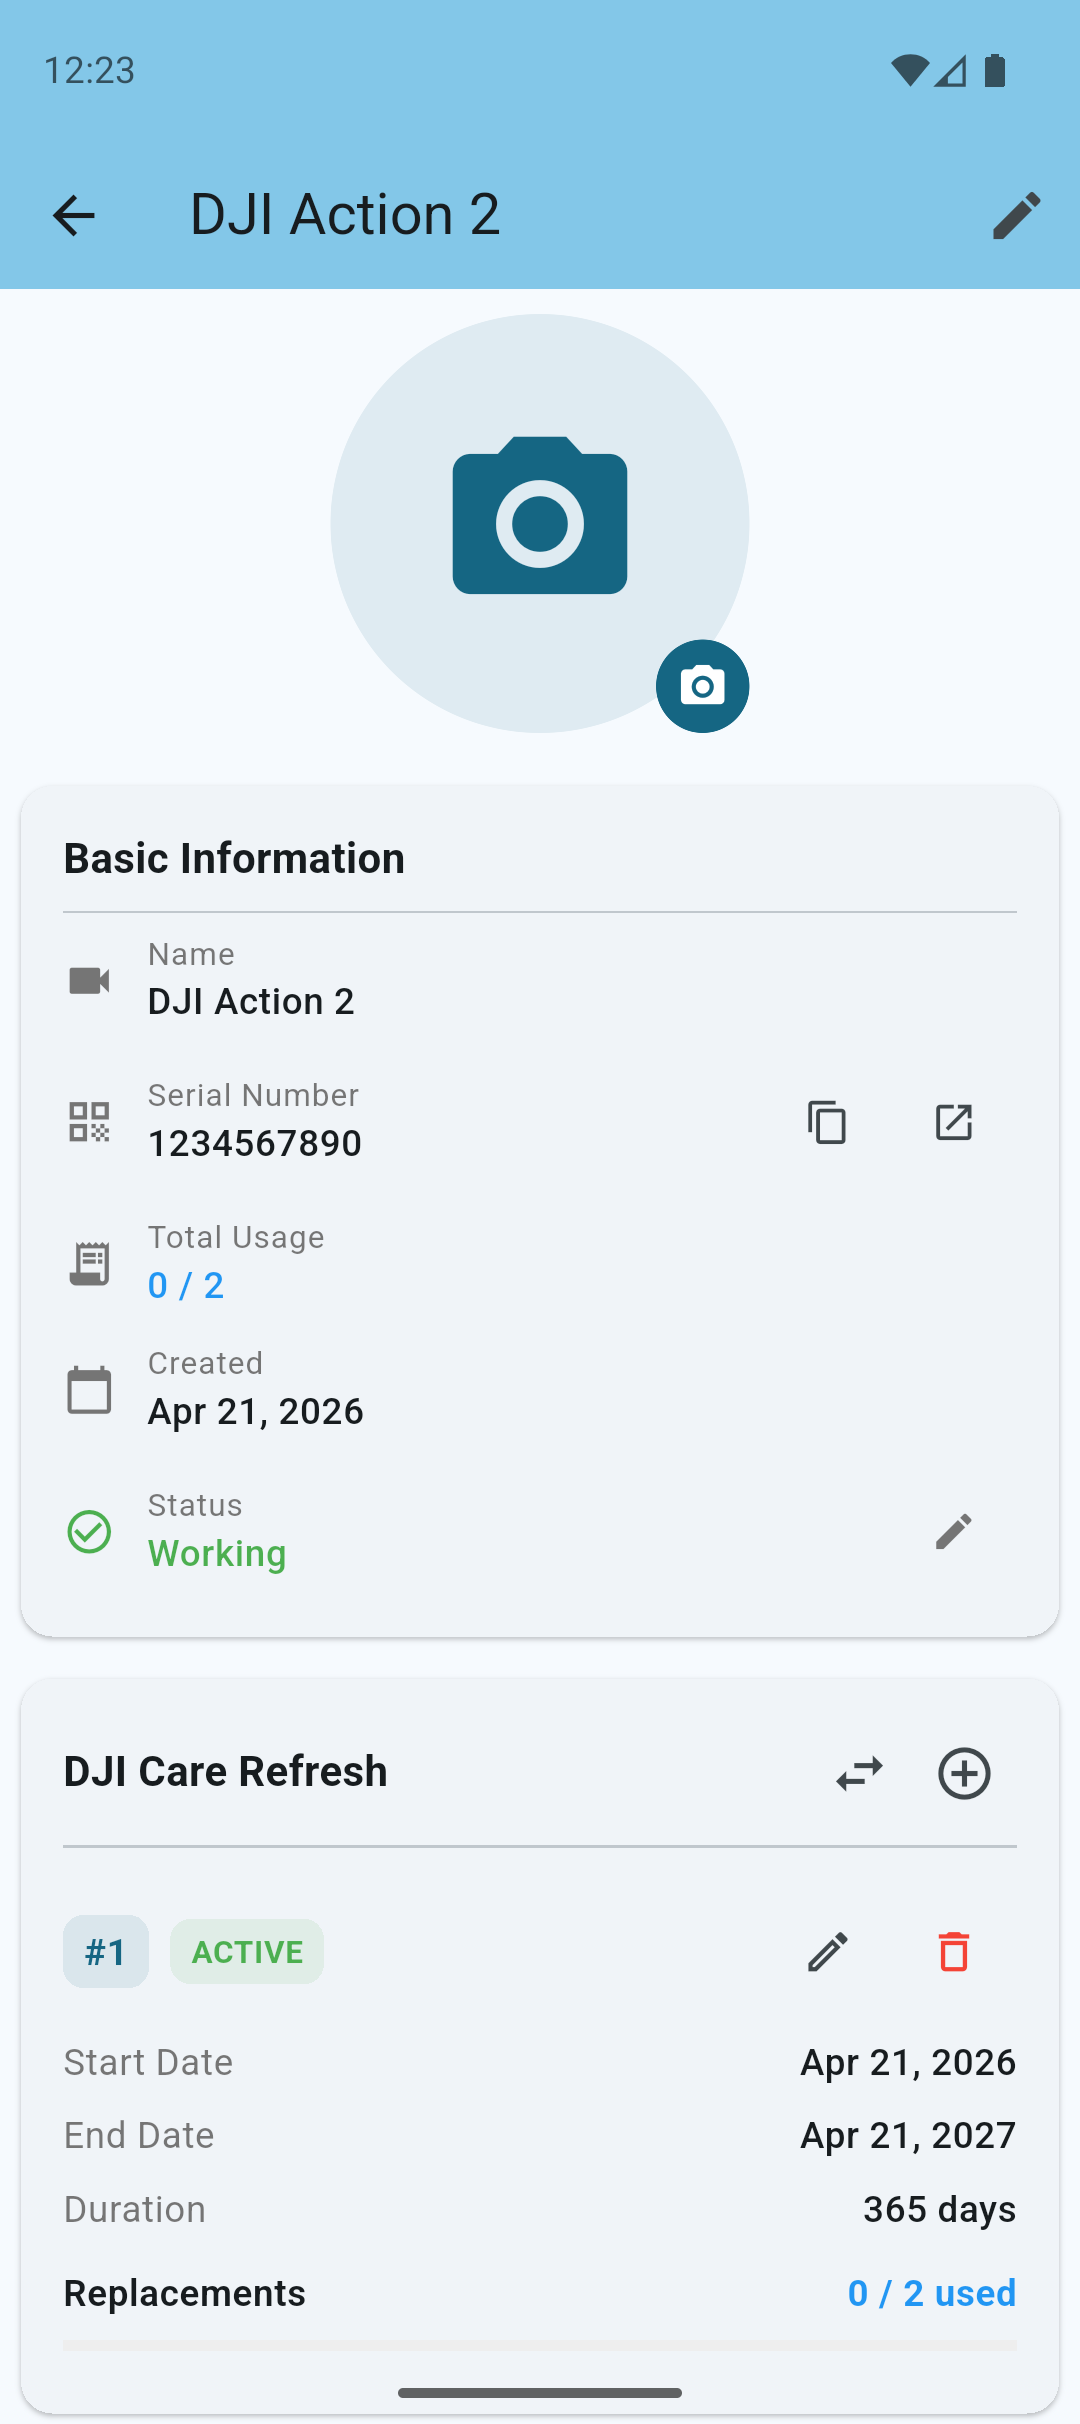
Now you can easily see your action cam's details and DJI Care Refresh contract information.
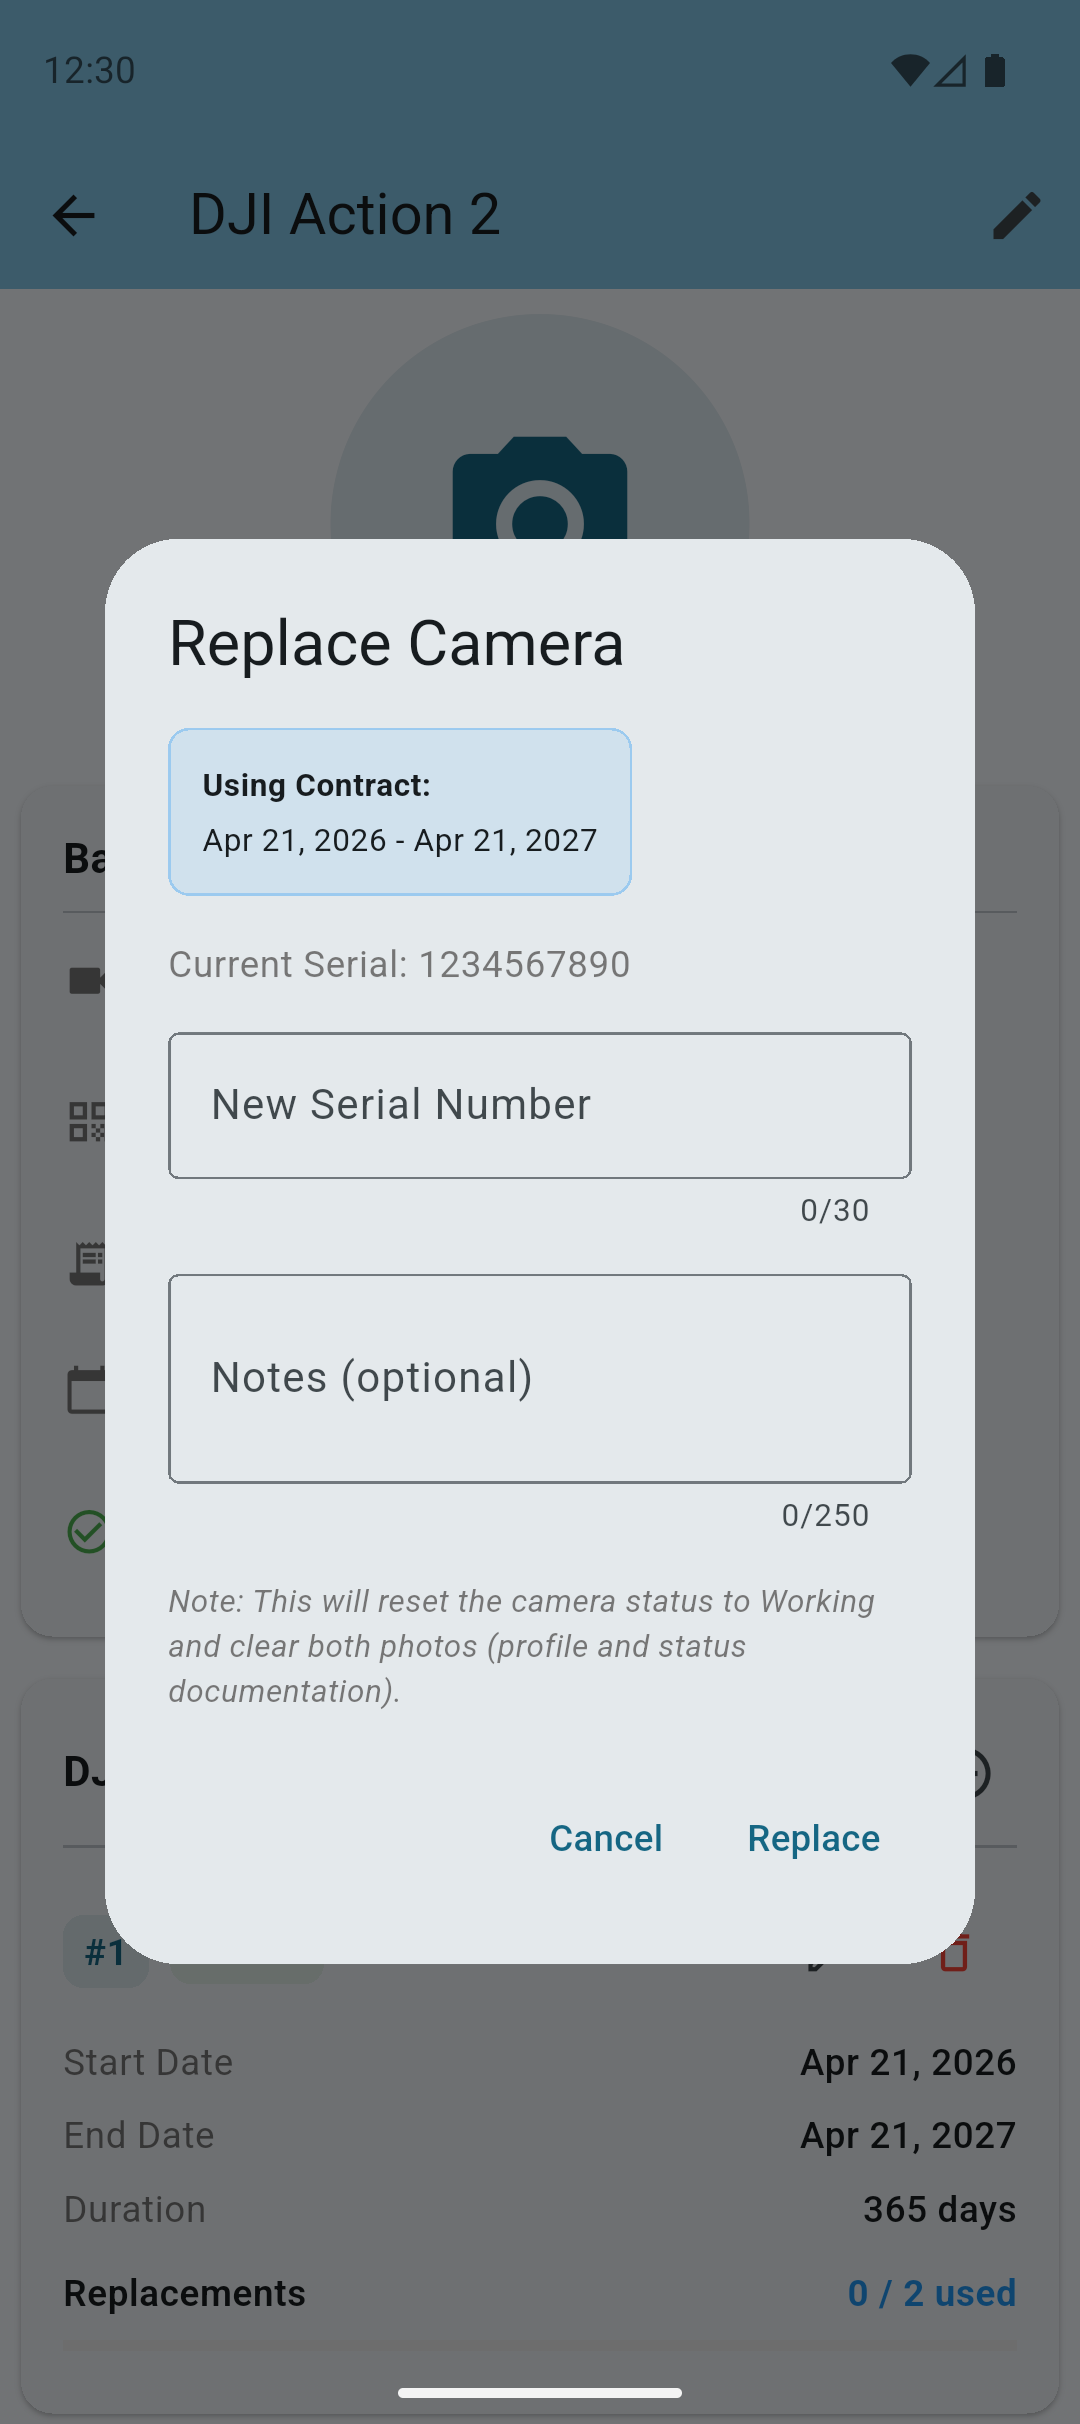
Tap the exchange icon in the DJI Care Refresh section (next to the +) button to open the replacement dialog.
In the replacement dialog, you will see the contract that will be used for the replacement. The app knows which contract to use based on the contract's date and remaining replacements available.
Enter the new serial number of the replacement device received by DJI.
Tap Replace to replace the action cam.
After replacing the action cam, you will see the updated contract information and the updated replacement history.
Note: The app will automatically set the status of the action cam to "Working", remove the photo and any notes.
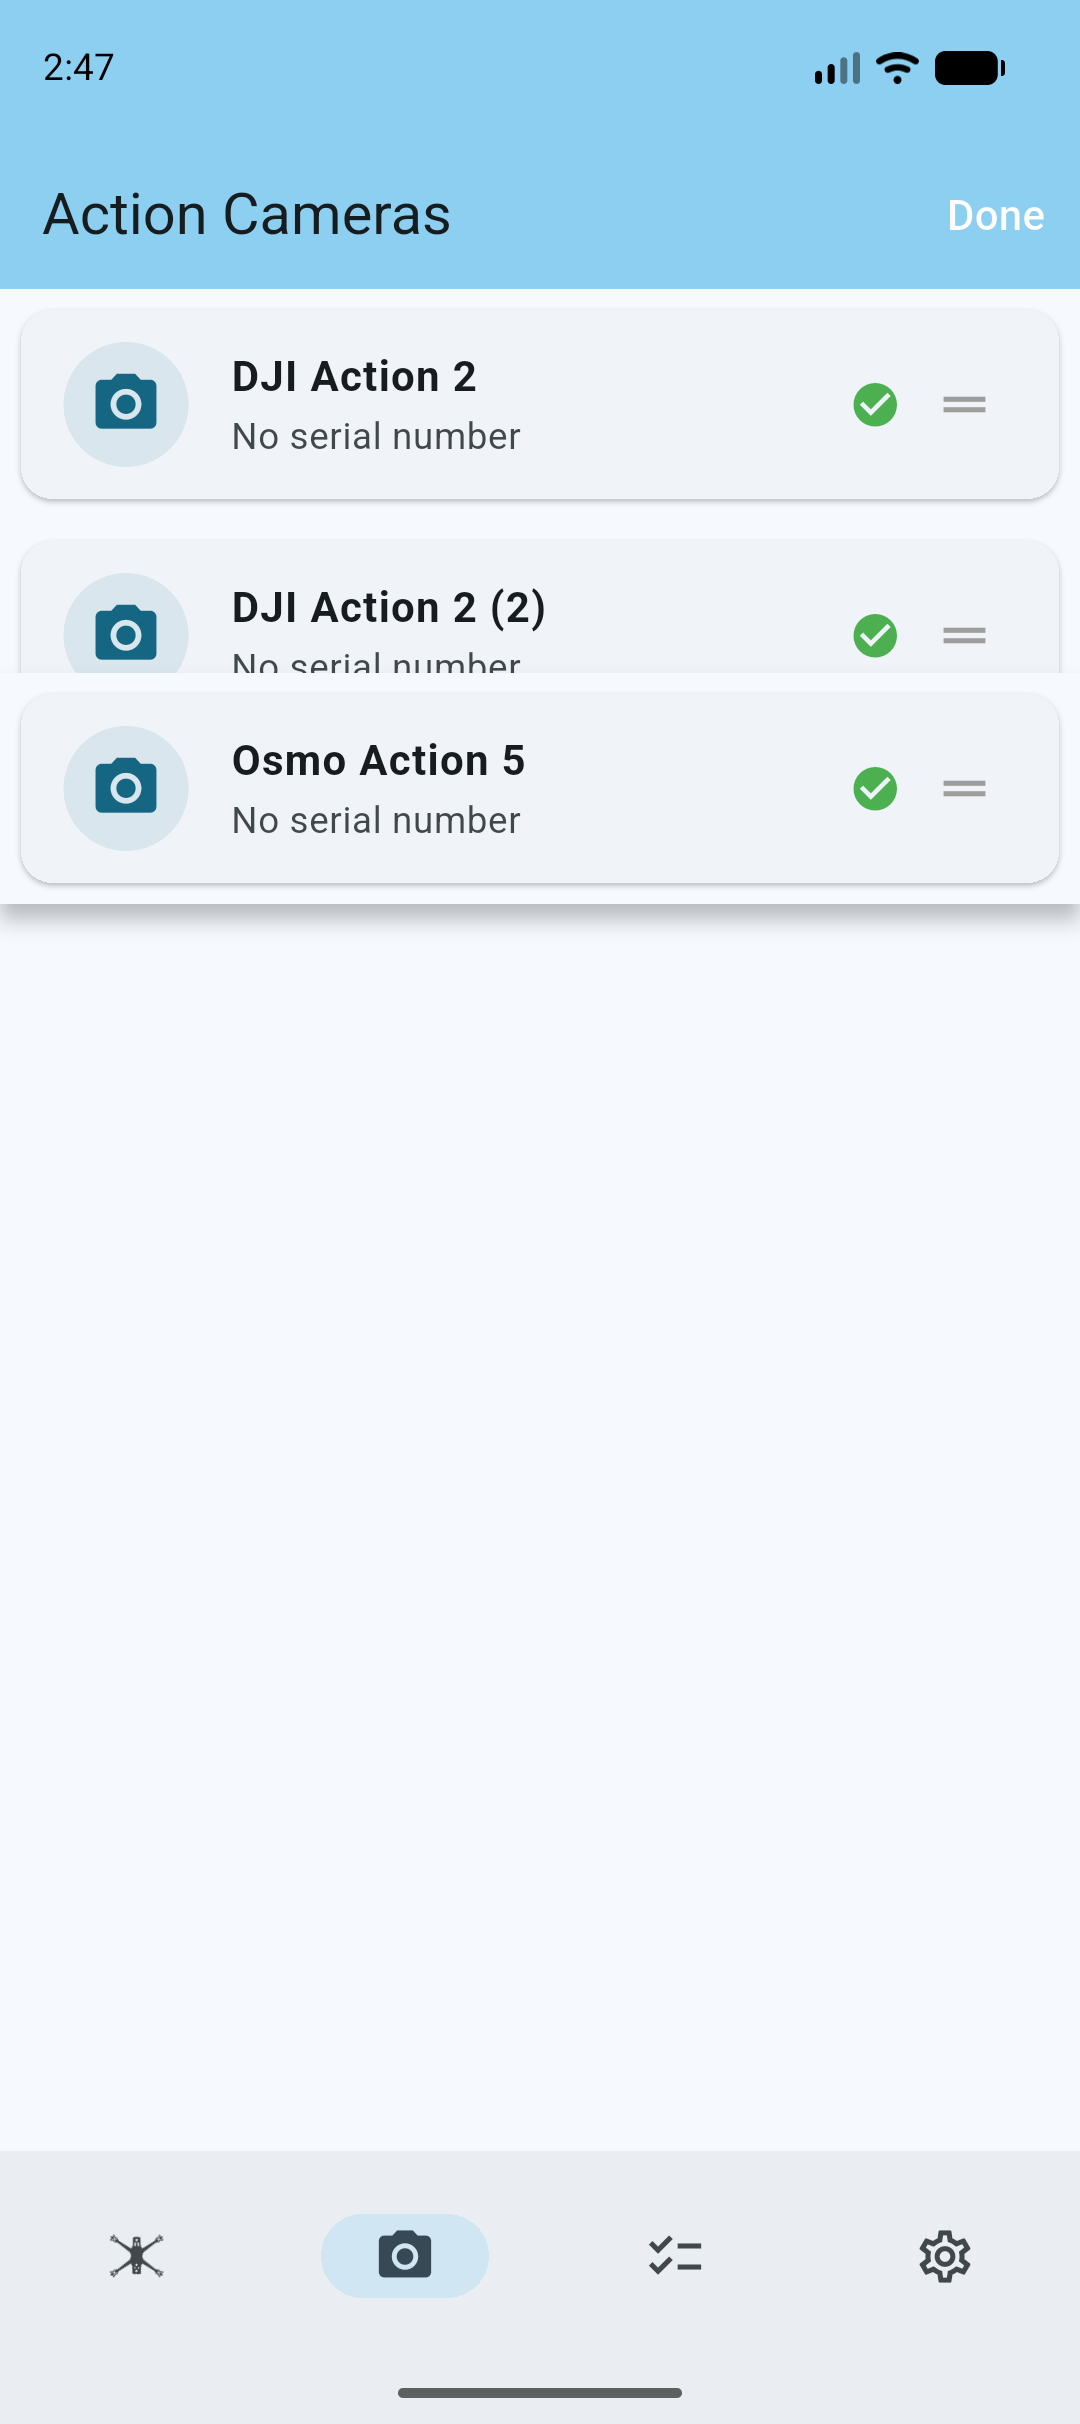
Reordering Action Cams
If you want to change the order of your action cams, you can use the 3 dotted menu in the top navigation bar, and tap Reorder.
This will enable handles on the action cams which allow you to drag and drop your action cams to rearrange their order.

Drag and drop the action cams to rearrange their order.
Tap the Done button to save the new order.
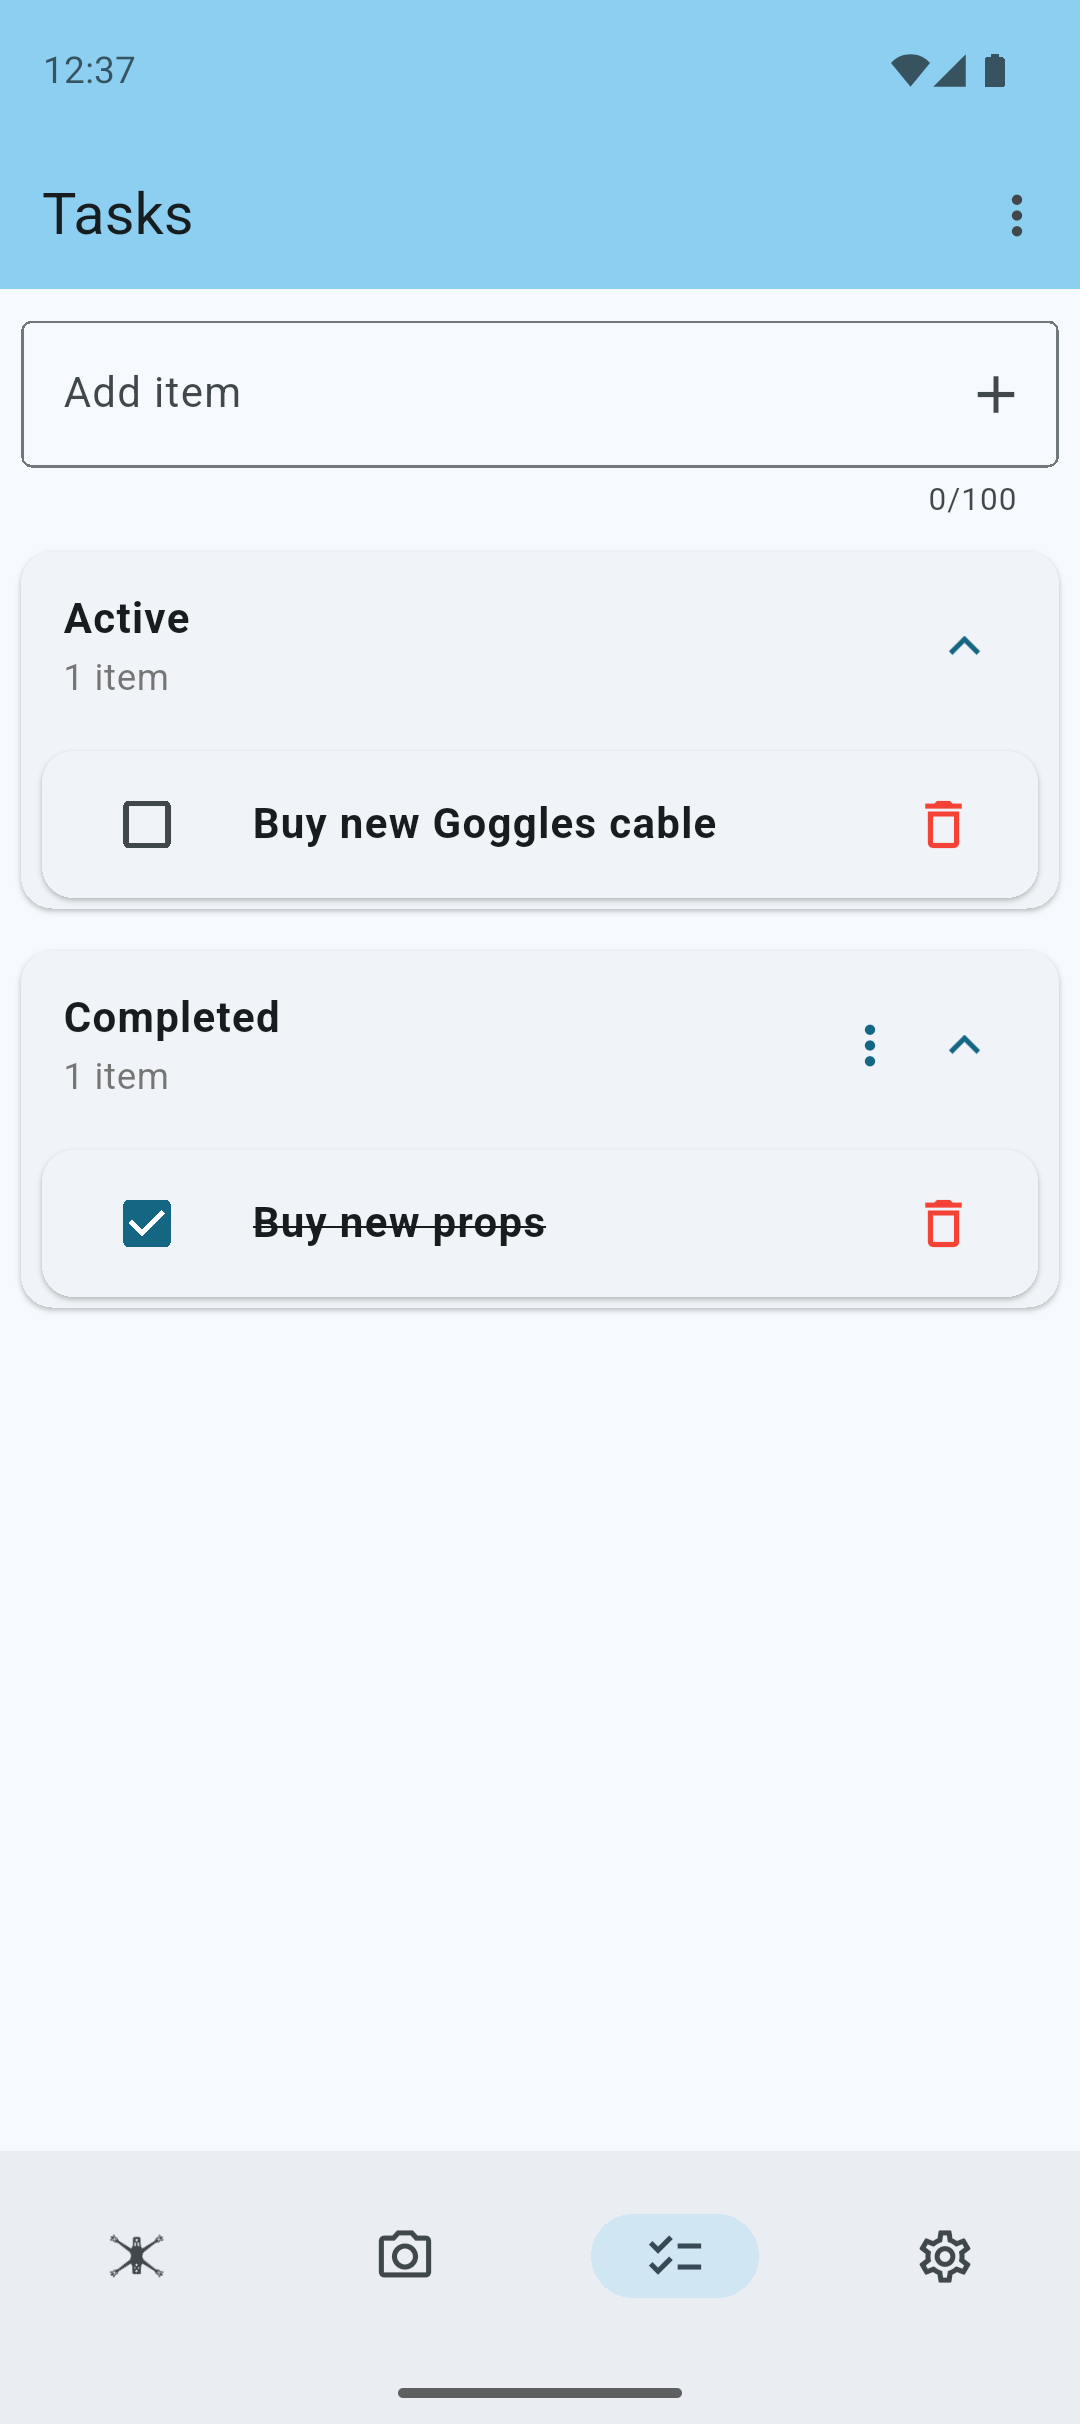
Tasks
Tasks allow you to keep track of your ongoing and completed tasks.
A simple to-do list to keep you organized - create tasks, edit them, and check them off as you go
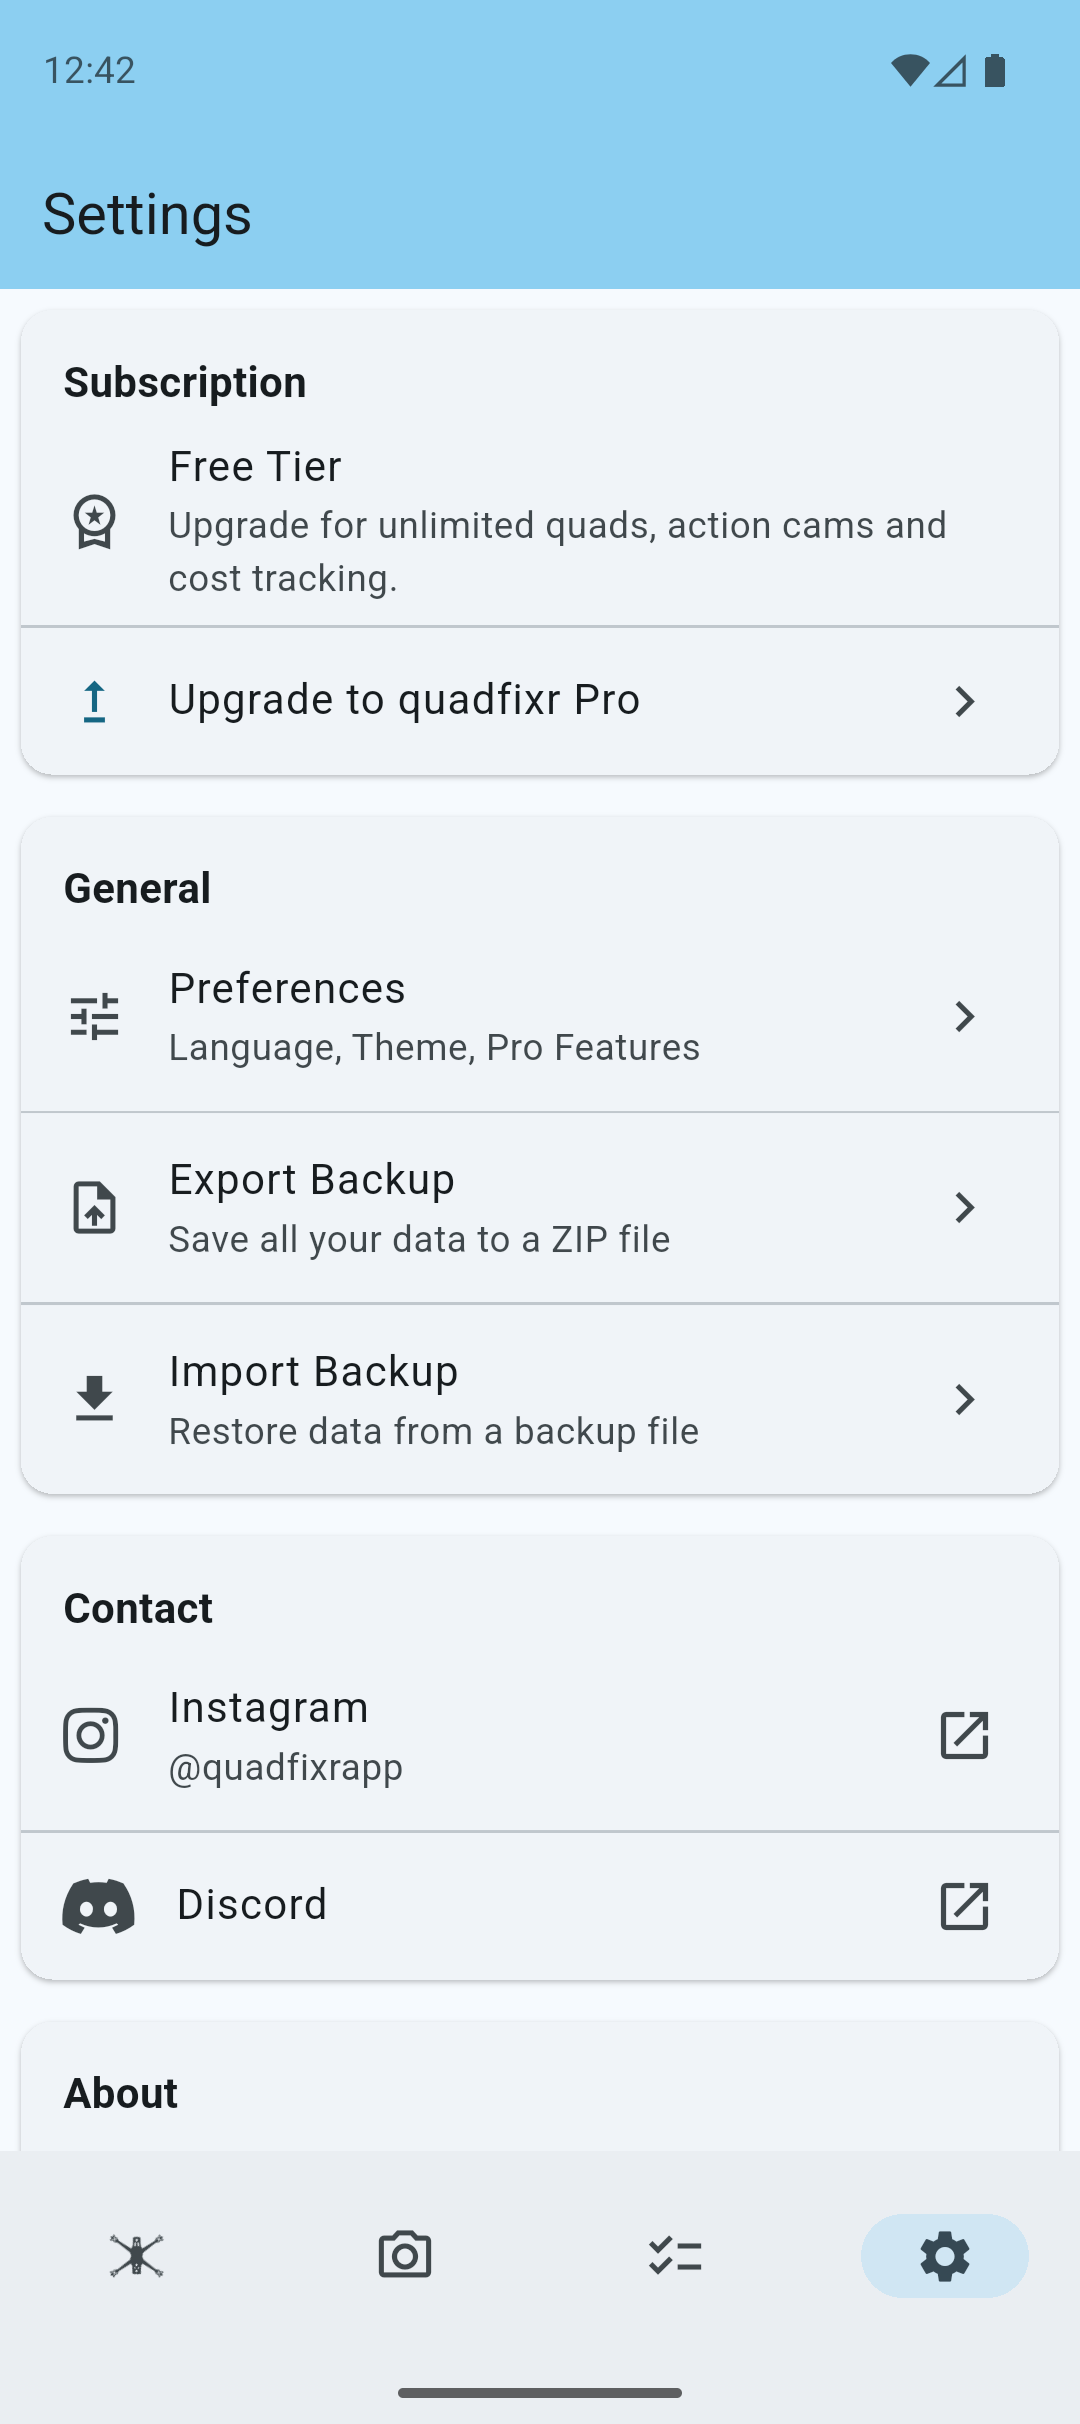
Settings
In Settings you can manage your subscription, preferences and use import/export functionality.
Tap on the Subscription section to view your subscription details, or to subscribe to quadfixr Pro.
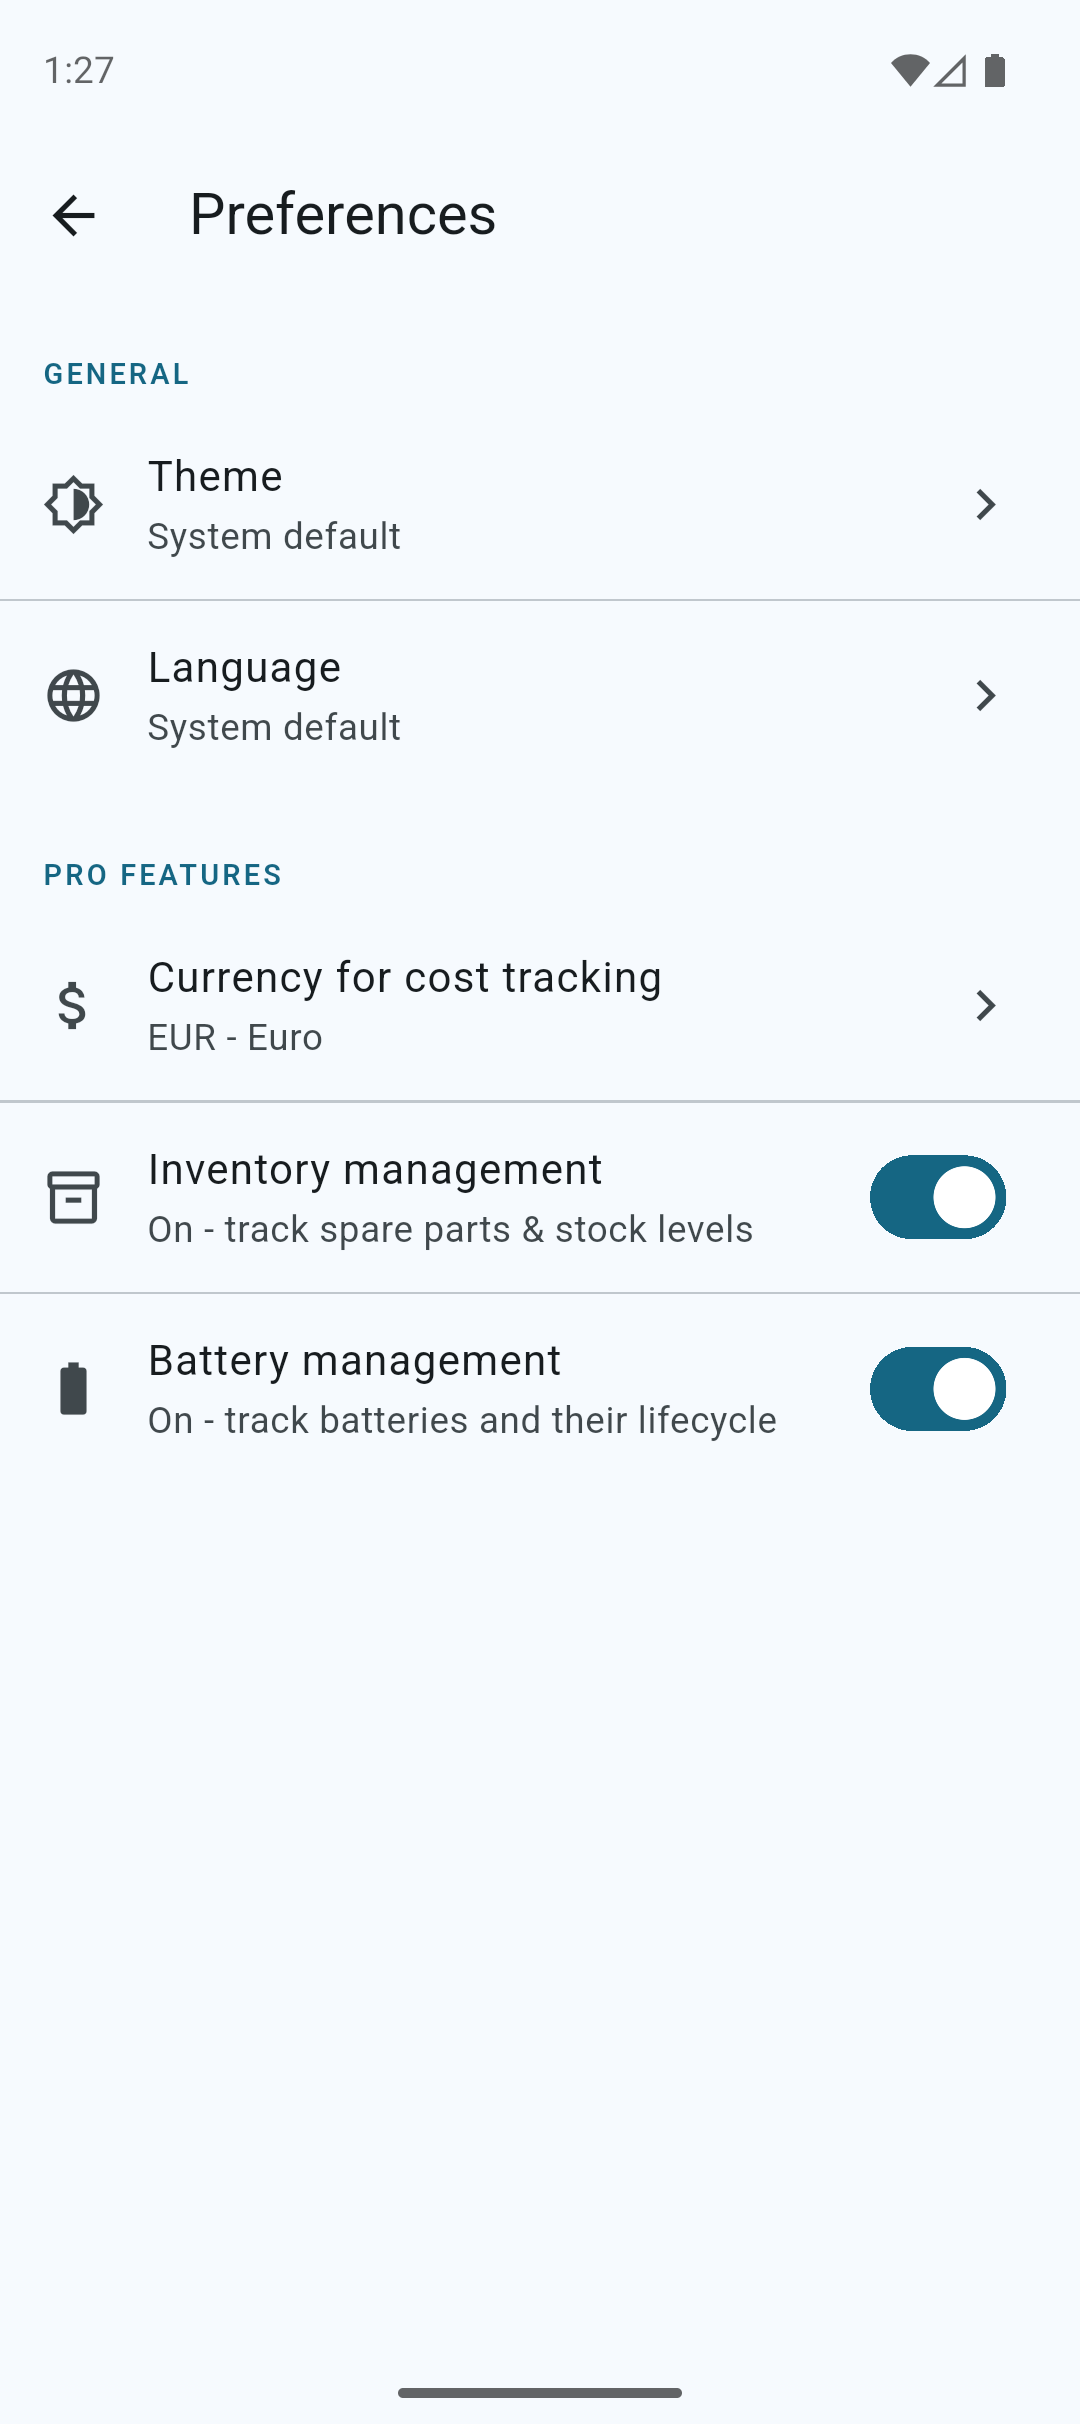
Tap on the Preferences section to customize your app experience.
Use the Import/Export section to backup your data, or to transfer your data to a new device.
Note: The app is fully offline and has no integrated cloud services. Please always keep a fresh backup of your data.
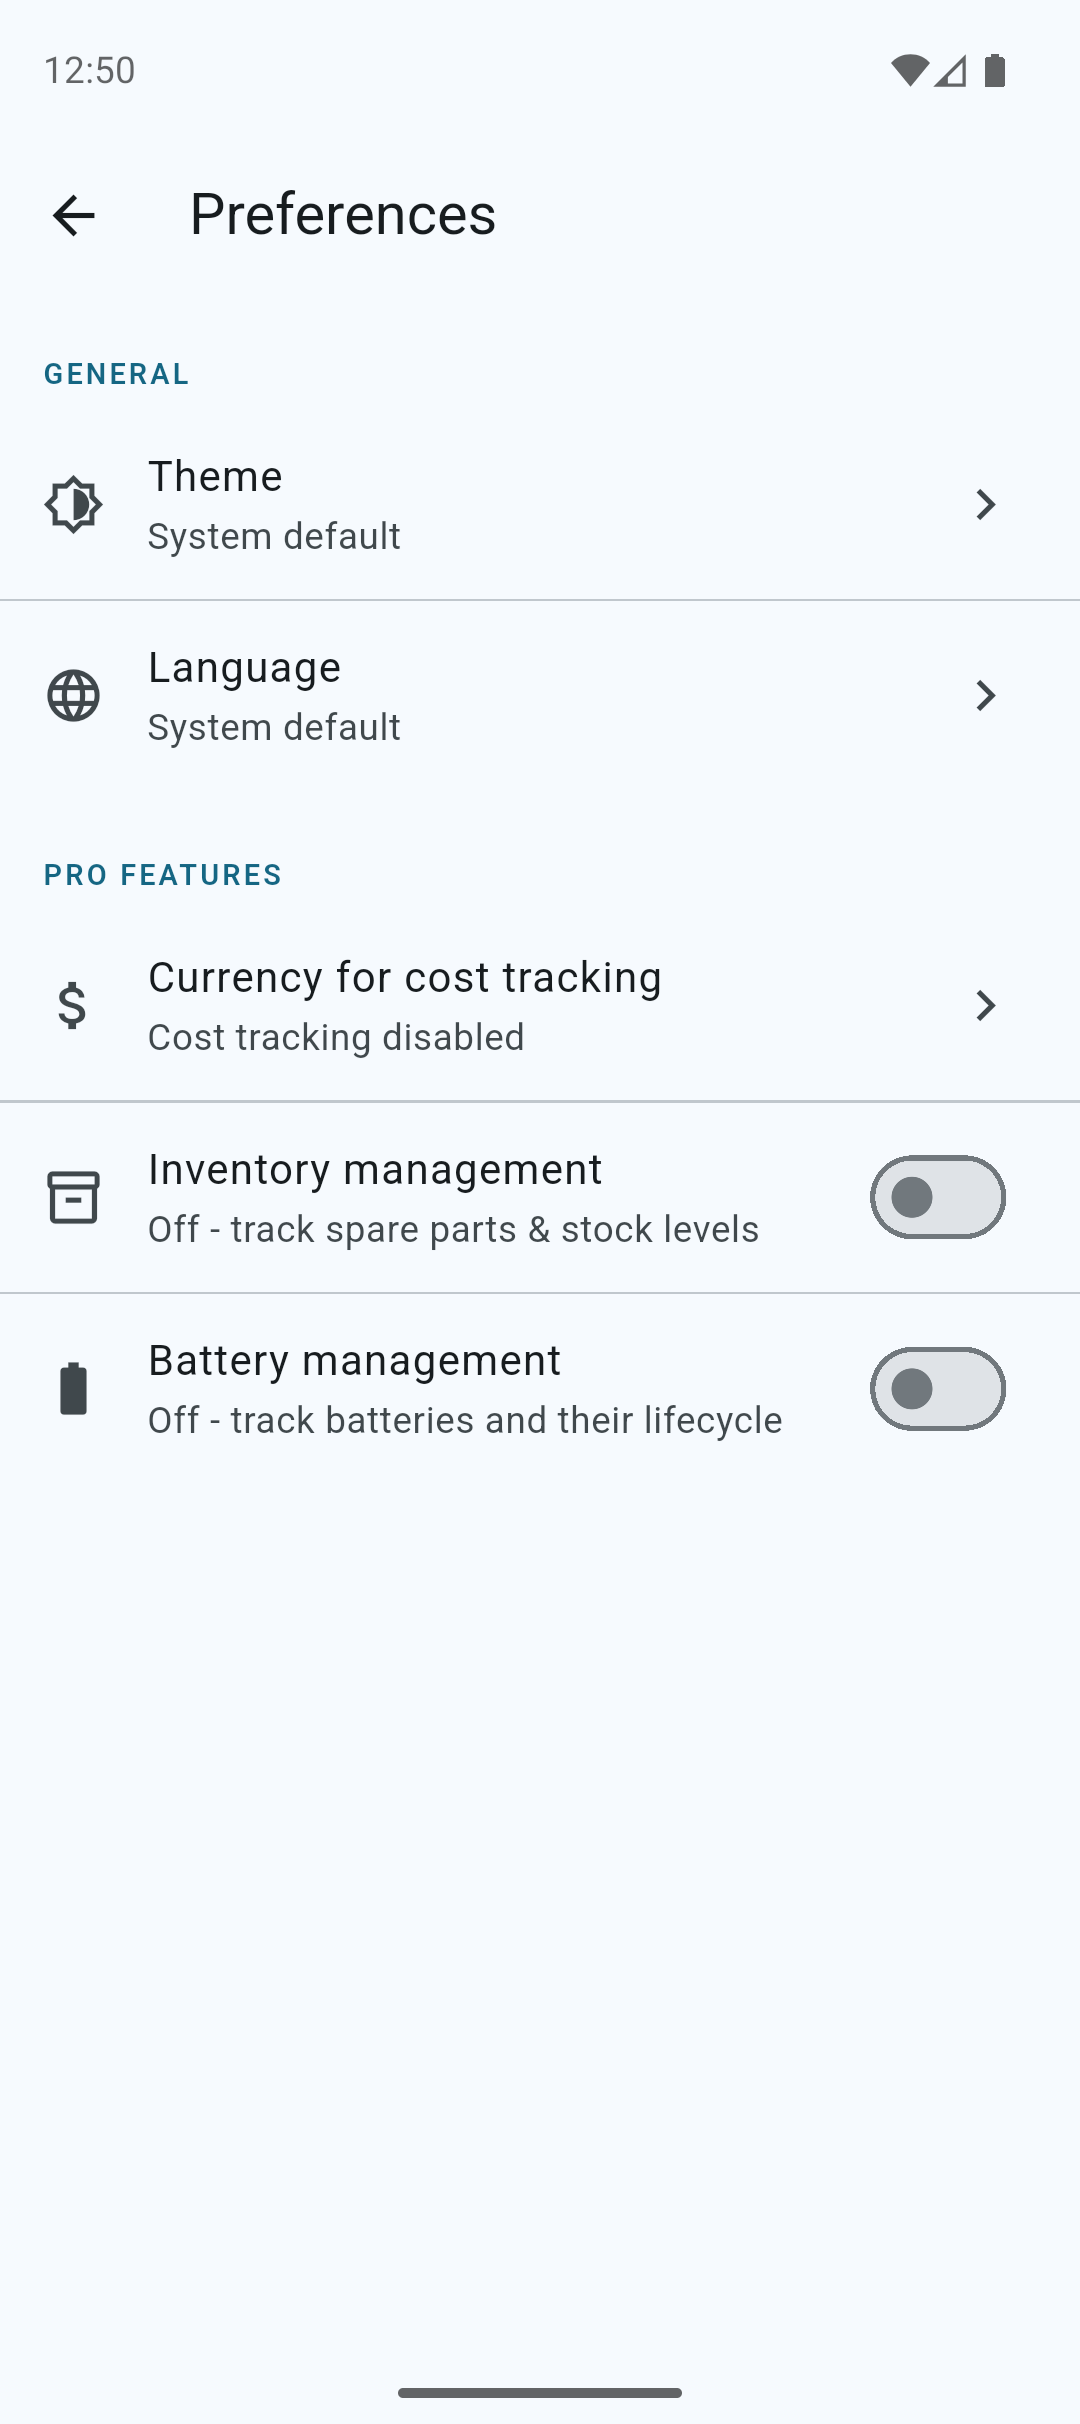
Preferences
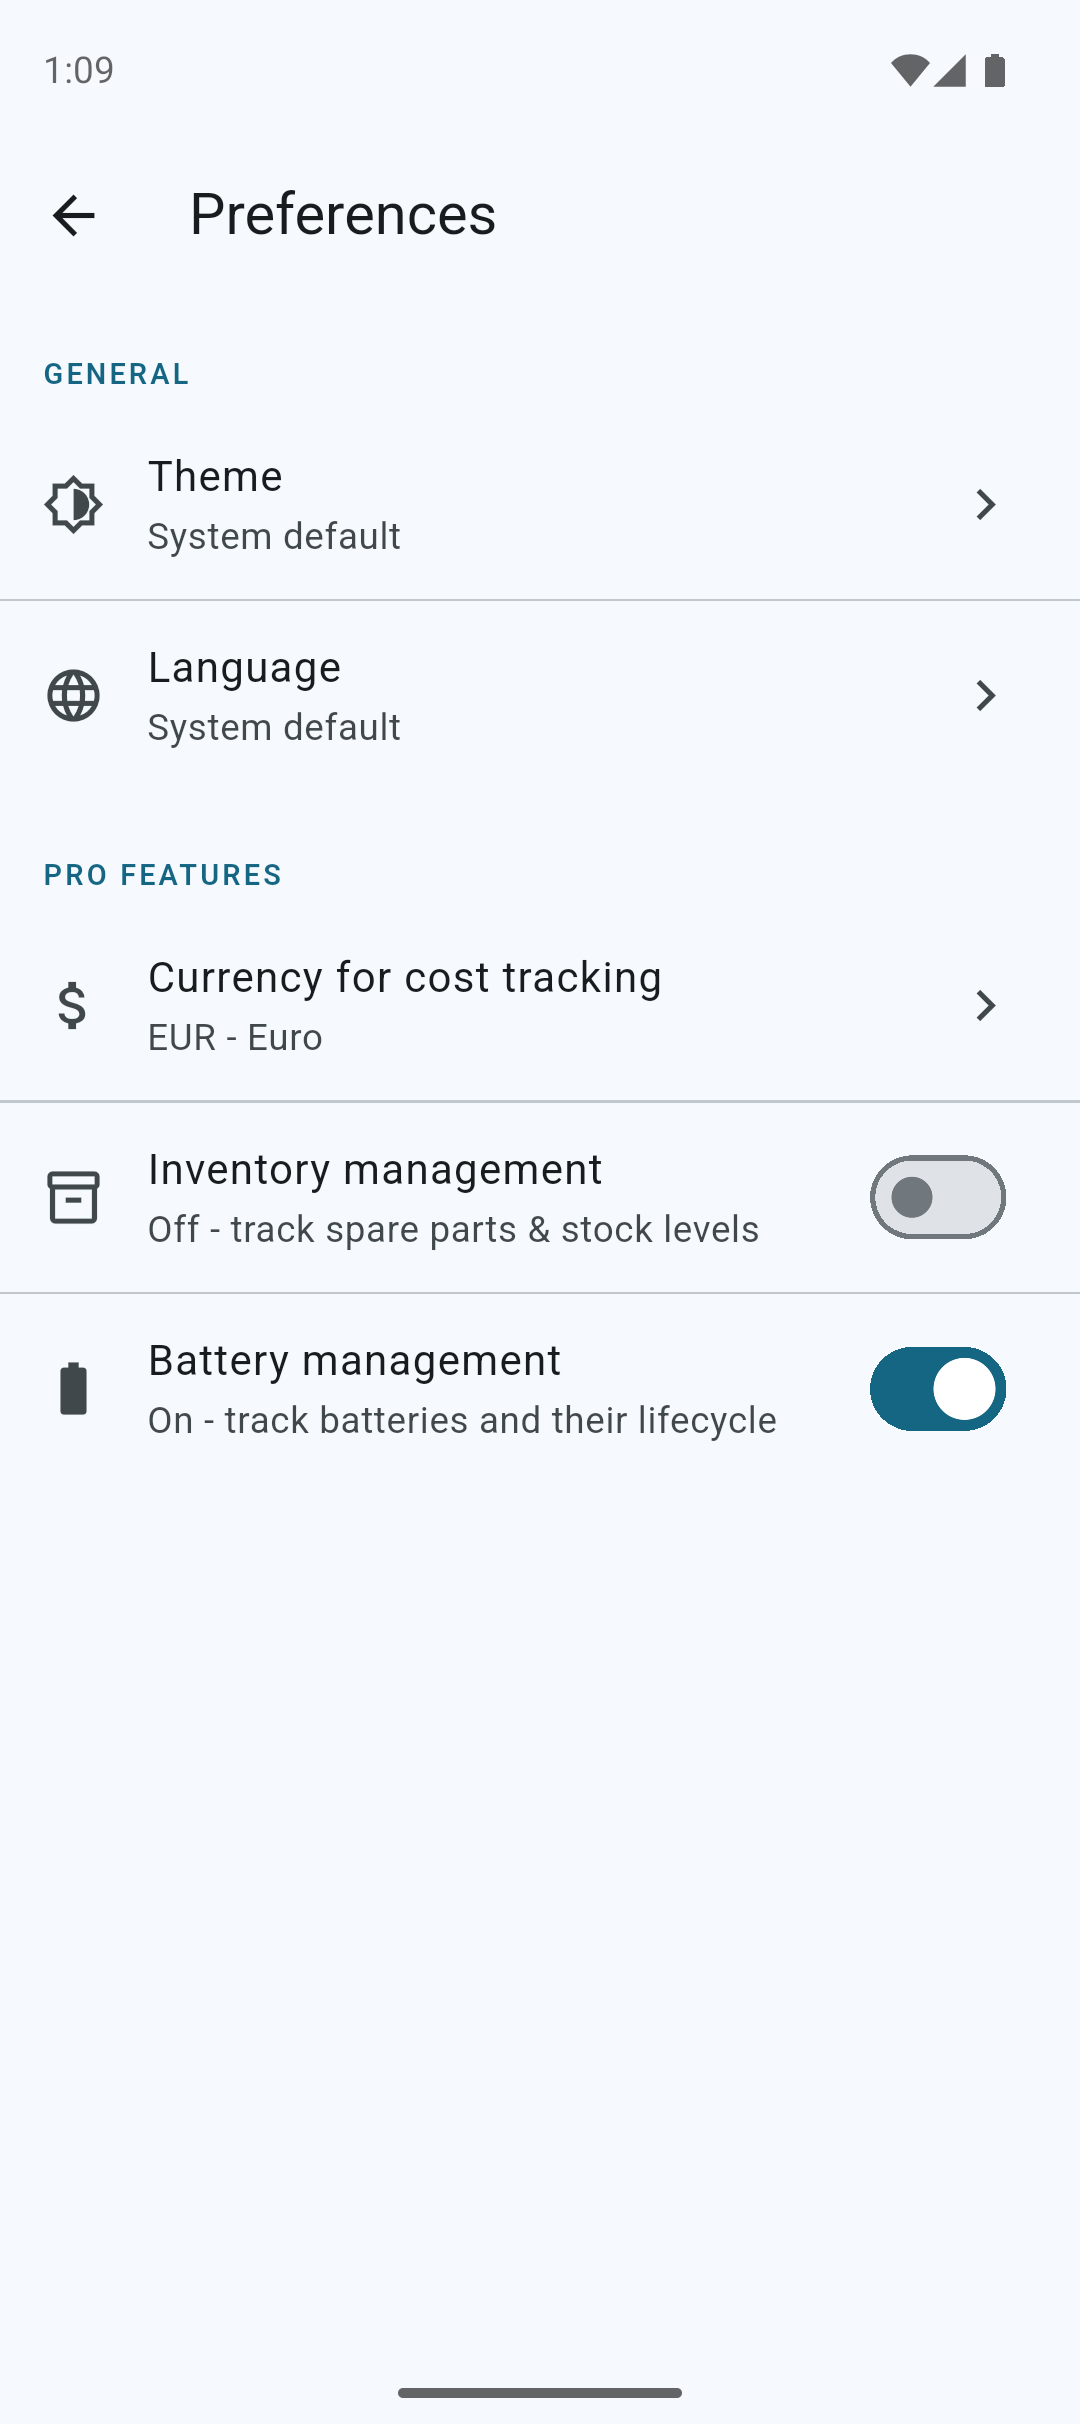
In the preferences screen you can change the app's settings and customize your experience.
Tap on Theme to change the app's appearance.
Tap on Language to change the app's language.
Available languages: 🇩🇪 🇬🇧 🇪🇸 🇫🇷 🇮🇹 🇵🇱 🇨🇳
Note: Some translations are AI generated and may not be perfect.
Pro Features (subscription required)
- Cost Tracking: Track the cost of your repairs and replacements in over 20 currencies.
- Inventory Management: Keep track of your spare parts inventory.
- Battery Management: Manage your batteries and track charging cycles.
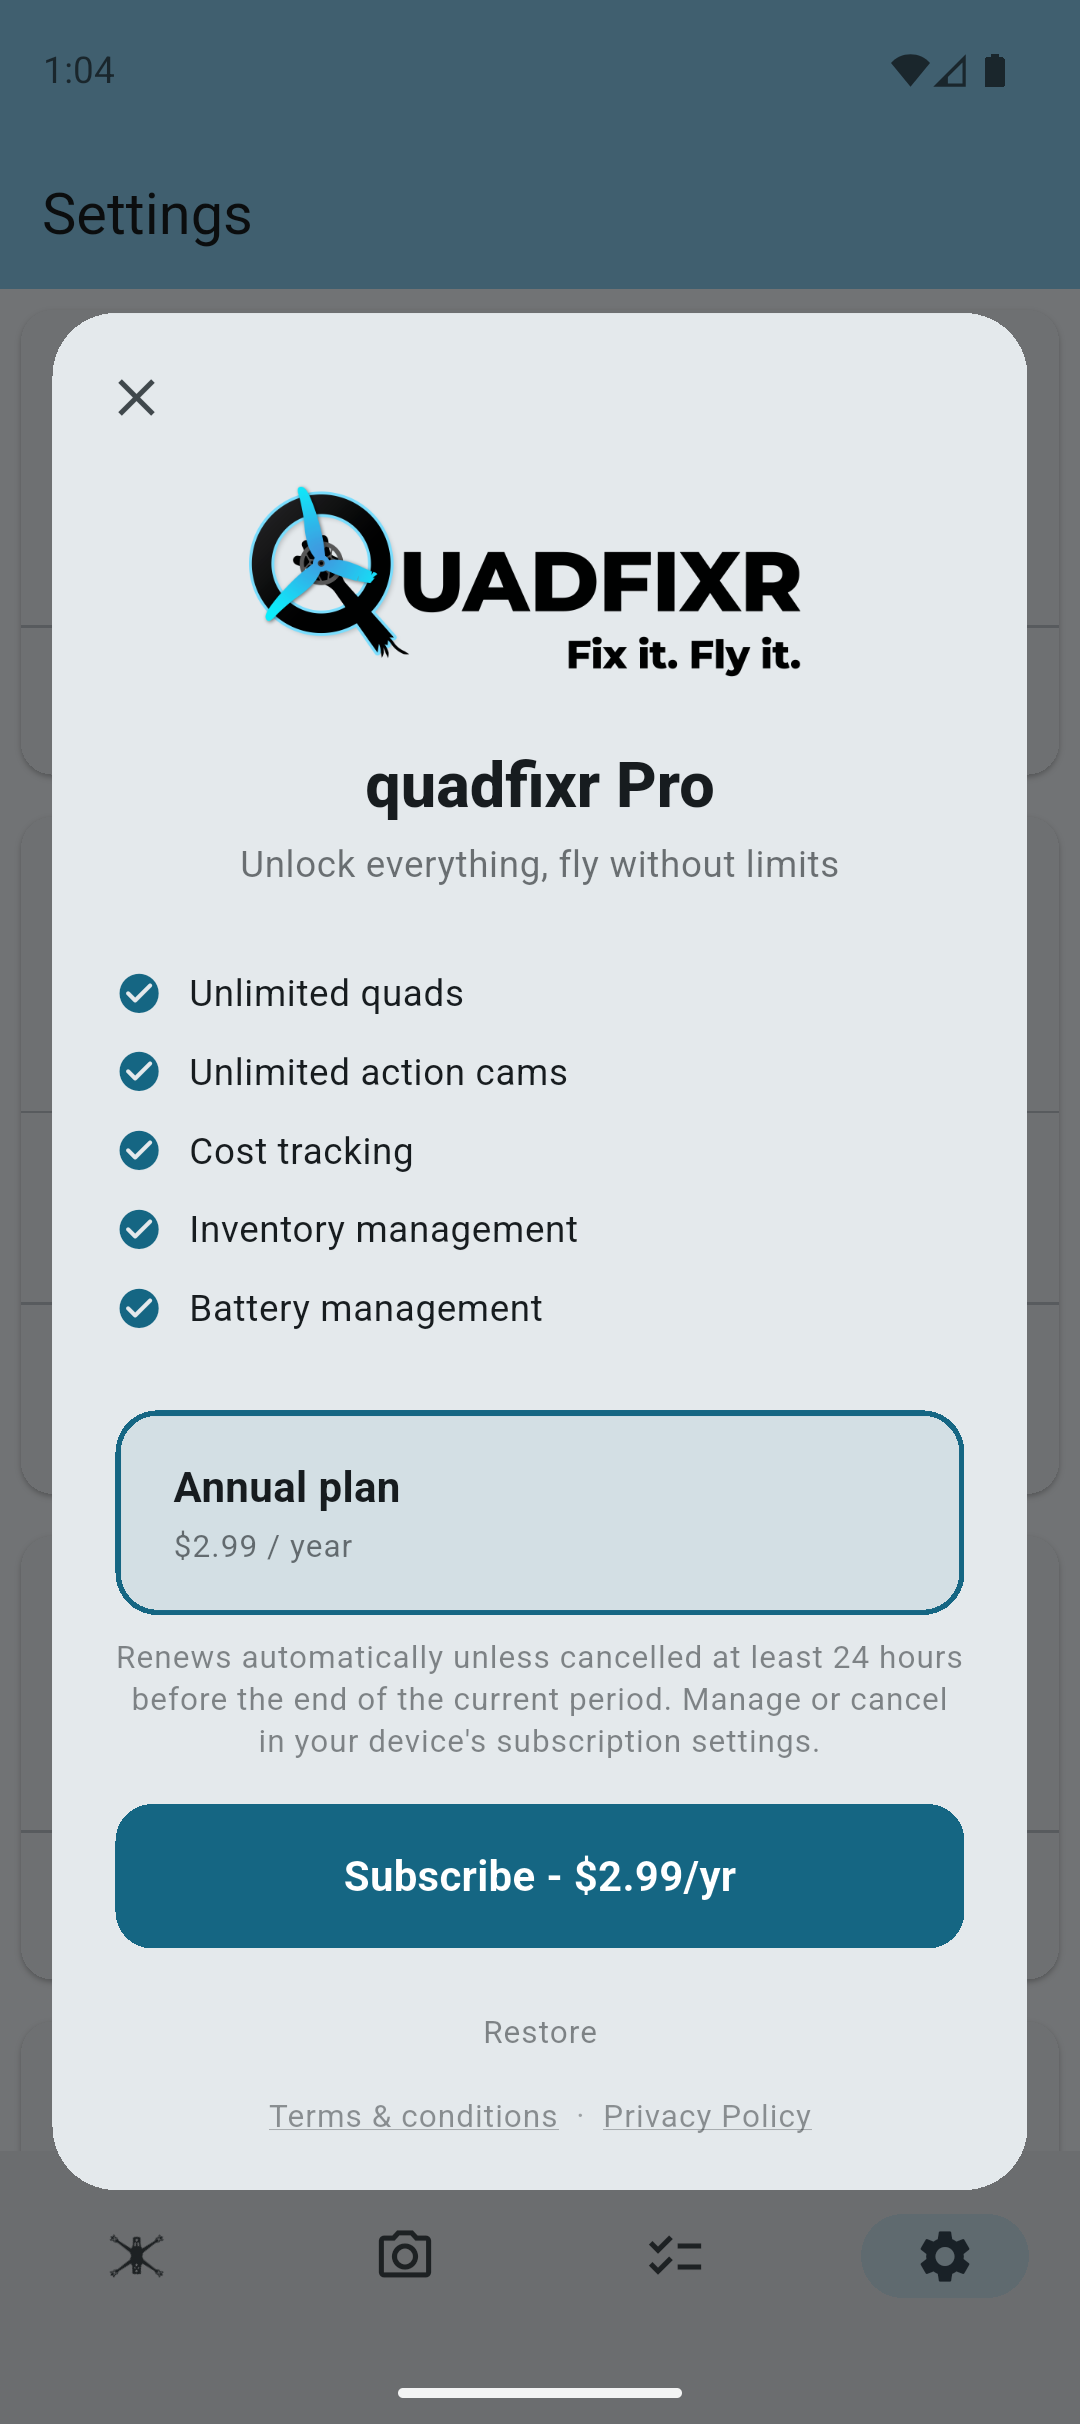
Subscribe to quadfixr Pro
If you like the app, consider subscribing to quadfixr Pro for additional features and benefits.
Subscribe to quadfixr Pro to remove all limits and access advanced features:
- Unlimited quads and action cams
- Cost tracking with over 20 currencies
- Inventory management
- Battery management
Pro is available as an affordable annual subscription. Manage your subscription at any time from the app's settings.
Thank you for supporting quadfixr Pro!
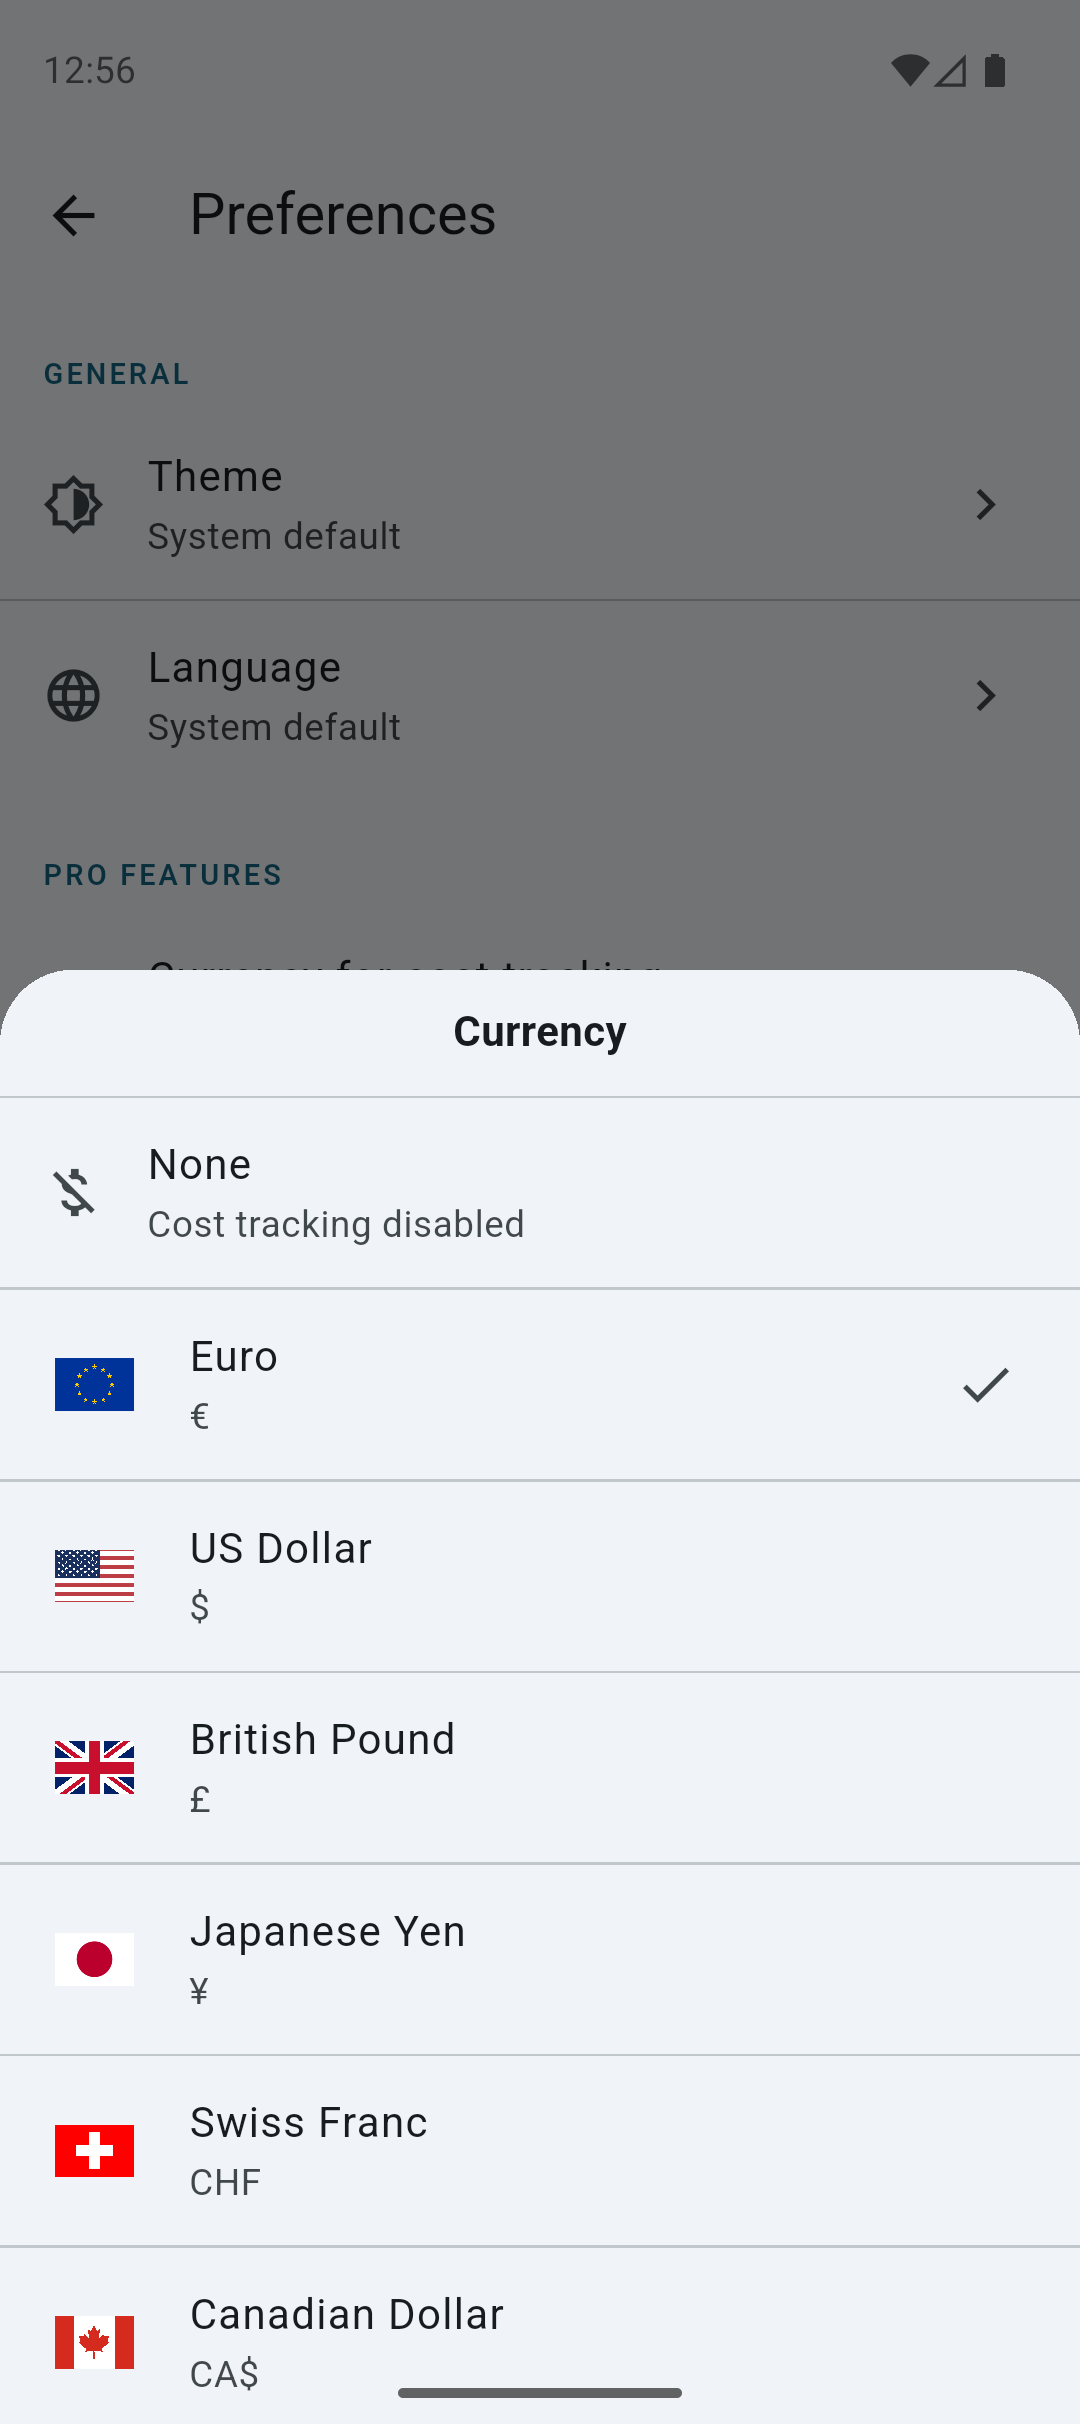
Cost Tracking Pro
Cost tracking allows you to monitor the expenses related to your repairs and replacements. This feature is available with a quadfixr Pro subscription.
Enable cost tracking by selecting a currency in the app's preferences.
Available currencies: 🇩🇪 🇺🇸 🇦🇹 🇵🇱 🇫🇷 🇮🇹 🇦🇪 🇨🇿 🇬🇧 🇱🇺 🇧🇪 🇪🇸 🇳🇱 🇸🇰 🇻🇳 🇦🇺 🇧🇬 🇧🇷 🇨🇭 🇩🇰 🇪🇪 🇬🇪 🇭🇺 🇮🇩 🇮🇳 🇰🇼 🇱🇻 🇲🇦 🇸🇦 🇸🇪 🇸🇮 🇹🇭 🇹🇷 🇹🇼 🇿🇦
Note: If you are missing a currency, feel free to contact me, and I'll add it.
You can now enter prices of components to your quads.
Or make some final adjustments when you replace the component.
Replacements get a price logged to their entry.
A sum of all the costs for single quads is visible in the Top Replacements tab.
A sum of all the costs for all quads is visible in the Statistics screen.
Tip: You can filter the statistics by date range to see costs for a specific period.
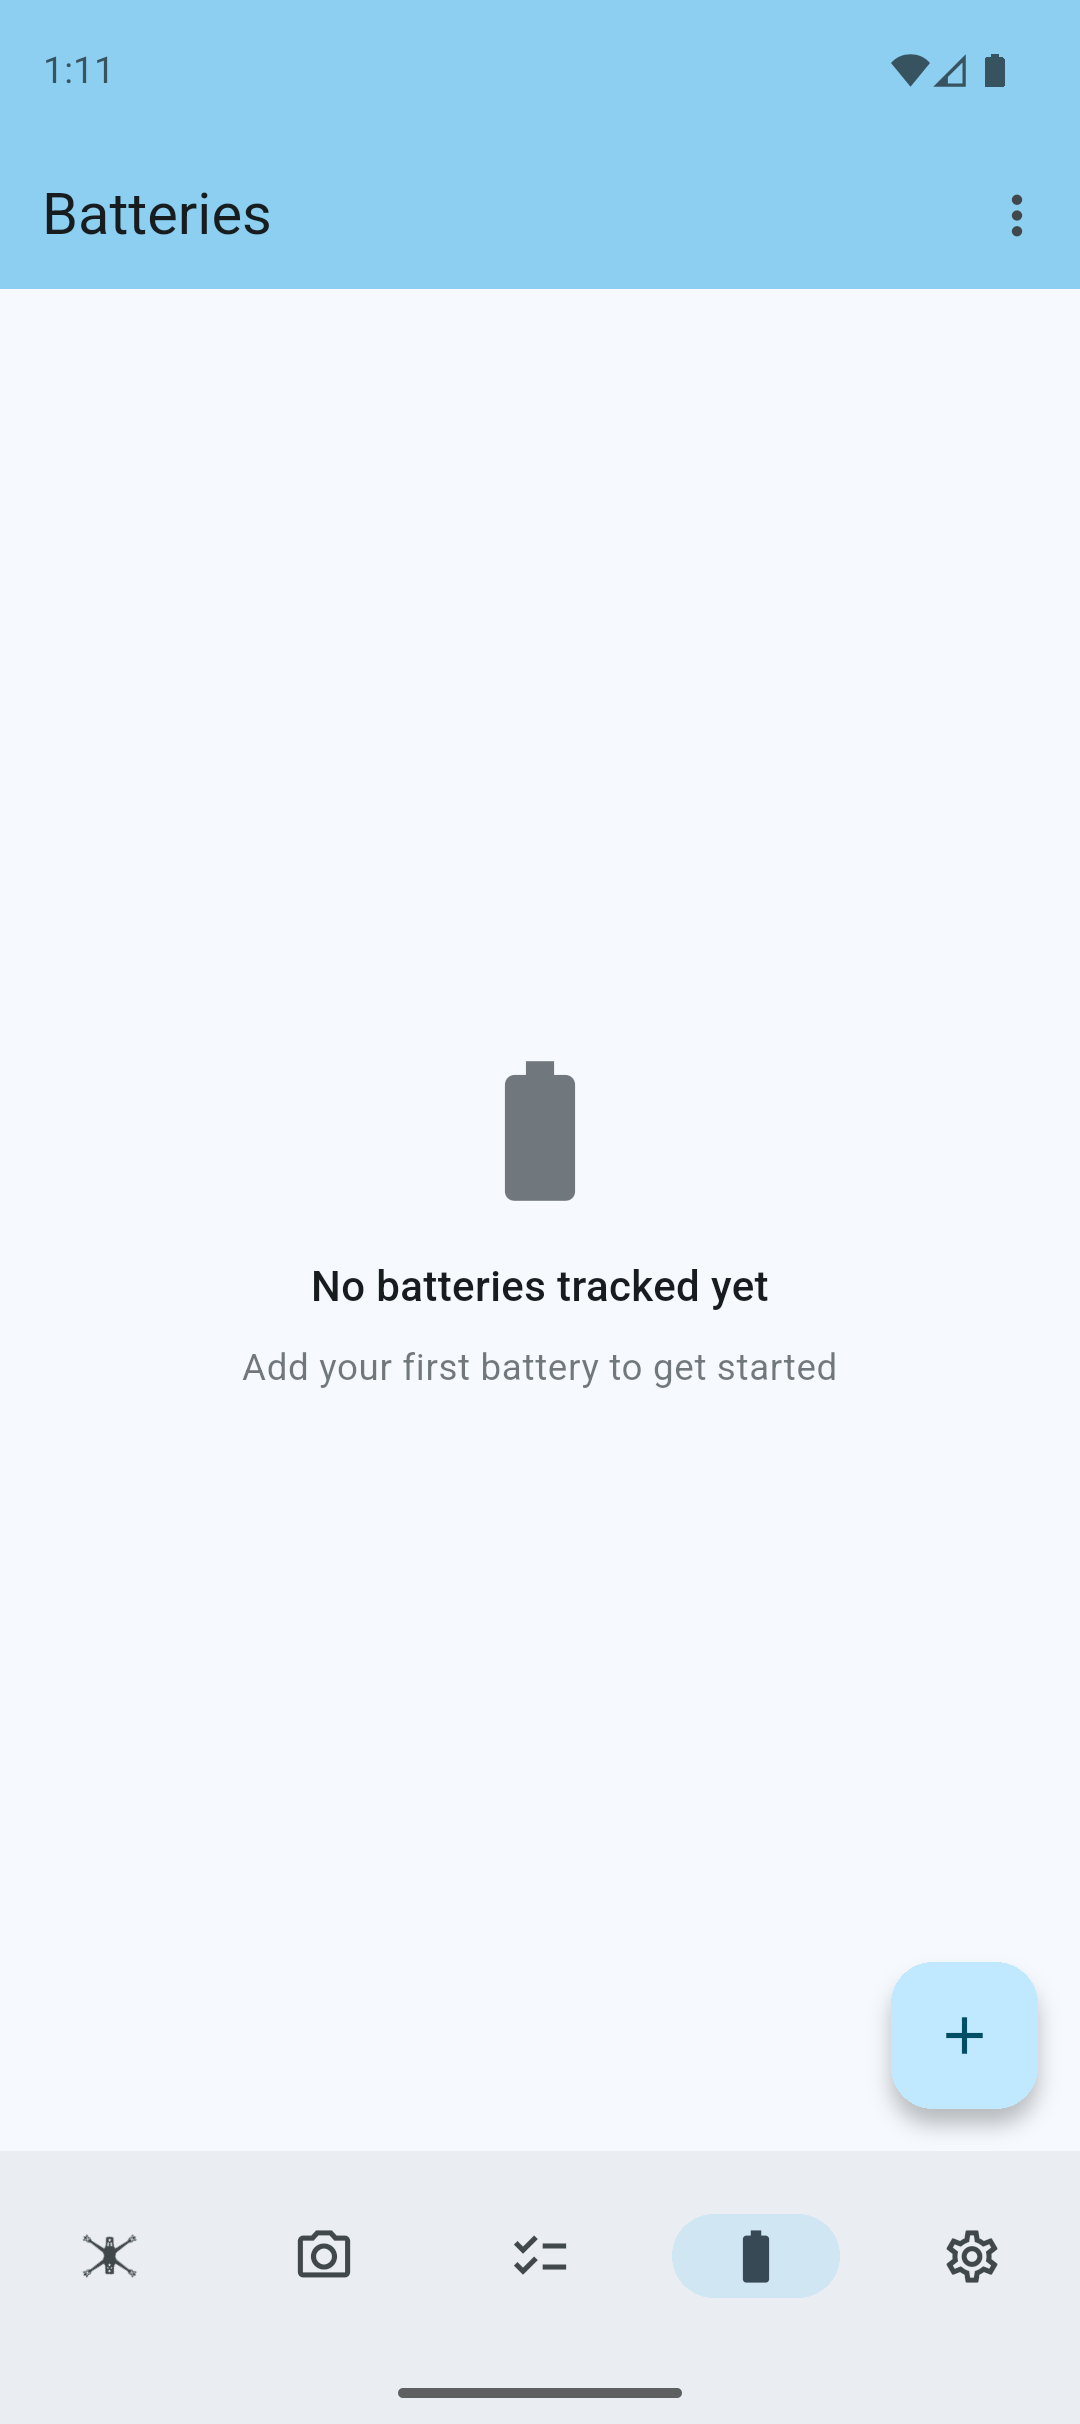
Battery Management Pro
Battery management allows you to monitor your battery age and track charging cycles. This feature is only available with a quadfixr Pro subscription.
Enable battery management by switching it on in the app's preferences.
Add A New Battery Pro
A new menu in the bottom navigation bar allows you to navigate to the battery management screen.
Note: If you have battery management and inventory management enabled, they will share the same menu, but will be separate tabs.
Tap on the + icon to add a new battery.
Fill out the details of your battery.
Tip: Give each of your batteries a unique nickname to easily identify them.
Note: If cost tracking is enabled, you can also enter the price of the battery.

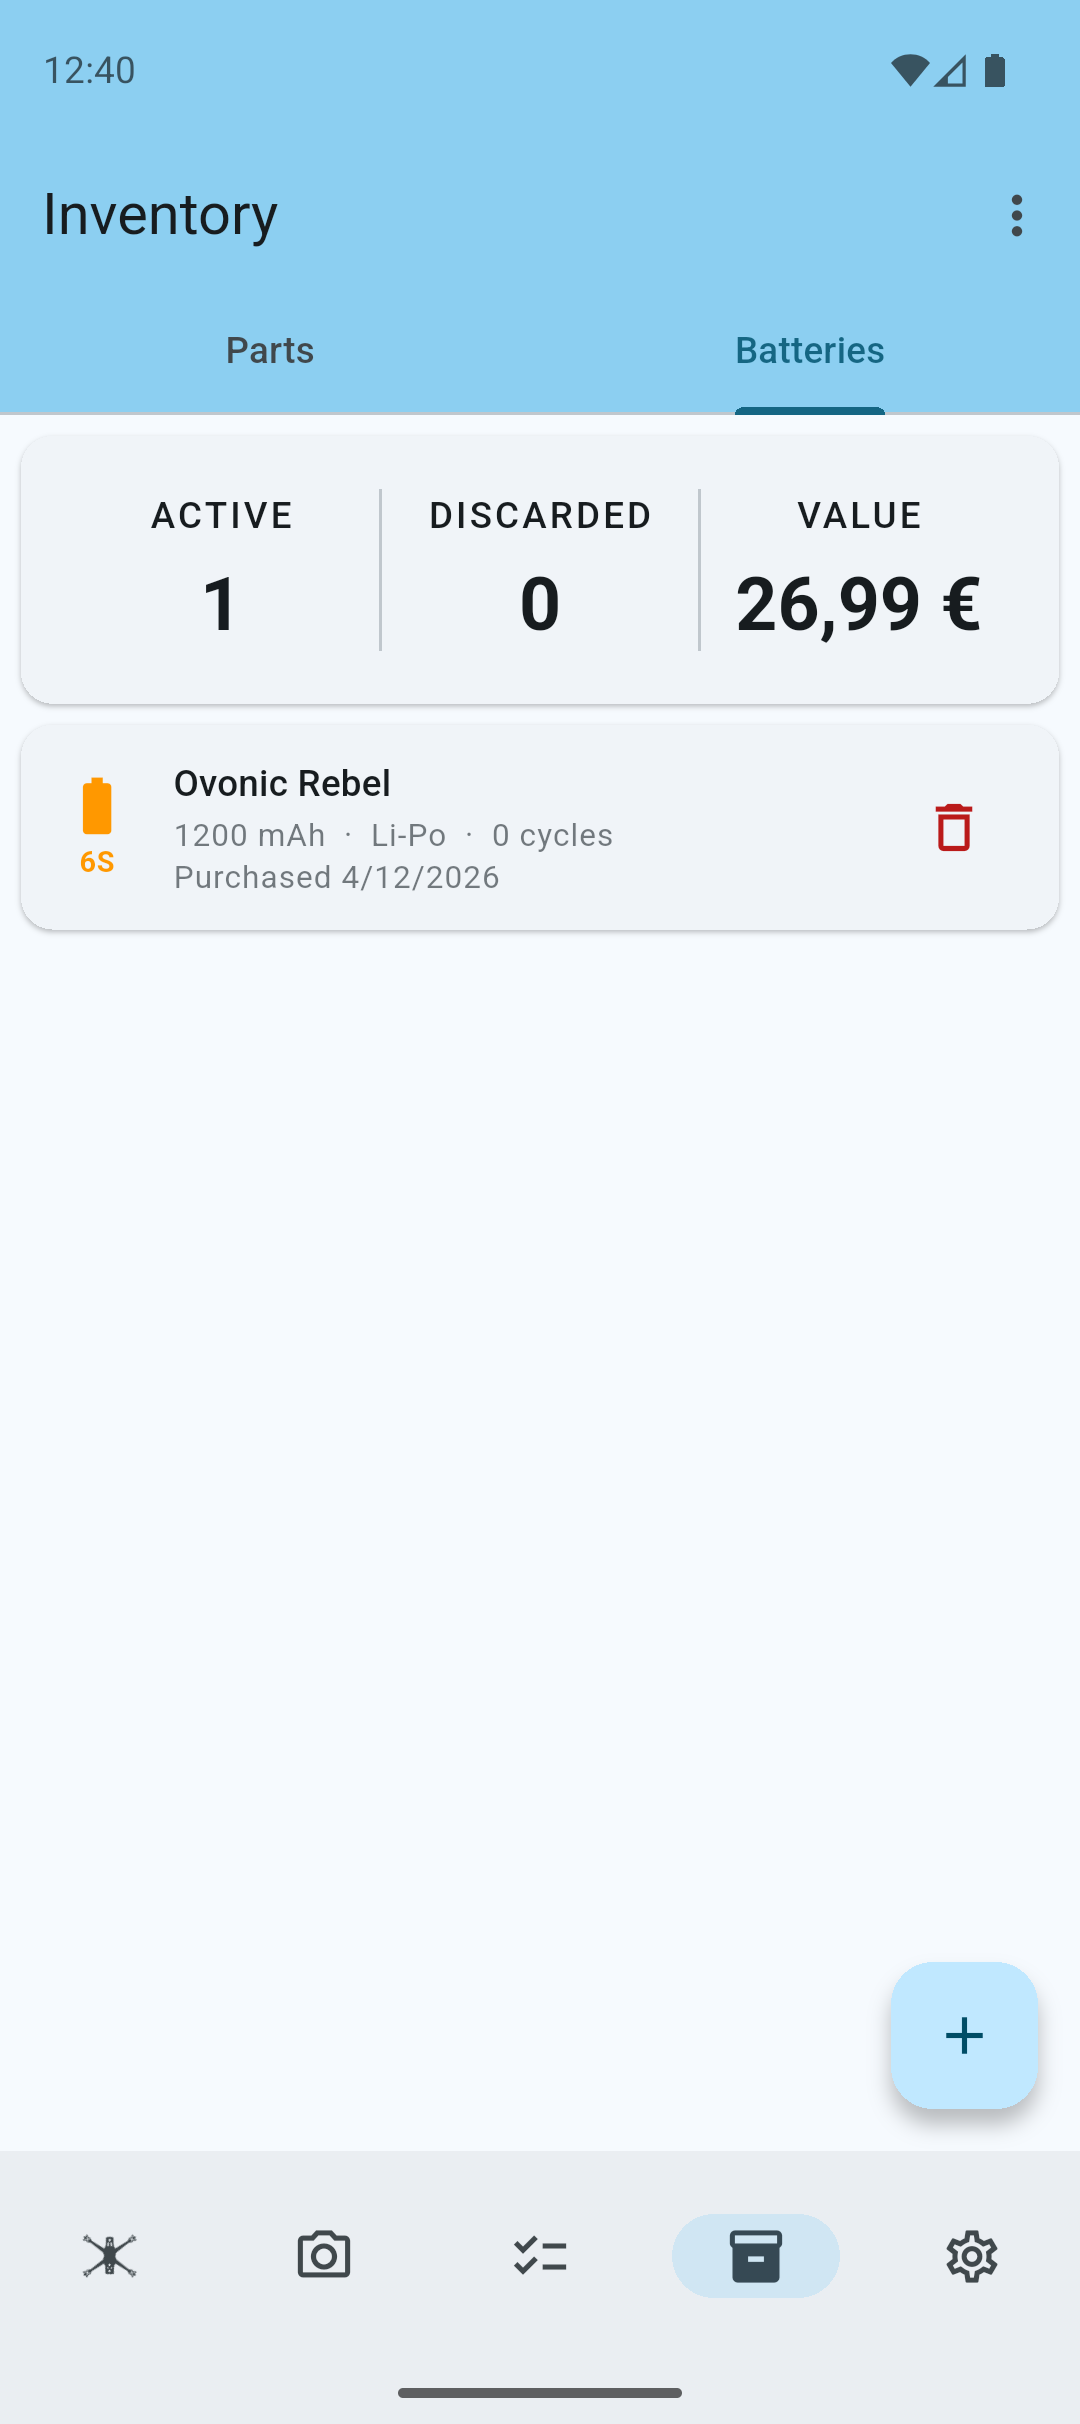
Battery Details Pro
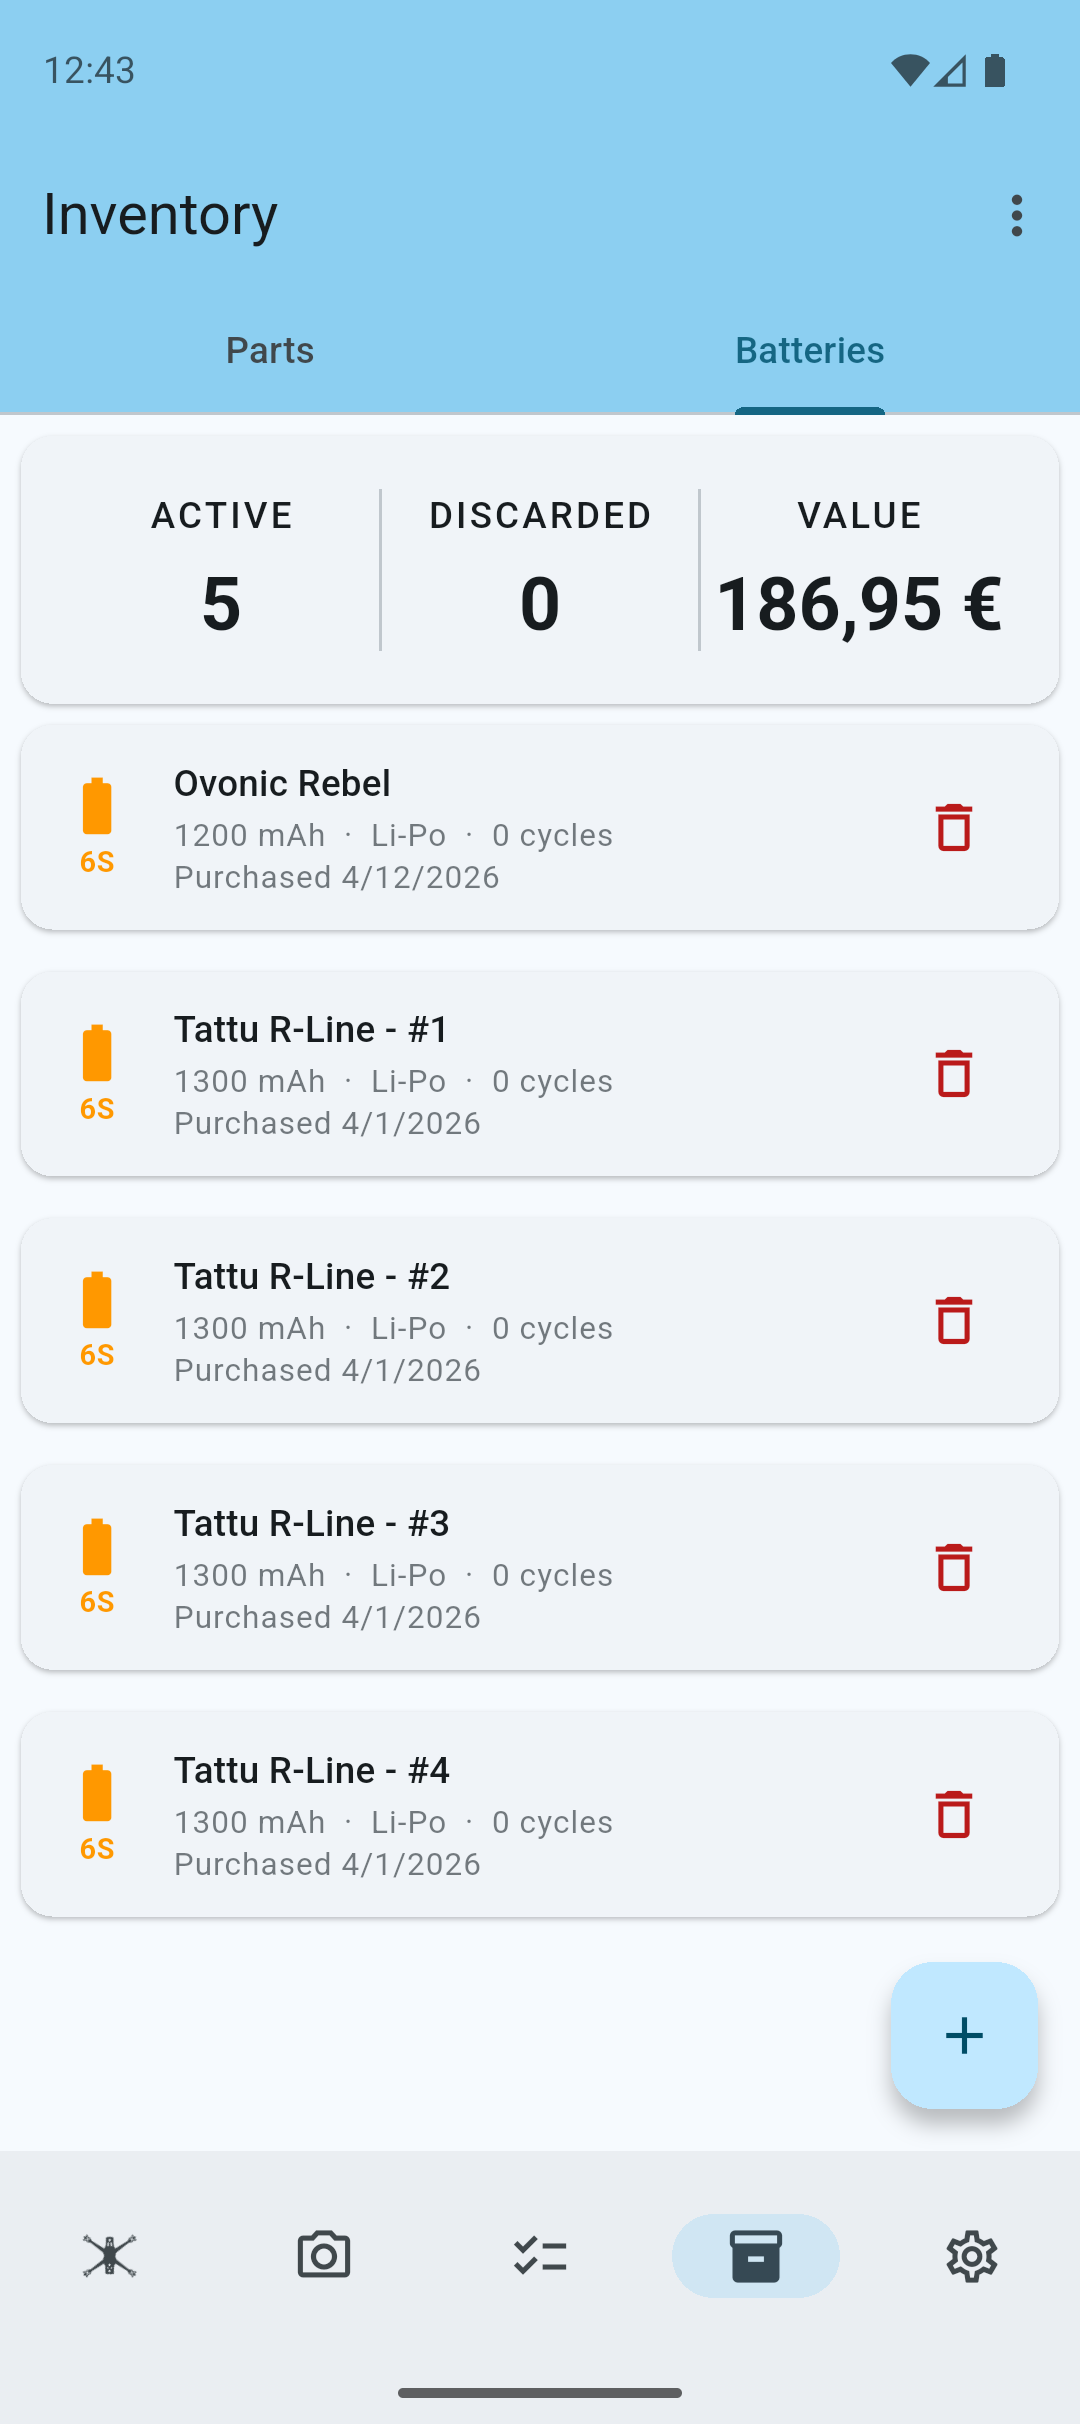
You can now see the newly created pack and see a small statistics section at the top of the list.
Note: You will only see the value in the statistics, if you have cost tracking enabled.
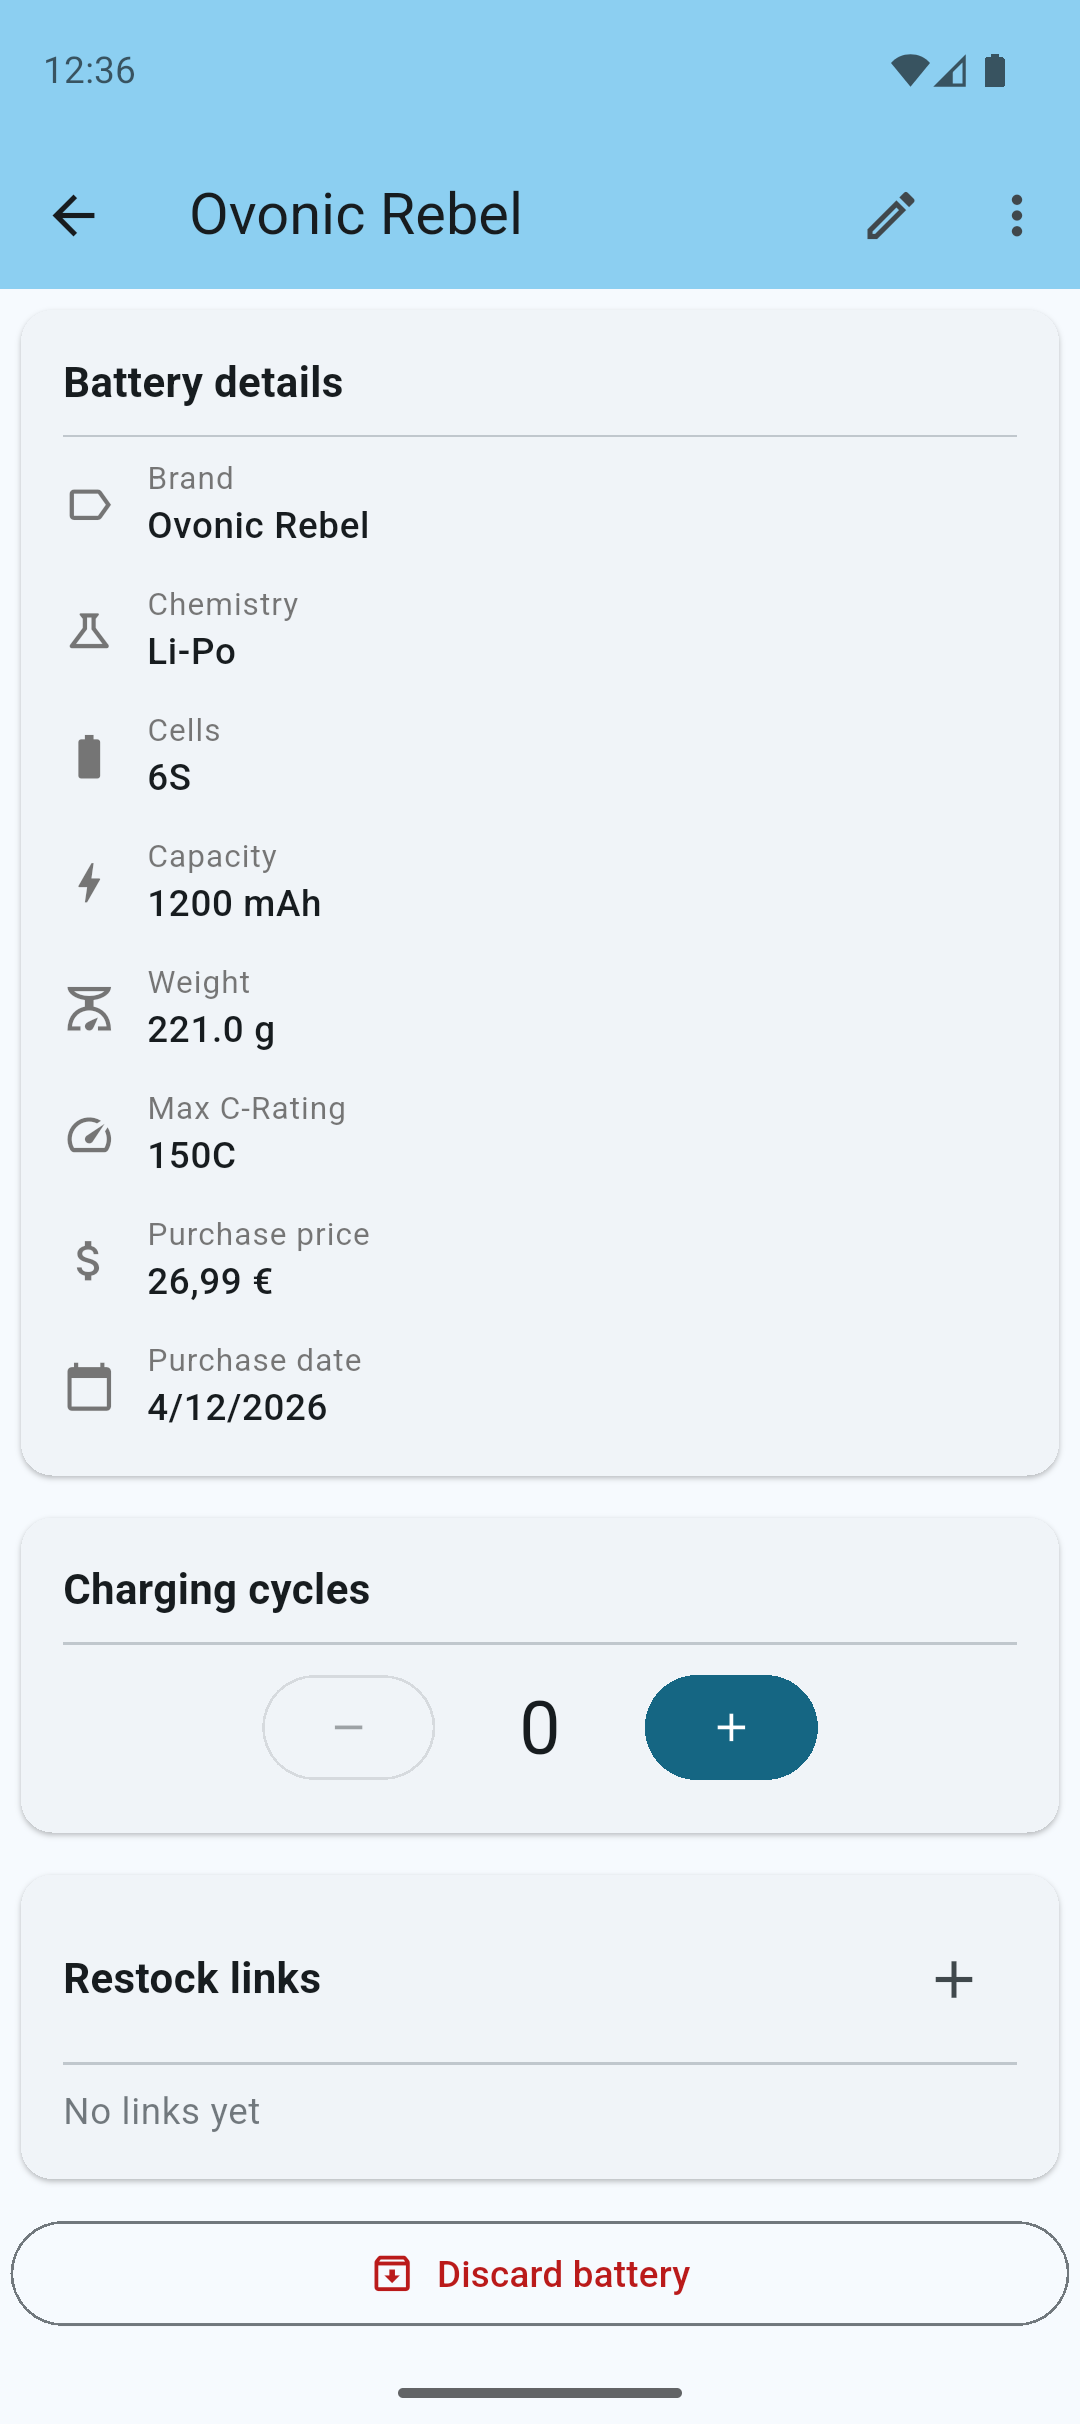
Tap on a battery to view its details.
You can now see the details of the selected battery.
Tap the Pen icon to edit the battery details.
Use the + and - buttons under the Charging Cycles to add or remove charging cycles from the battery.
Add Restock Links to quickly reorder the same batteries.
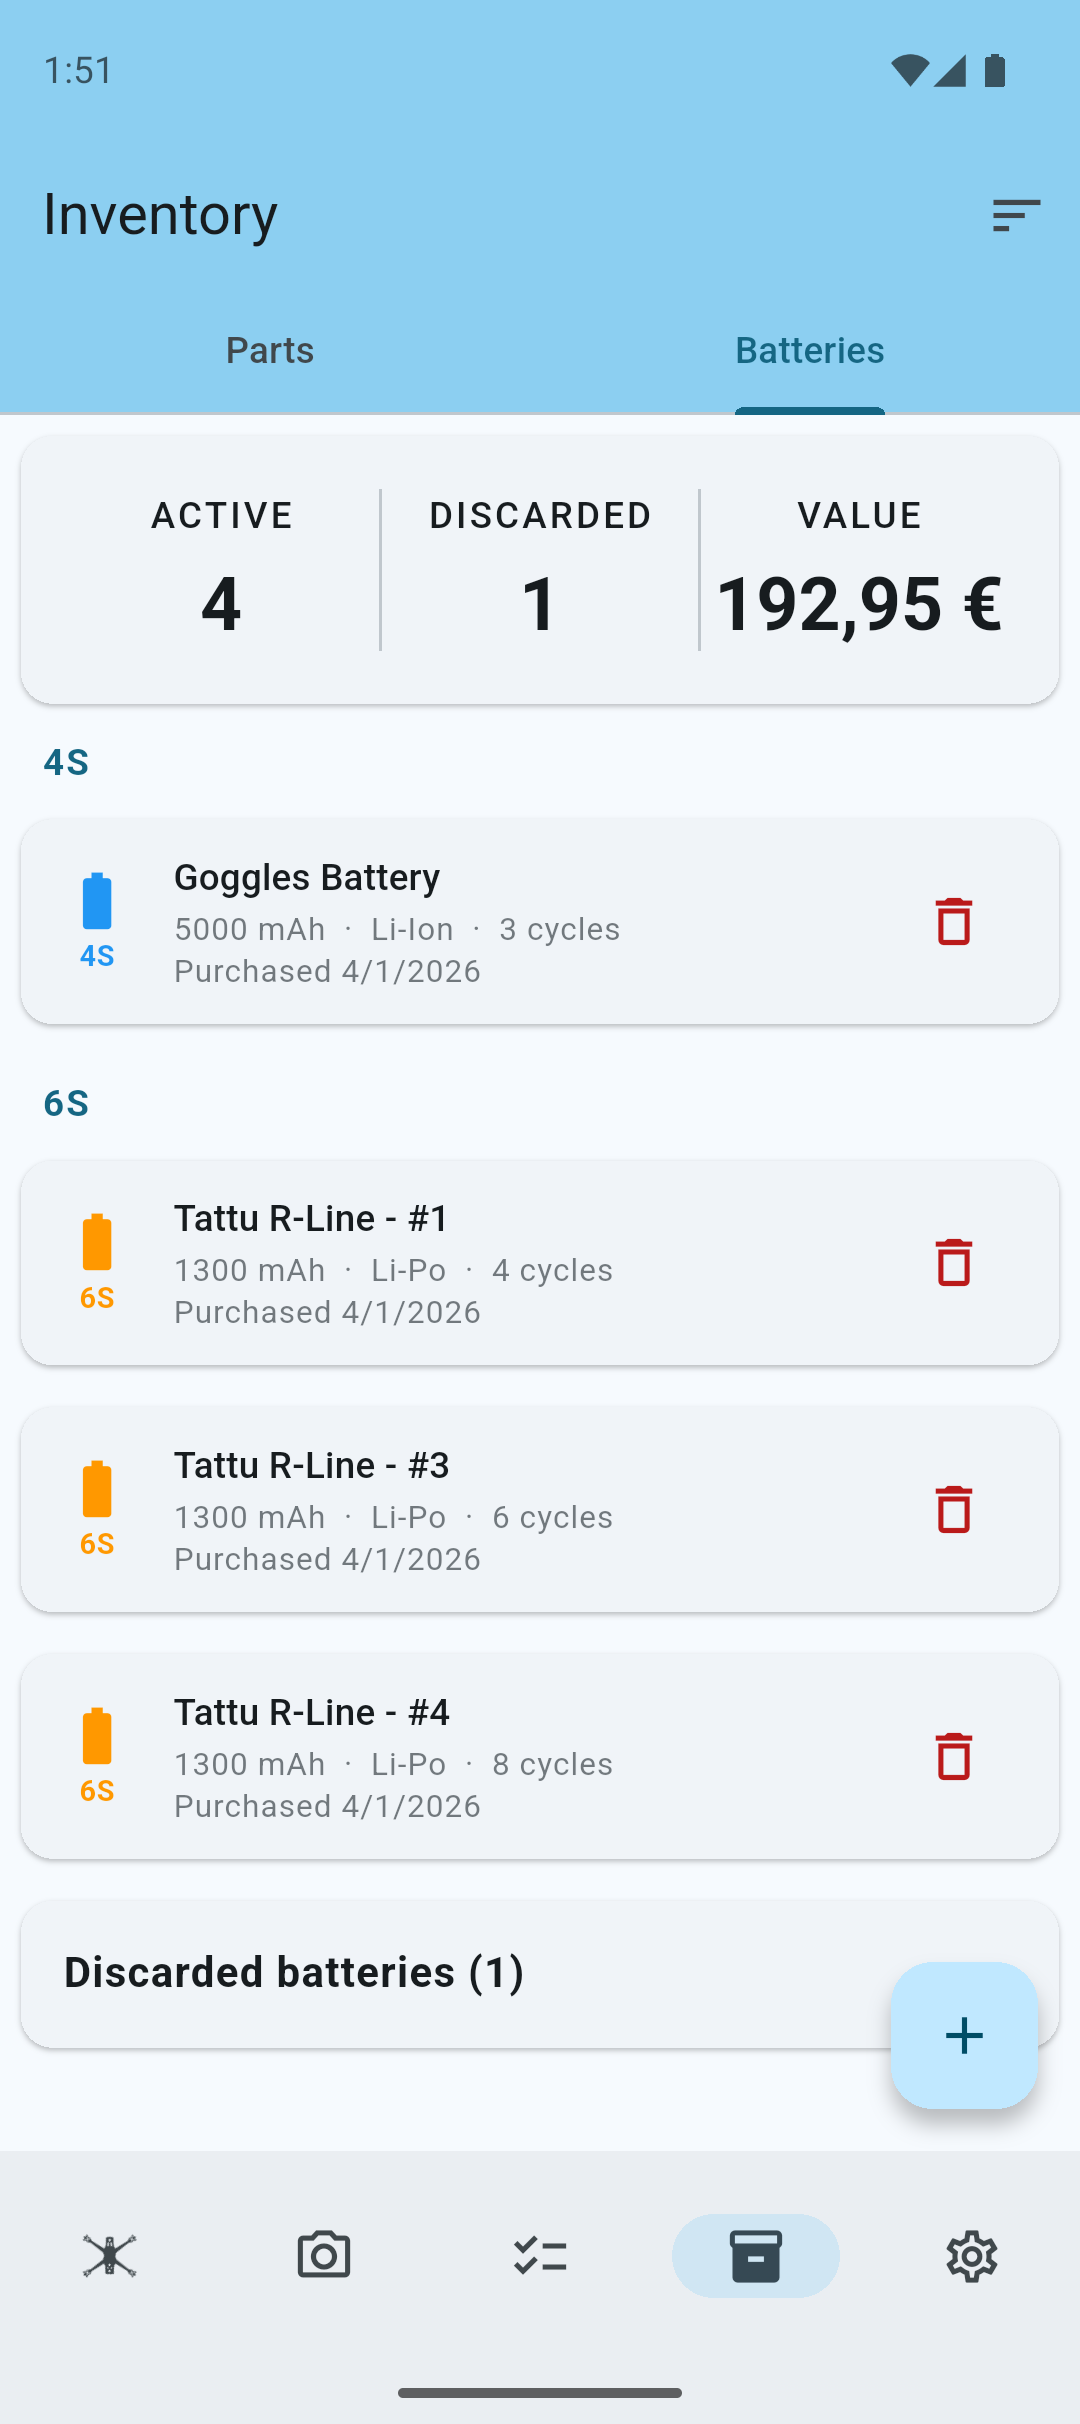
Tap the Discard battery button to discard a battery.
Discarded batteries are shown in the list under a separate section.
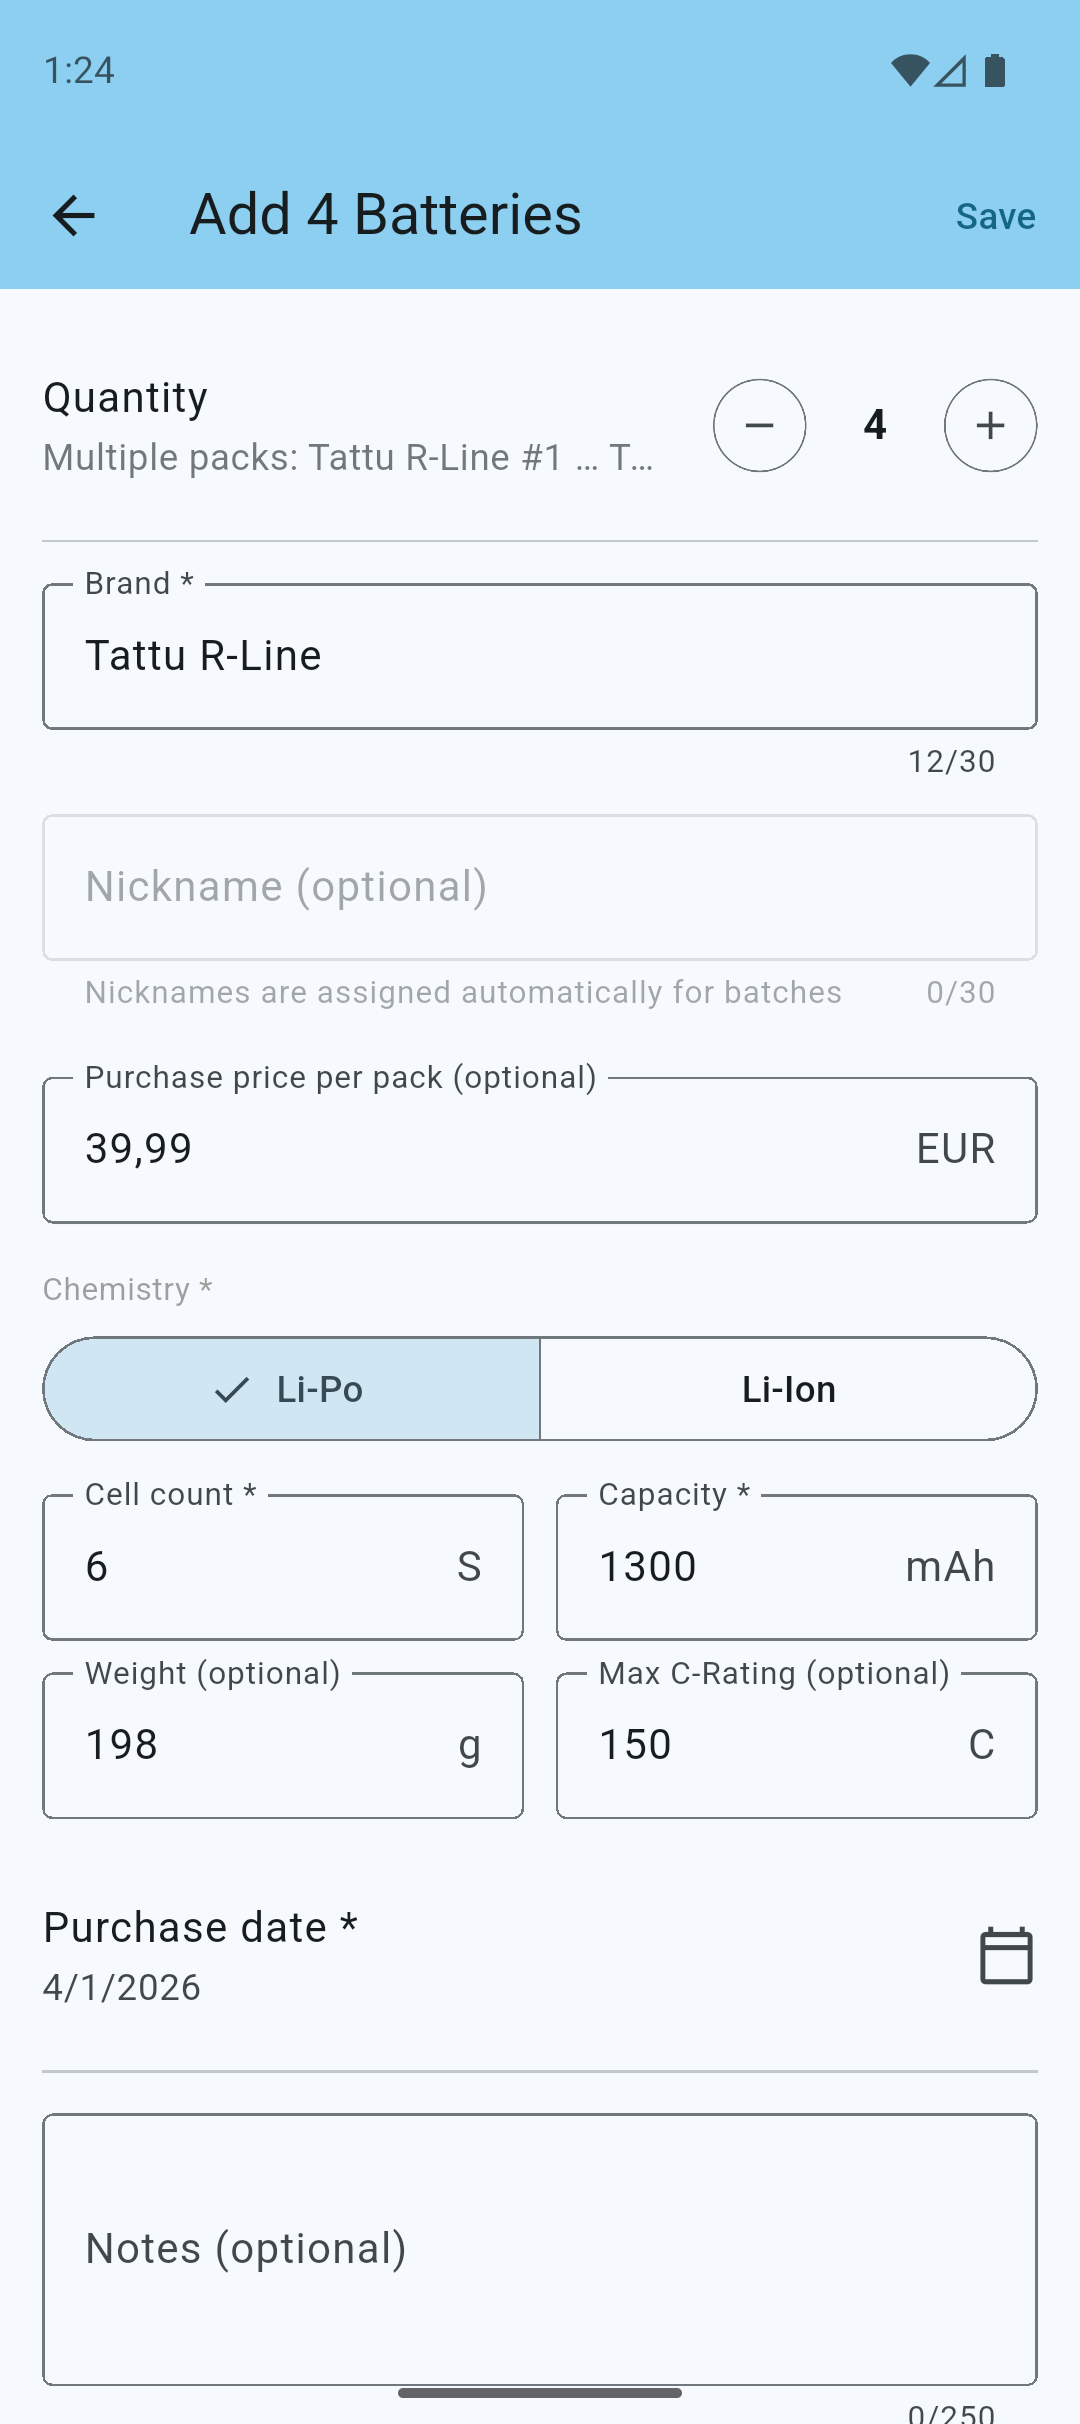
Add Multiple Batteries Pro
When you create a new battery, you can also add multiple batteries from the same brand and type at once.
Simply change the quantity to the desired number of batteries.
Note: The batteries' nicknames will be automatically generated based on the quantity. For example: 4 new batteries will be named "#1", "#2", "#3", and "#4".
You can now see the newly created set of batteries and their automatically generated nicknames.
Battery Grouping Pro
Battery grouping allows you to organize your batteries into type or cell count.
To enable battery grouping, tap the button on the top navigation bar to access the sorting and grouping options.
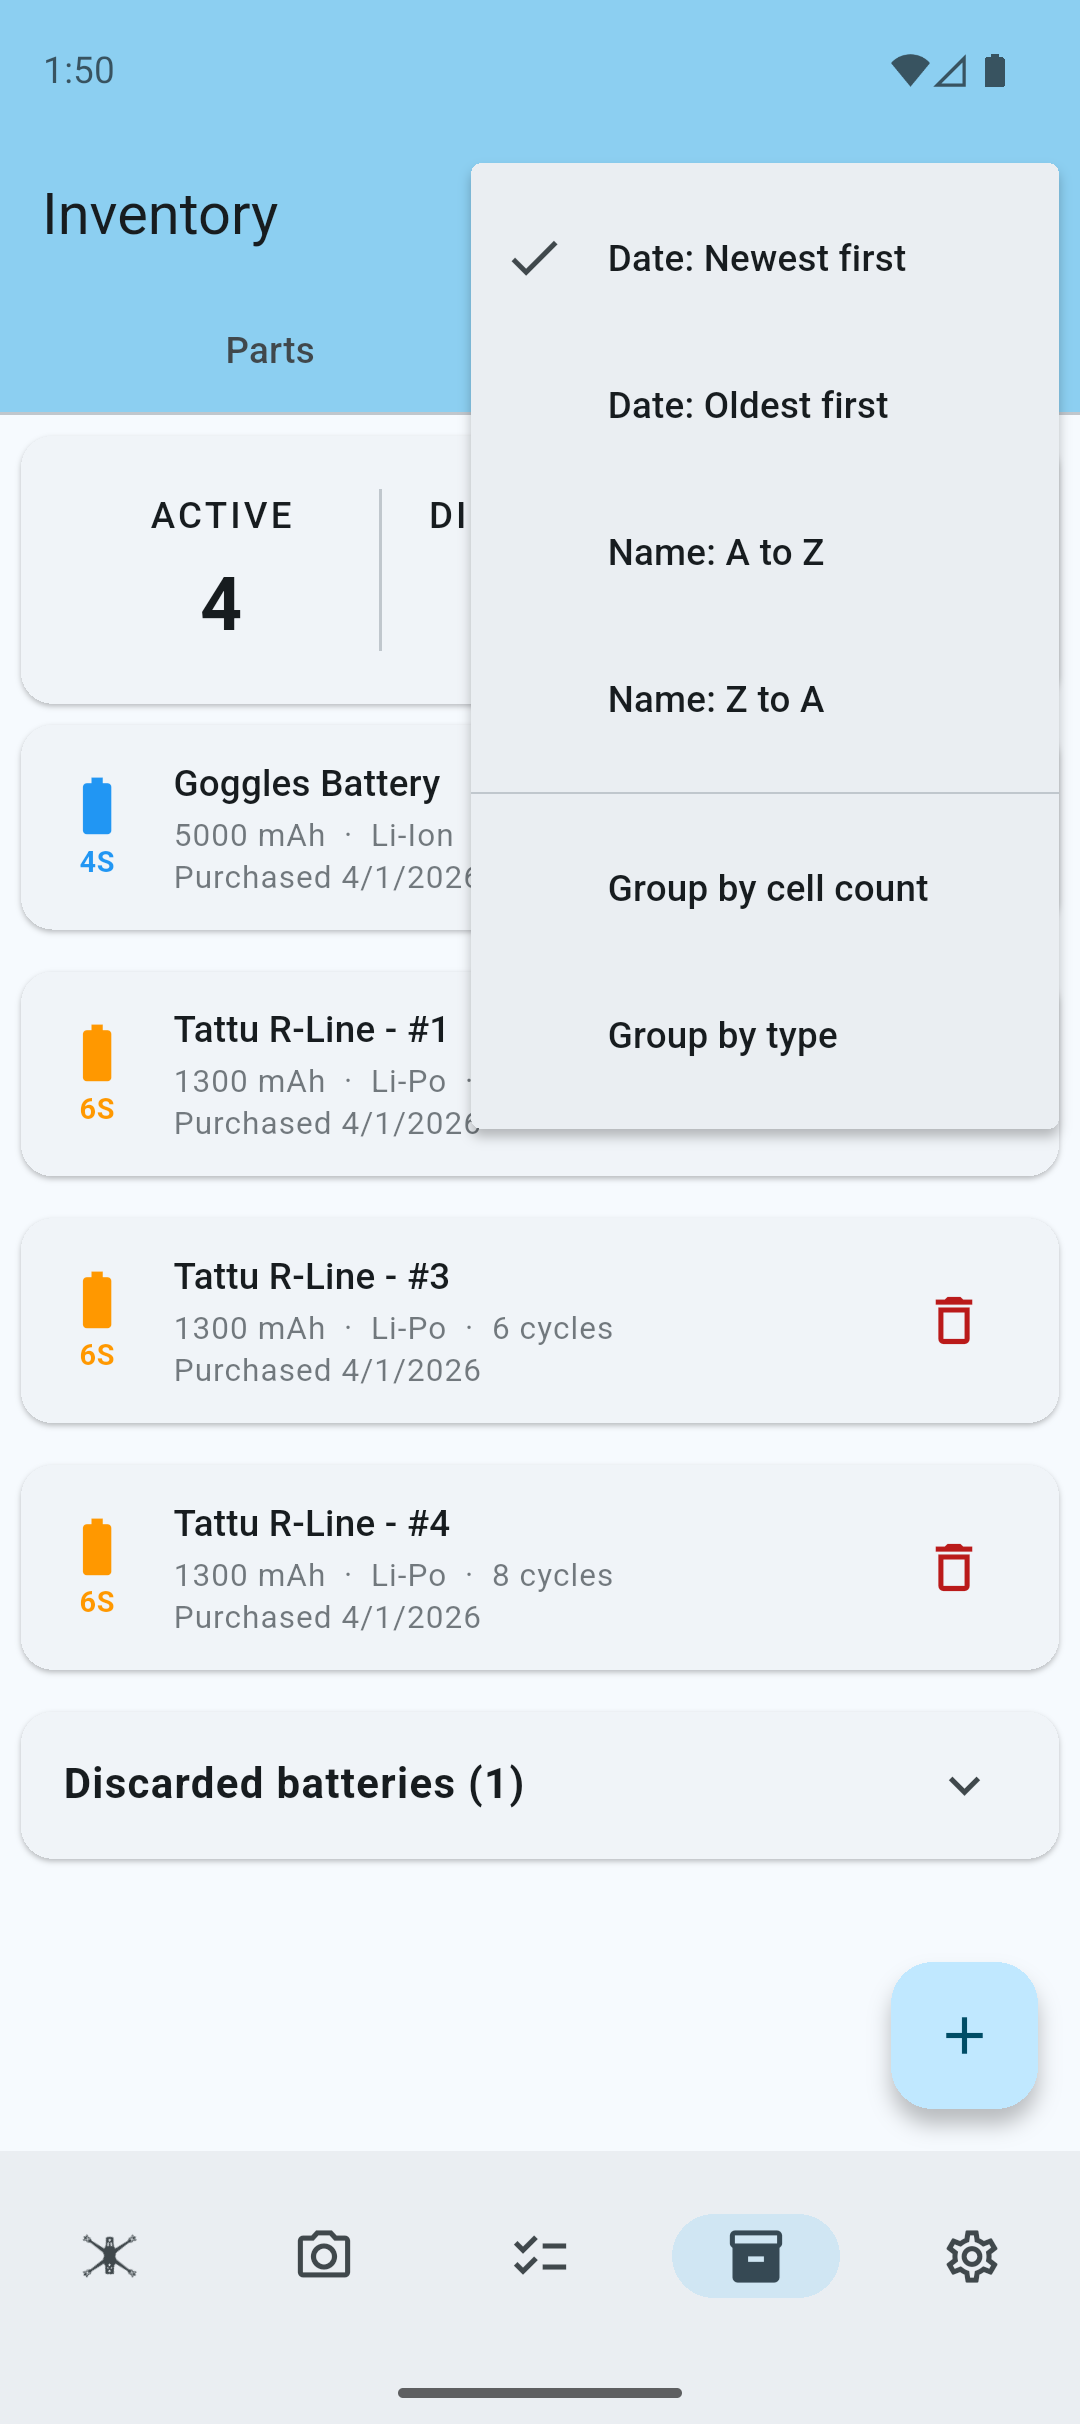
Batteries grouped by type.

Batteries grouped by cell count.
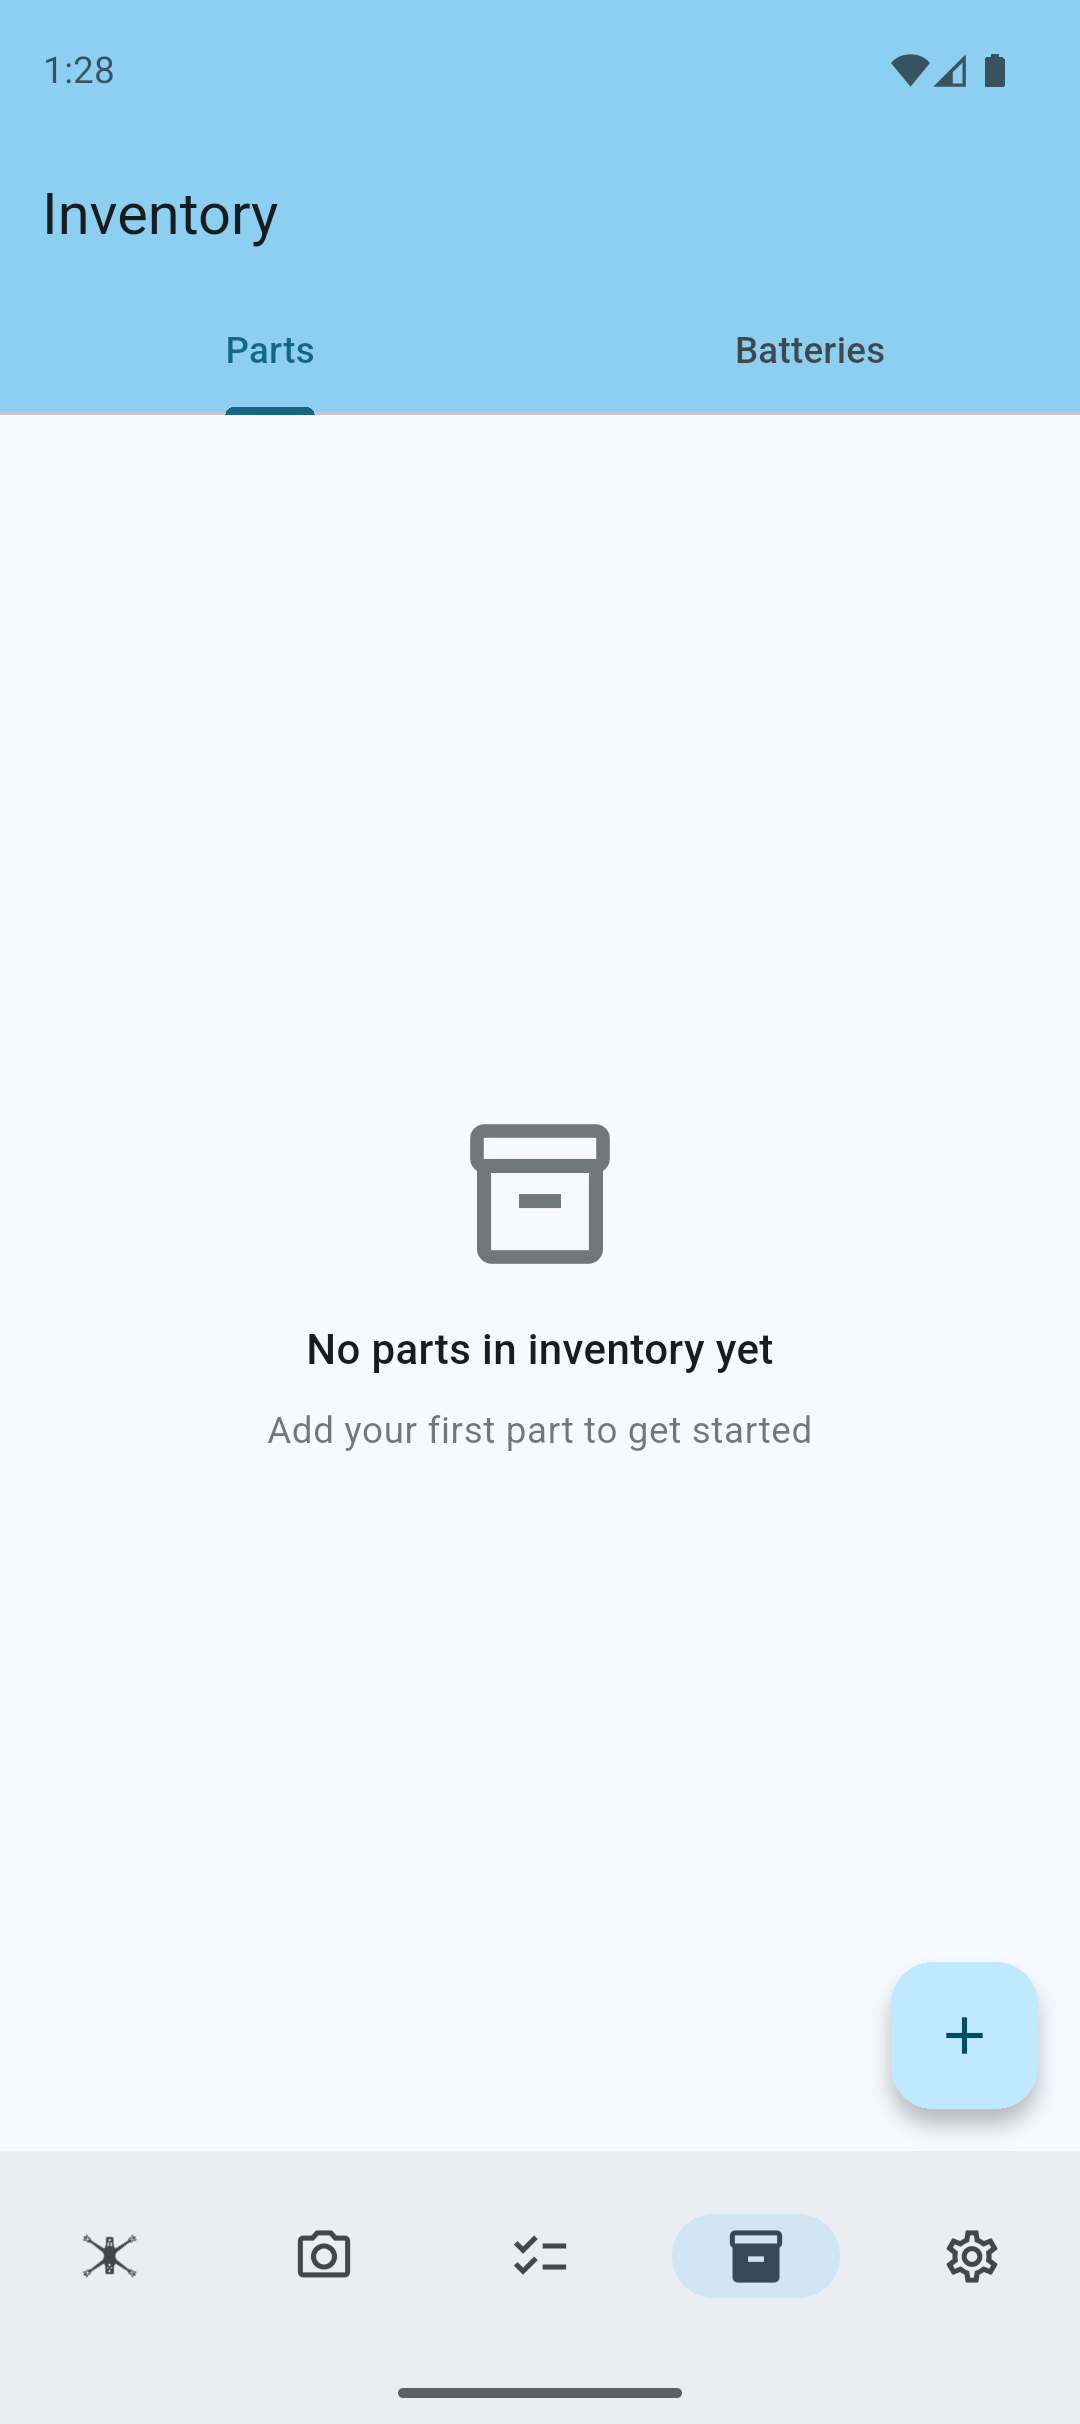
Inventory Management Pro
Inventory management allows you to keep track of your stock. This feature is only available with a quadfixr Pro subscription.
Enable inventory management by switching it on in the app's preferences.
Add Inventory For Parts Pro
A new menu in the bottom navigation bar allows you to navigate to the inventory management screen.
Note: If you have battery management and inventory management enabled, they will share the same menu, but will be separate tabs.
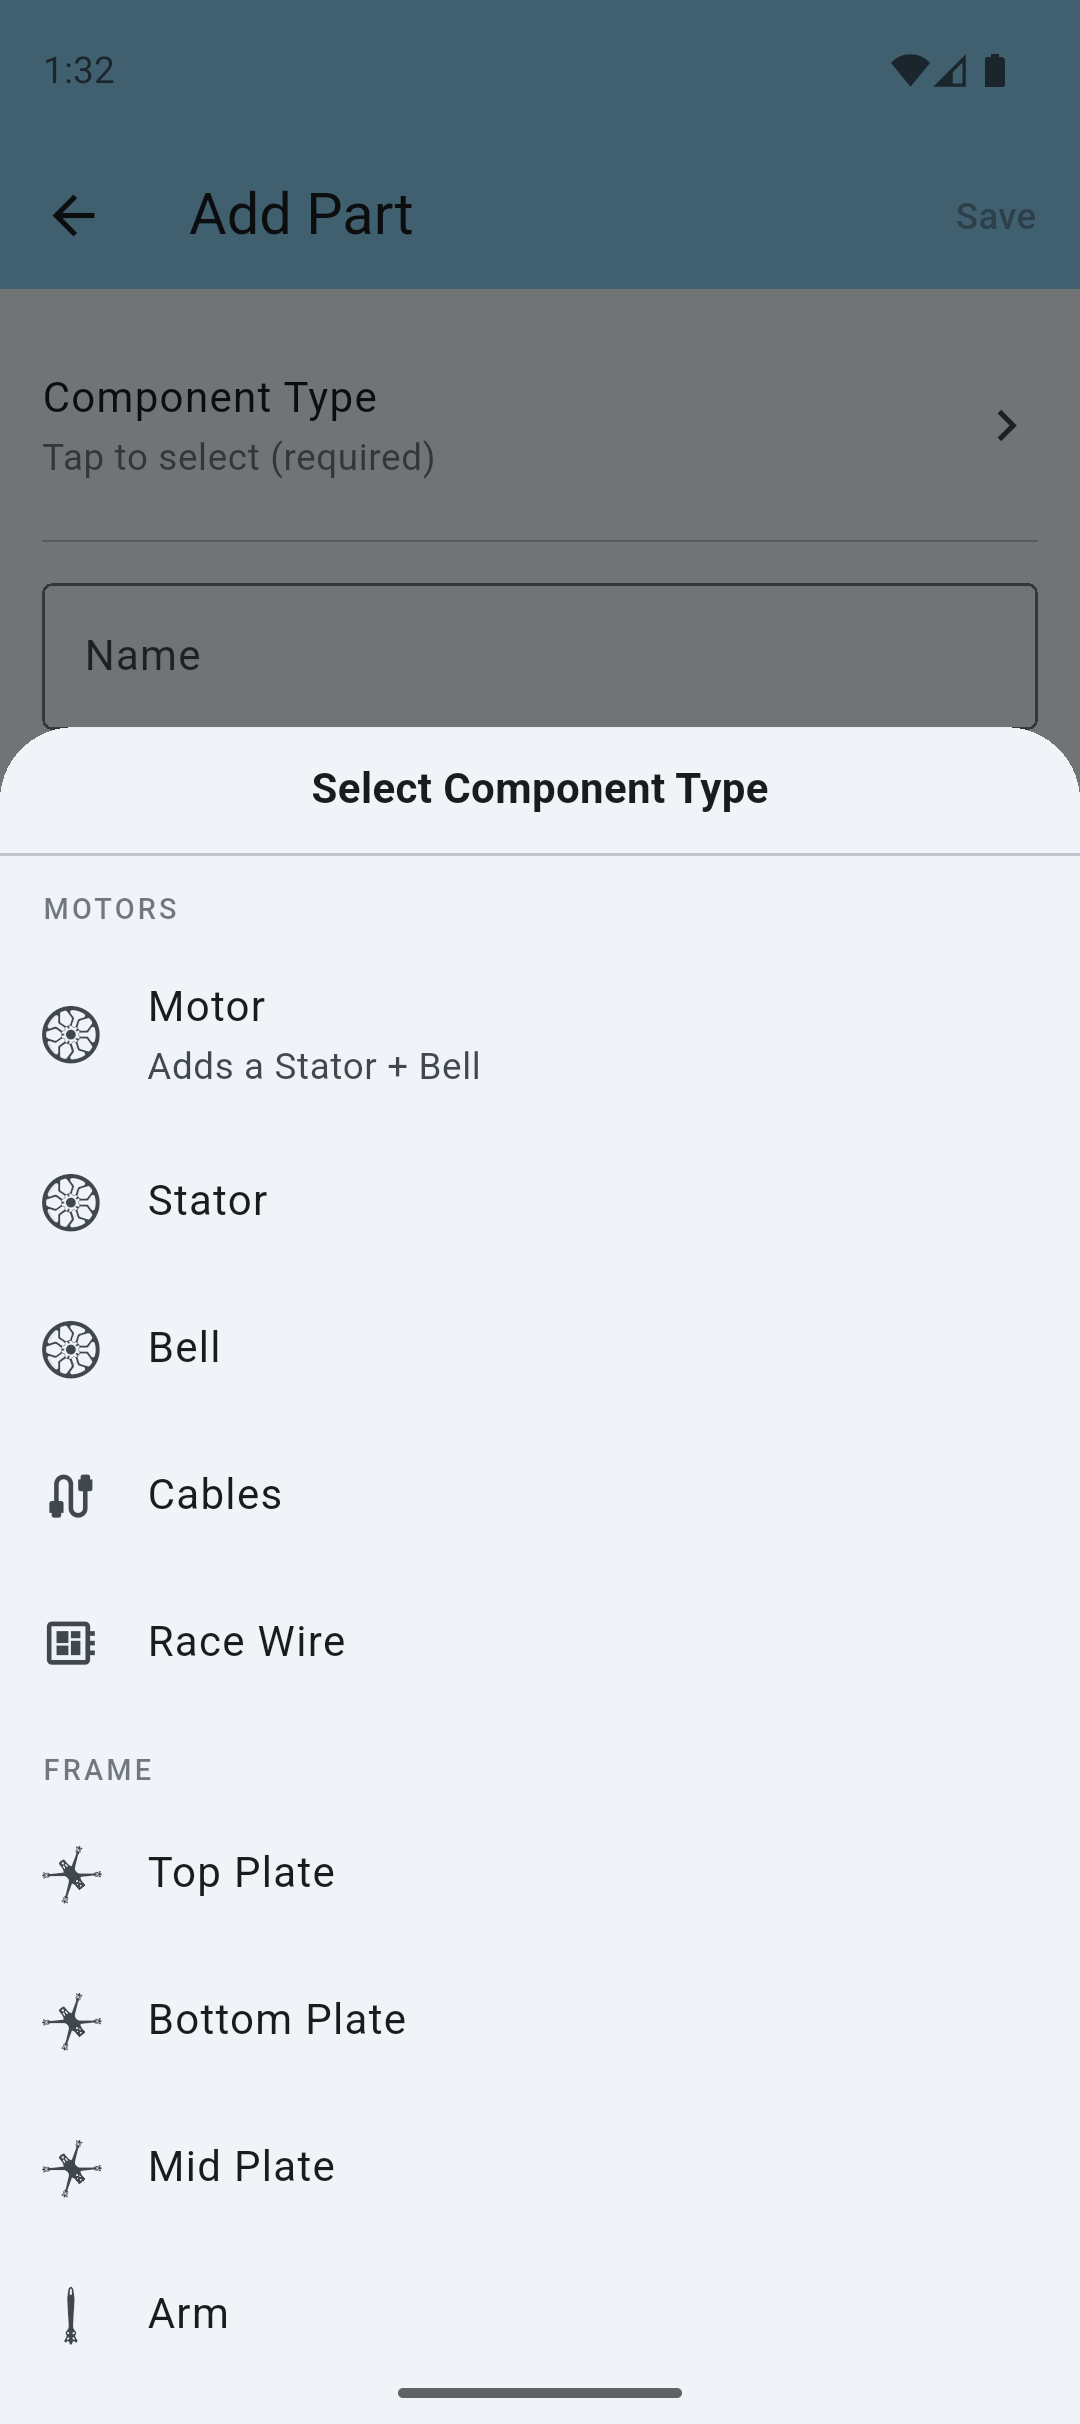
Tap on the + icon to add a new part to your inventory.
Fill out the details of your inventory item.
Select a component type from the list of component types. These reflect all the parts you can have on any of your quads.
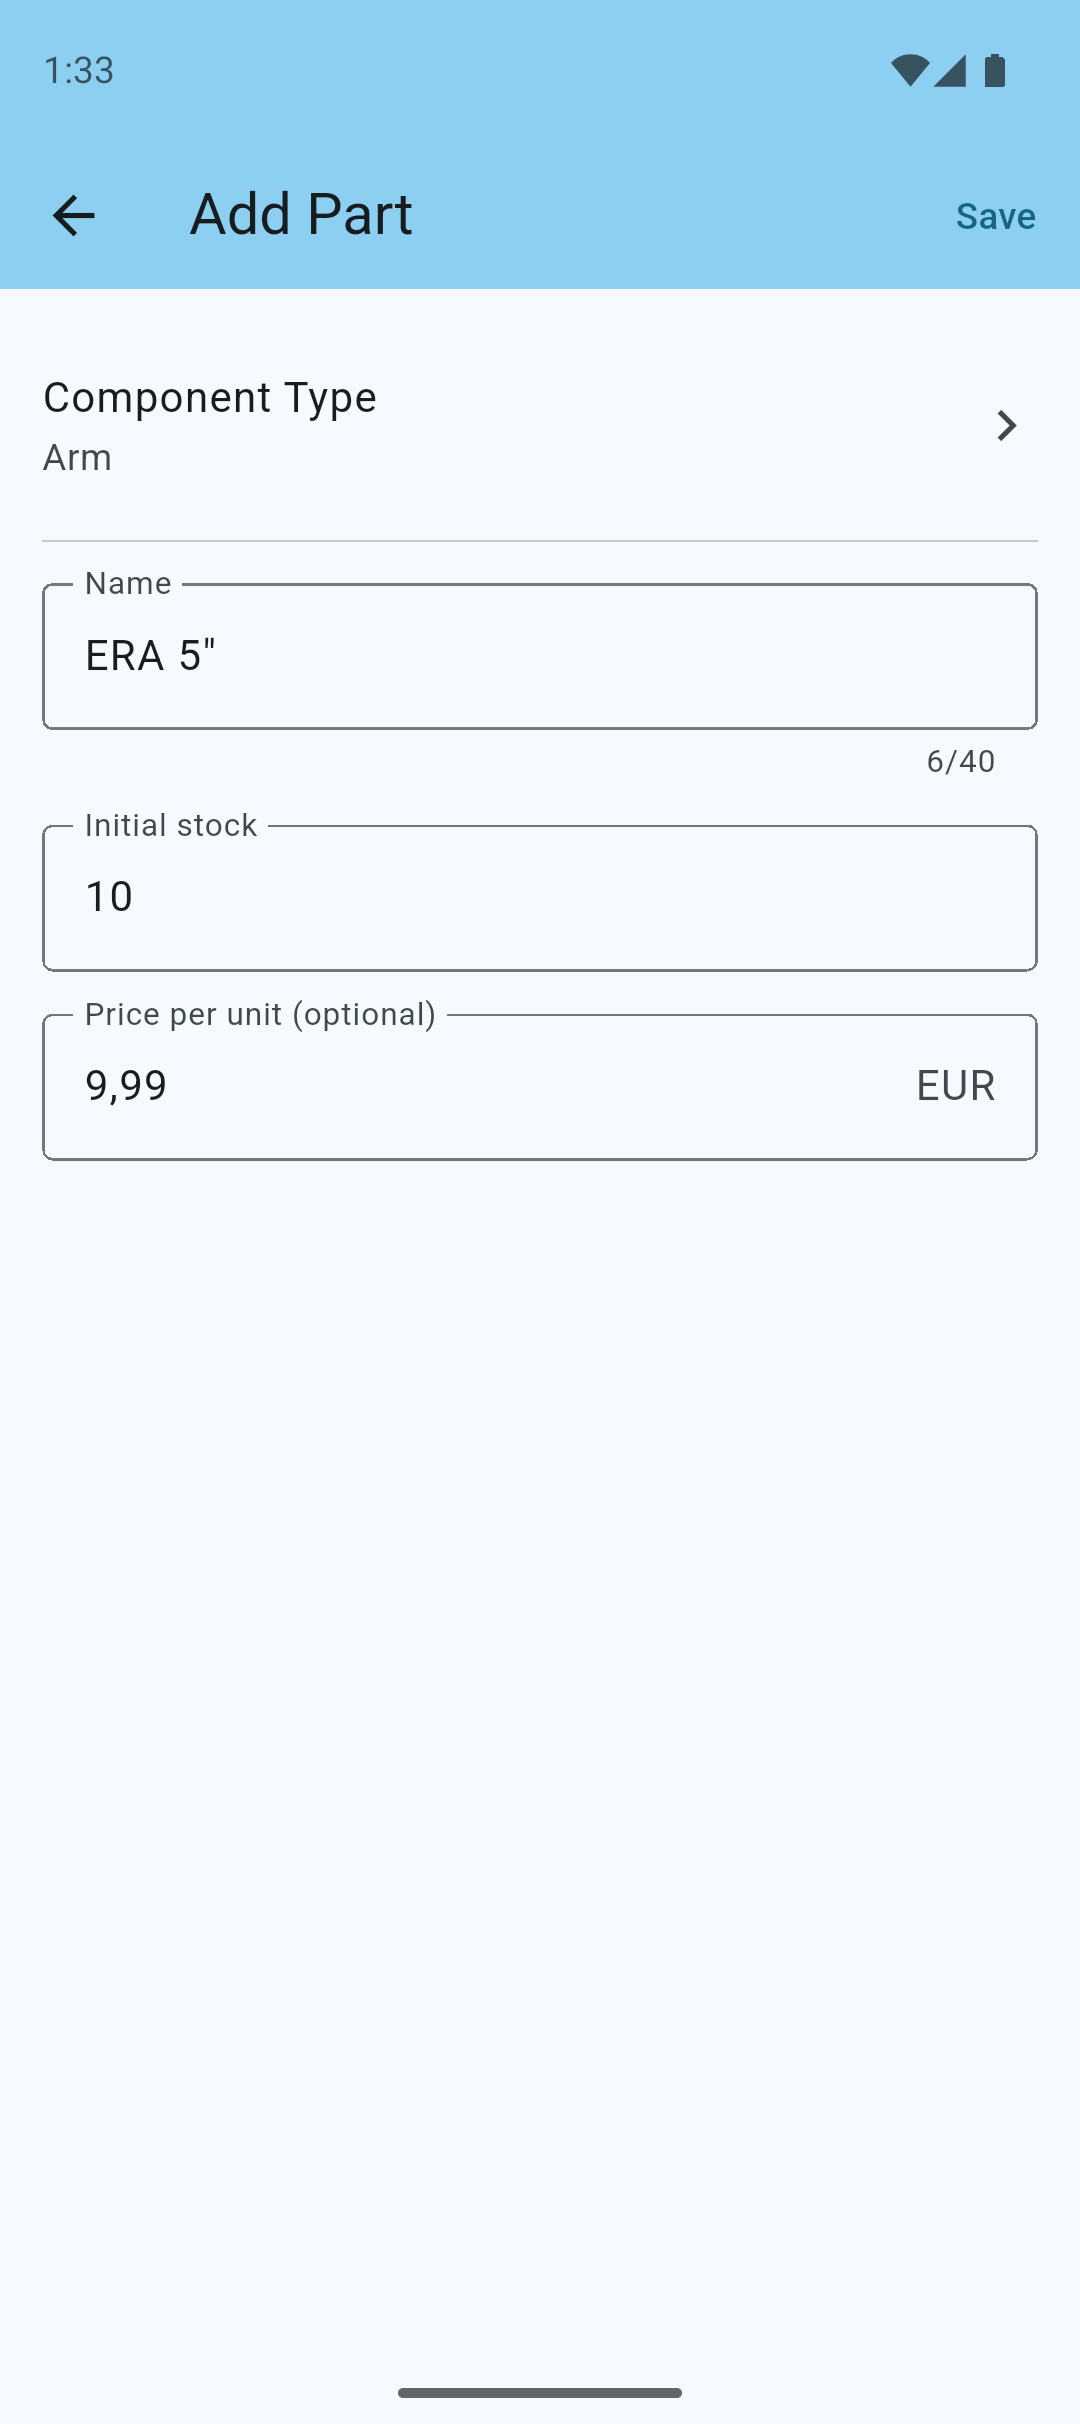
Enter a name and the initial stock.
Note: If cost tracking is enabled, you can also enter the price of the part.
When you're done, tap Save to add the part to your inventory.
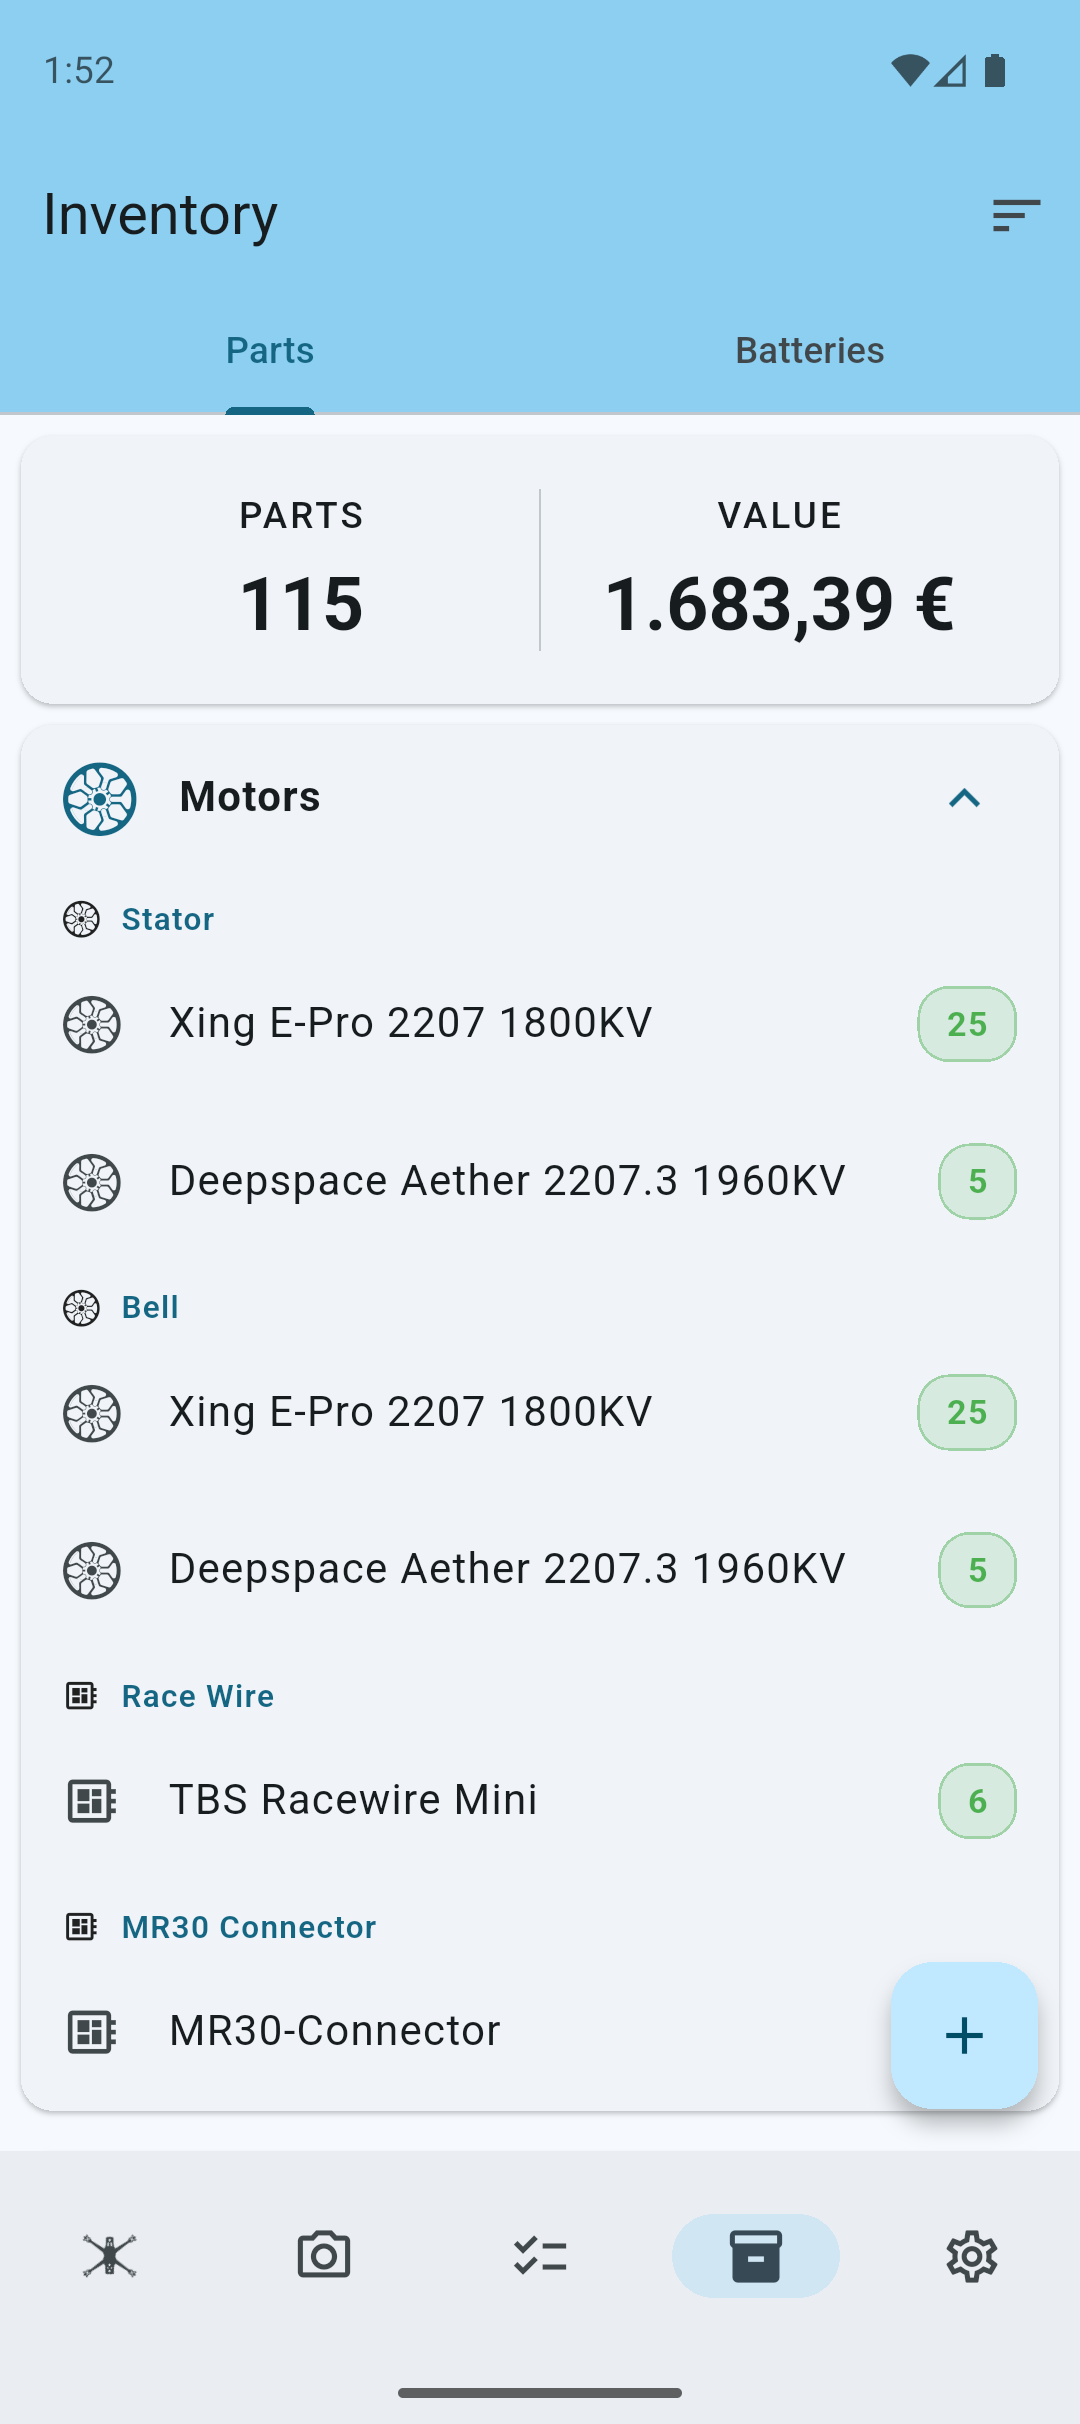
Inventory Overview Pro
You can now see the newly created part and its stock level, and see a small statistics section at the top of the list.
Note: You will only see the value in the statistics, if you have cost tracking enabled.
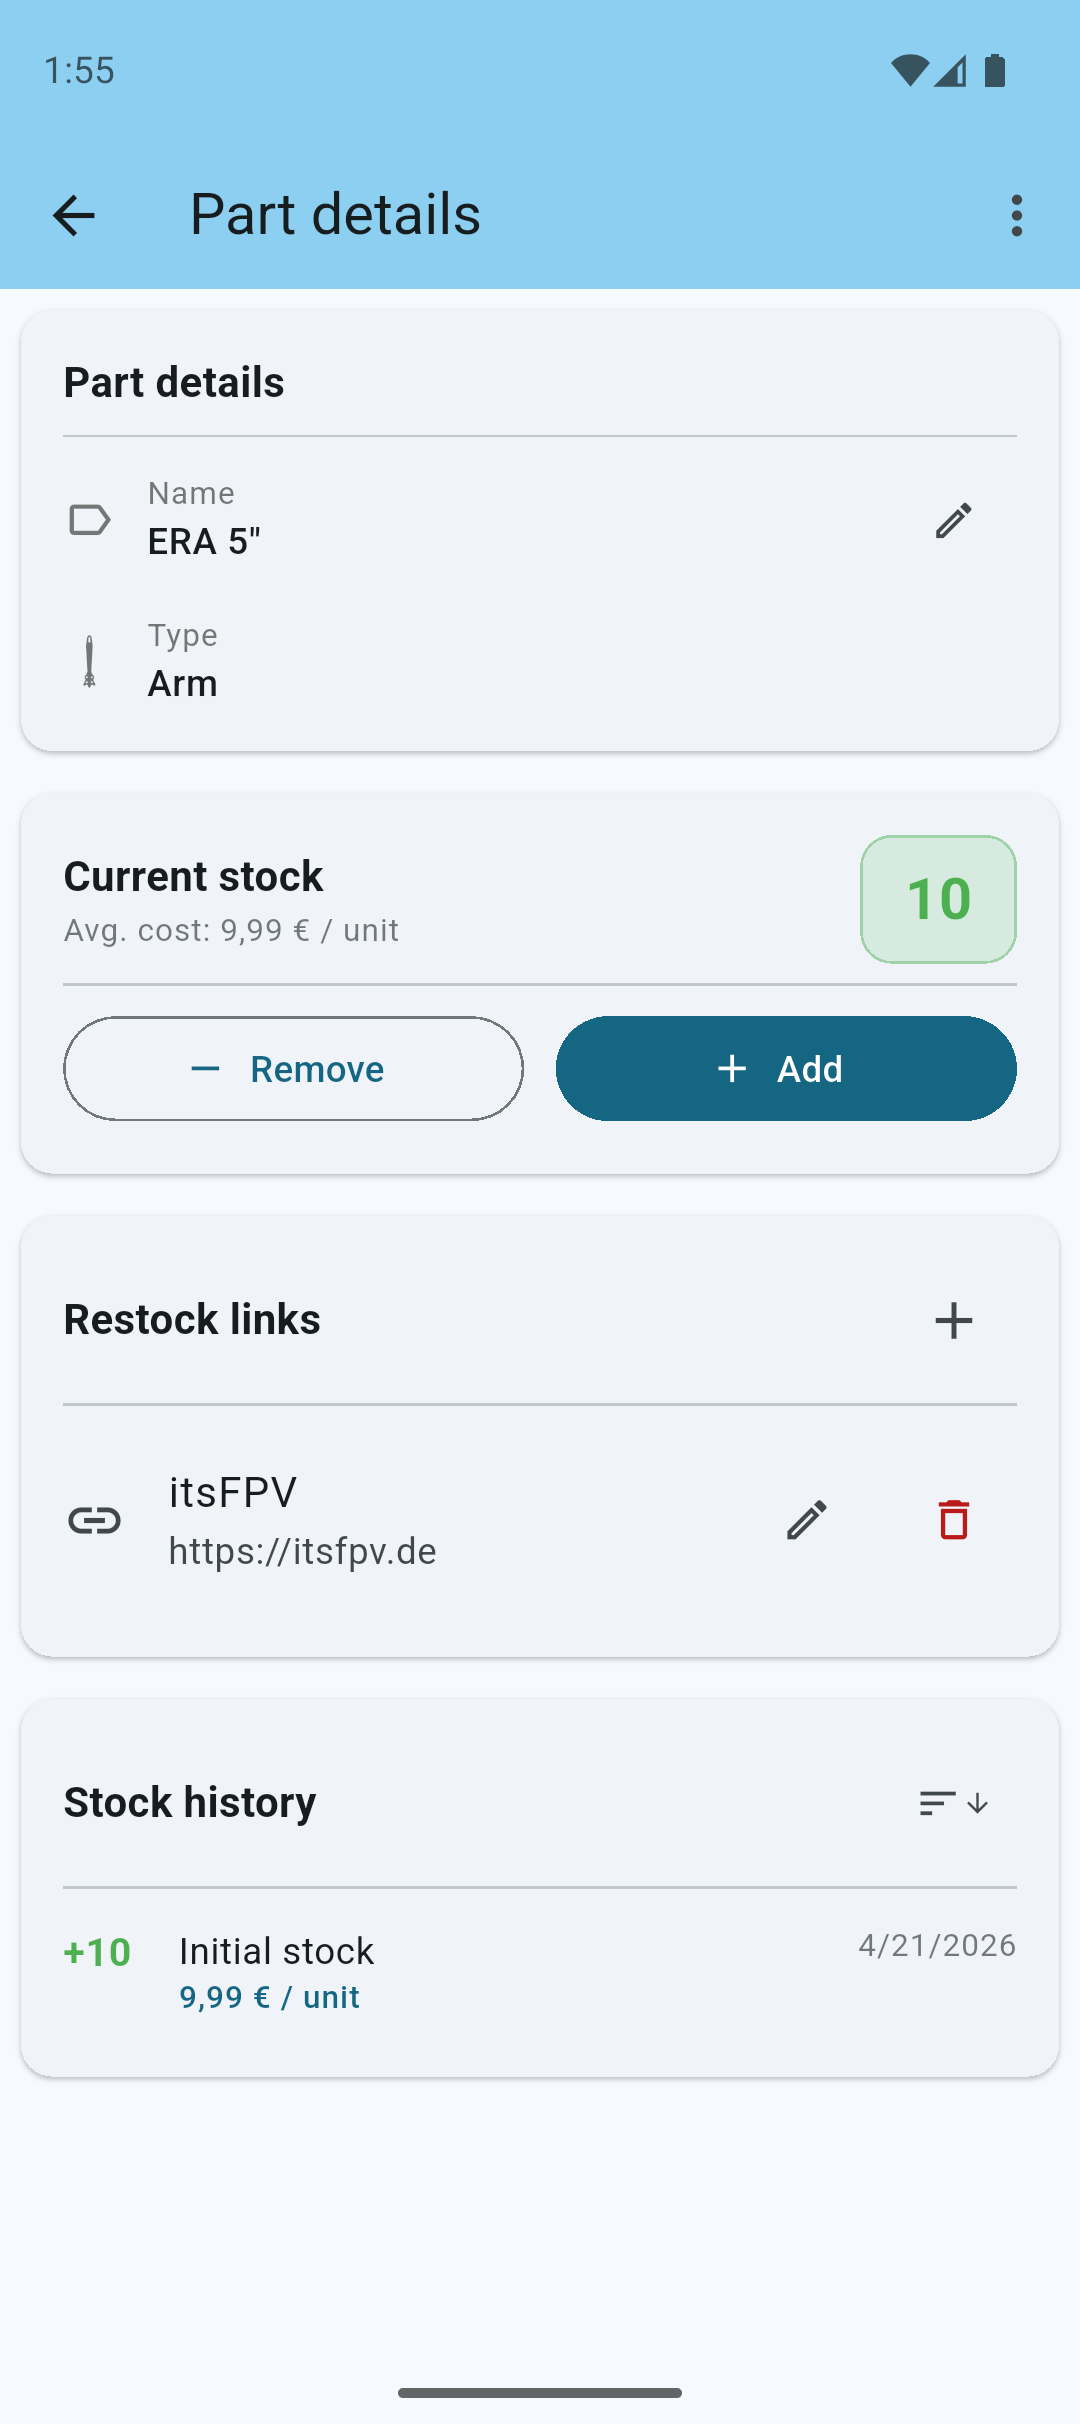
Tap on a part to view its details.

In the details view you can see the part's stock level, cost, and other relevant information.
Use the Pen icon to edit the part's name.
Use the - Remove button to remove stock from the part.
Use the + Add button to add stock to the part.
Note: You can not directly modify the stock level of a part. You have to use the add and remove buttons to change the stock level. This is to keep a history of all changes to the stock level, so you can see when you added or removed stock, and how much.
Add Restock Links to quickly reorder the same parts when stock is low.
Note: When cost tracking is enabled, you are able to enter a price for the part you are adding to your inventory. The price of the part will be calculated automatically by the system using WAC (Weighted Average Cost).
Inventory Grouping Pro
Inventory grouping allows you to organize your inventory into component type groups, which makes it easier to know how much motors, stators, FC's etc. you have, instead of looking at a long list of individual parts.
To enable inventory grouping, tap the button on the top navigation bar to access the sorting and grouping options.
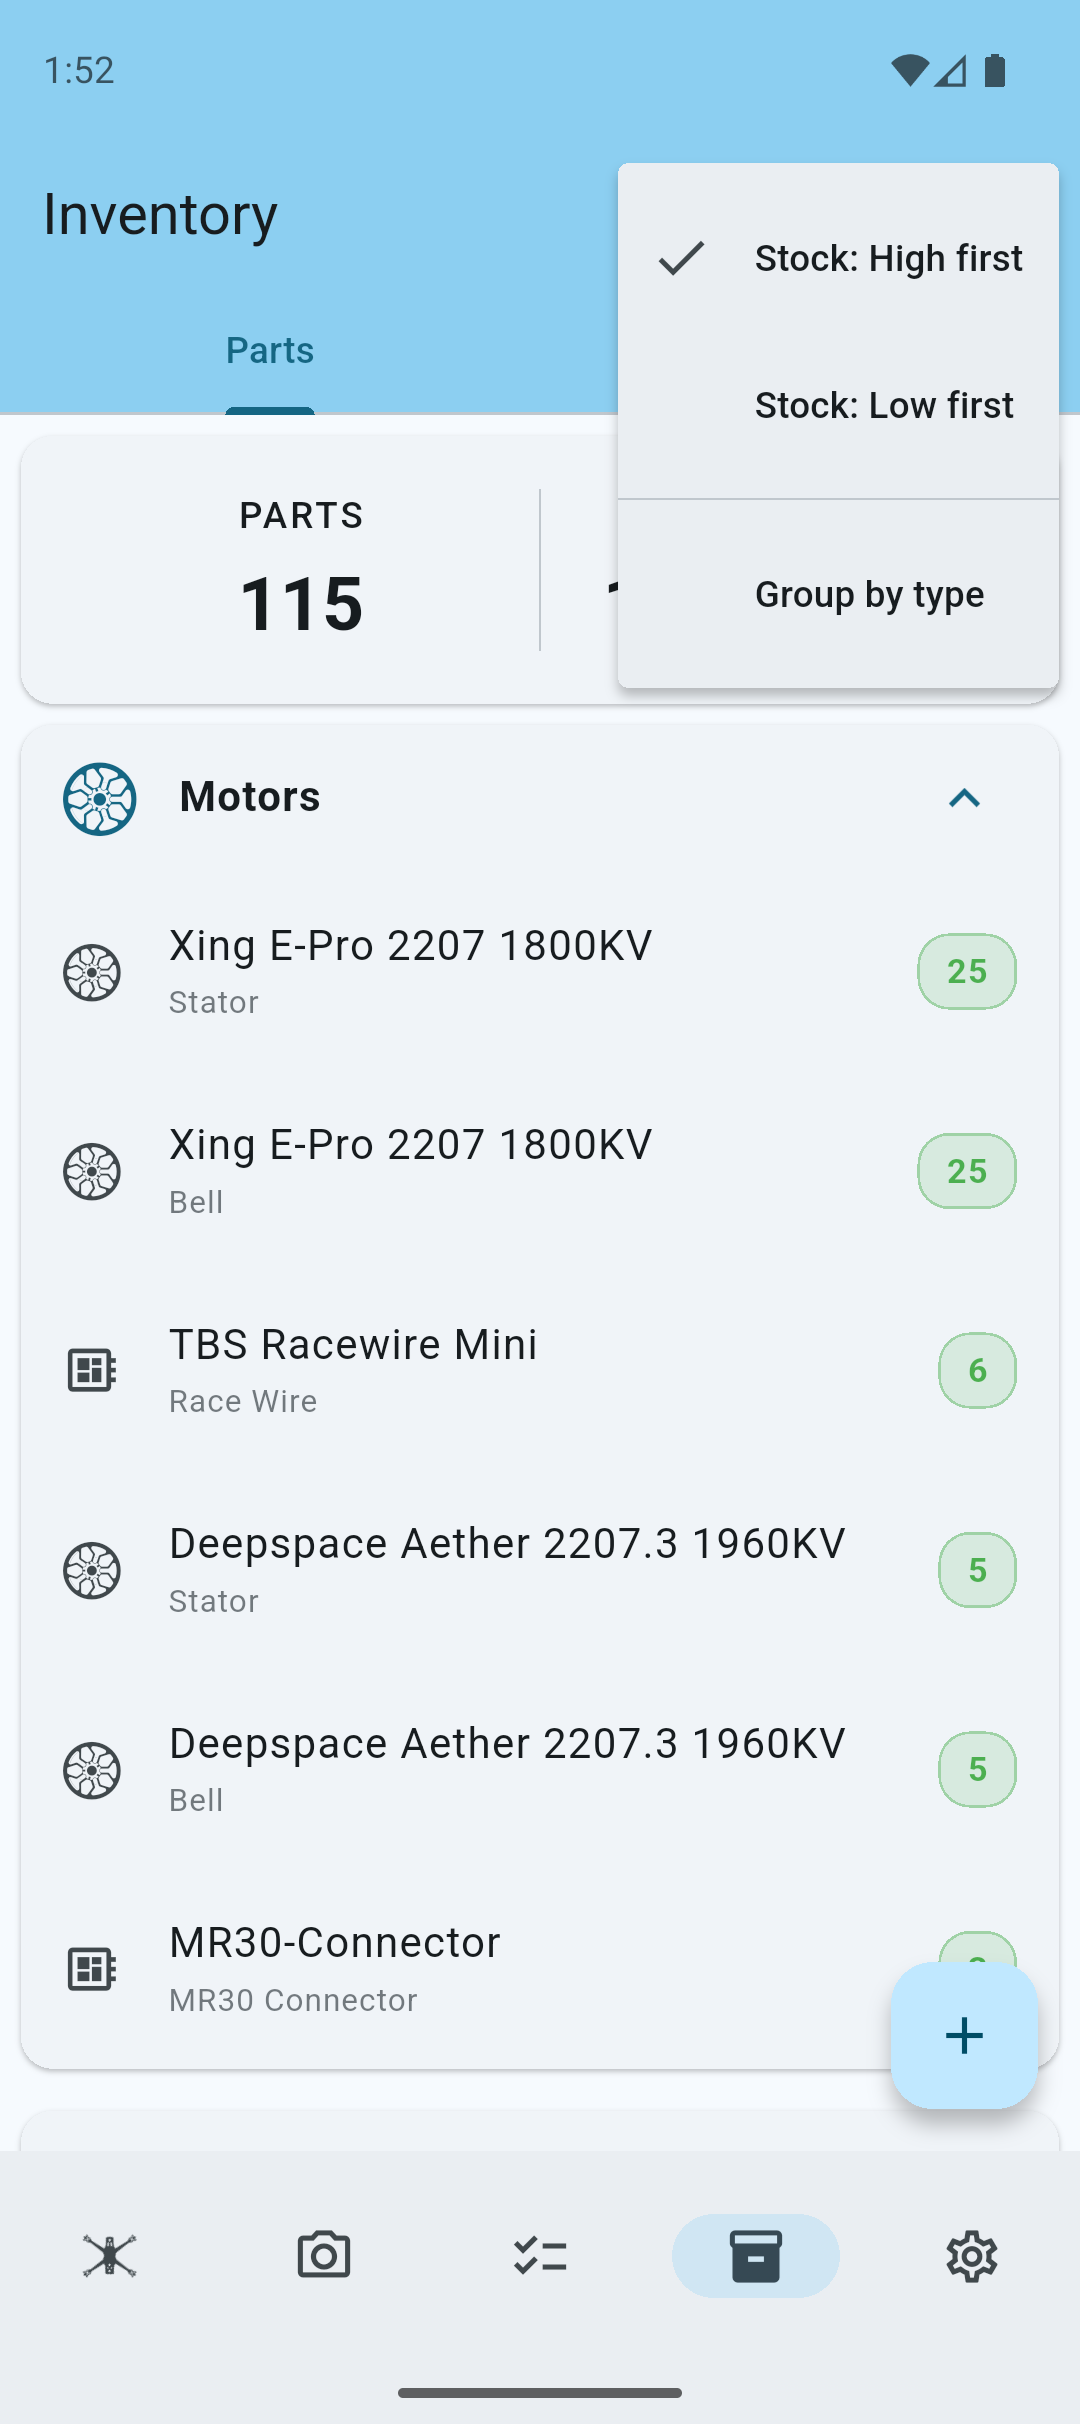
Inventory grouped by type.
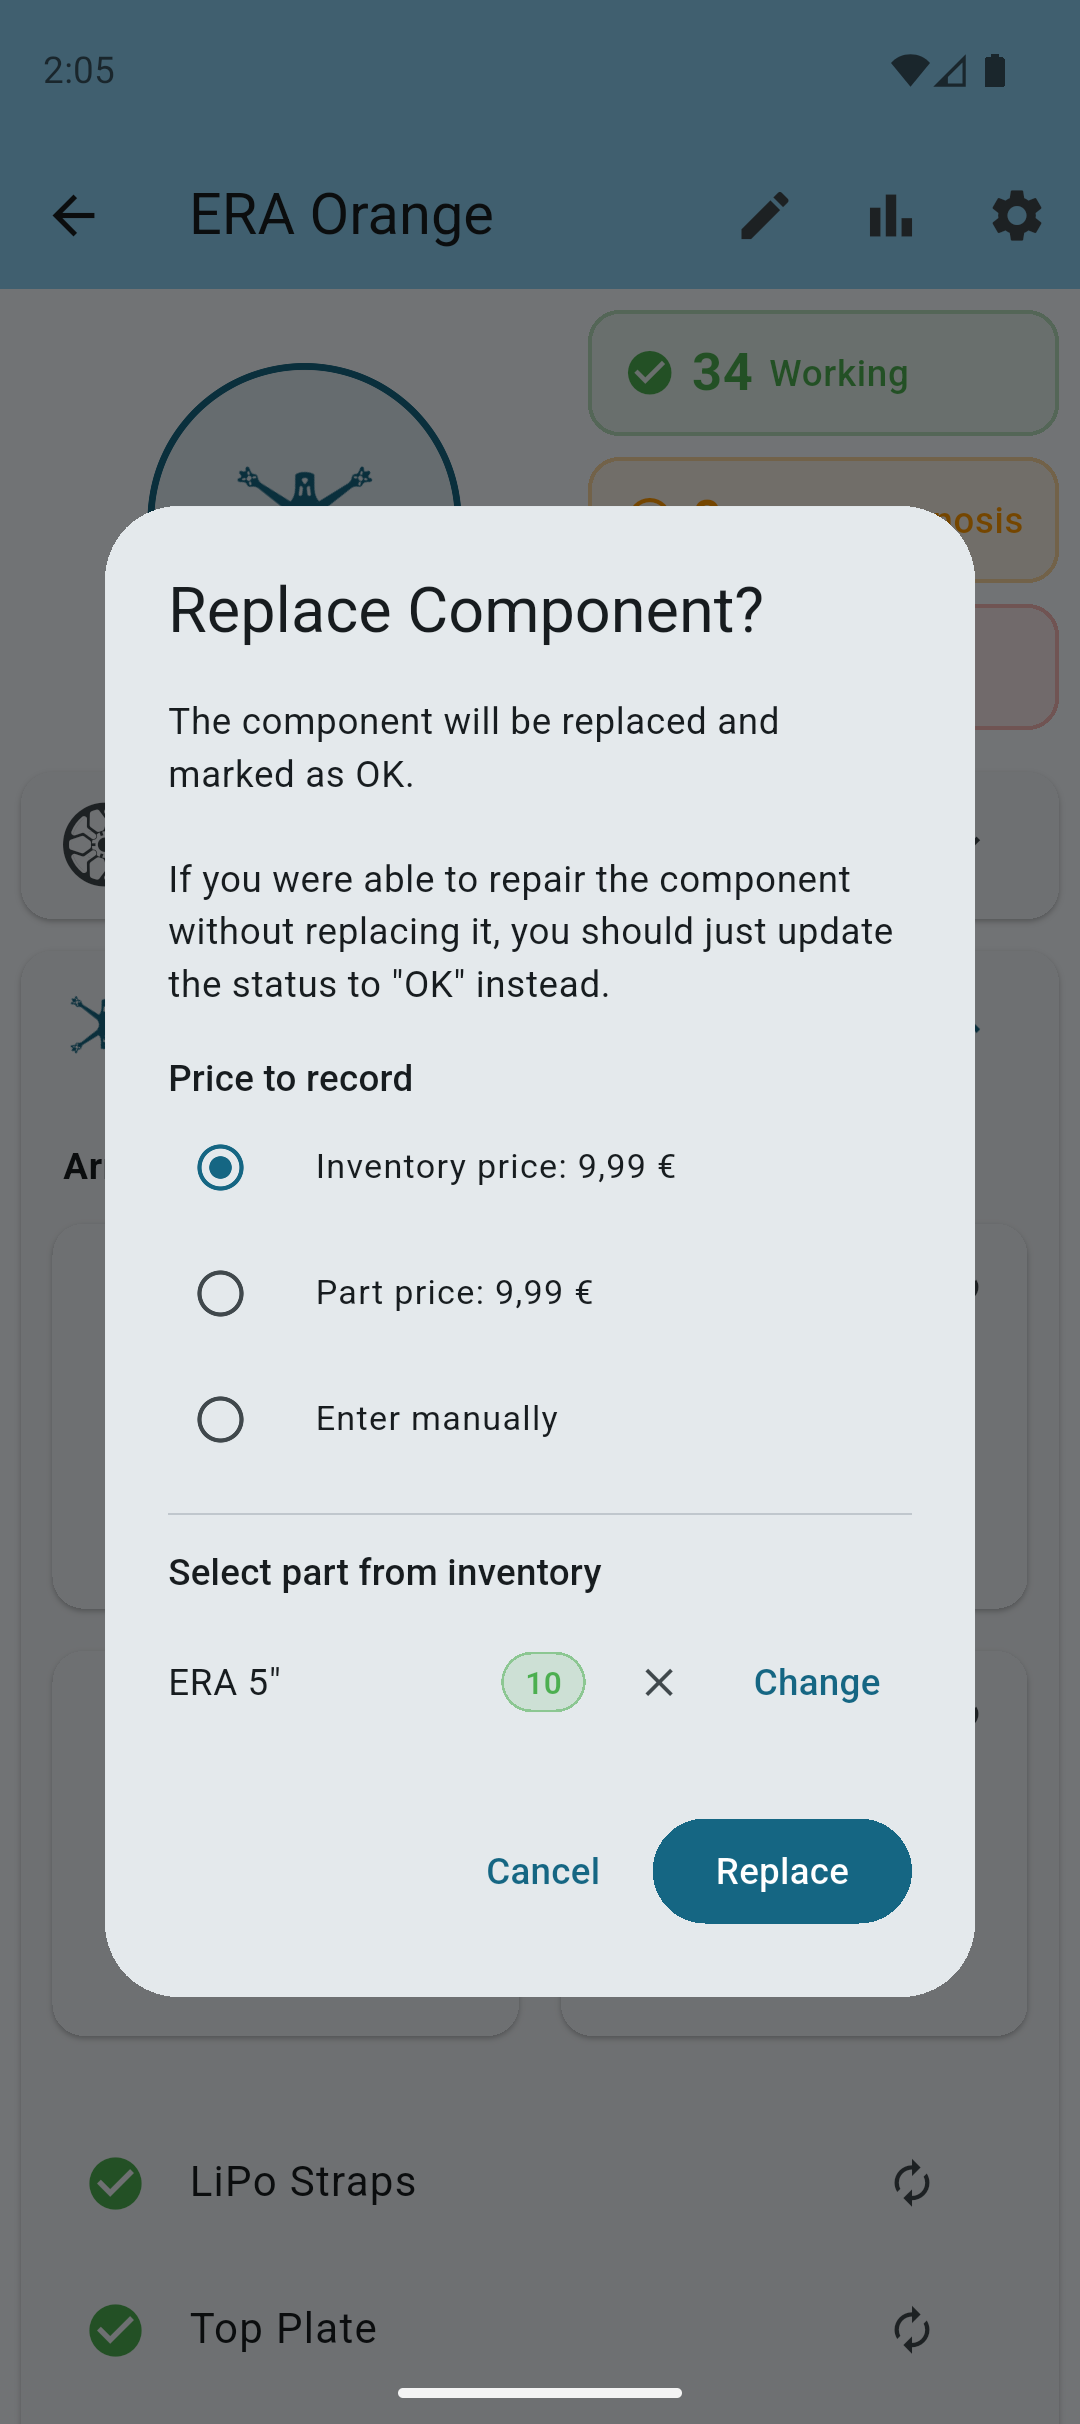
Component Replacement from Inventory Pro
When inventory management is enabled, you can replace components directly from your inventory.
In the component replacement dialog, you can now select a part from inventory to replace the existing component.
Tap Select to select a part from inventory (only if available parts are in stock).
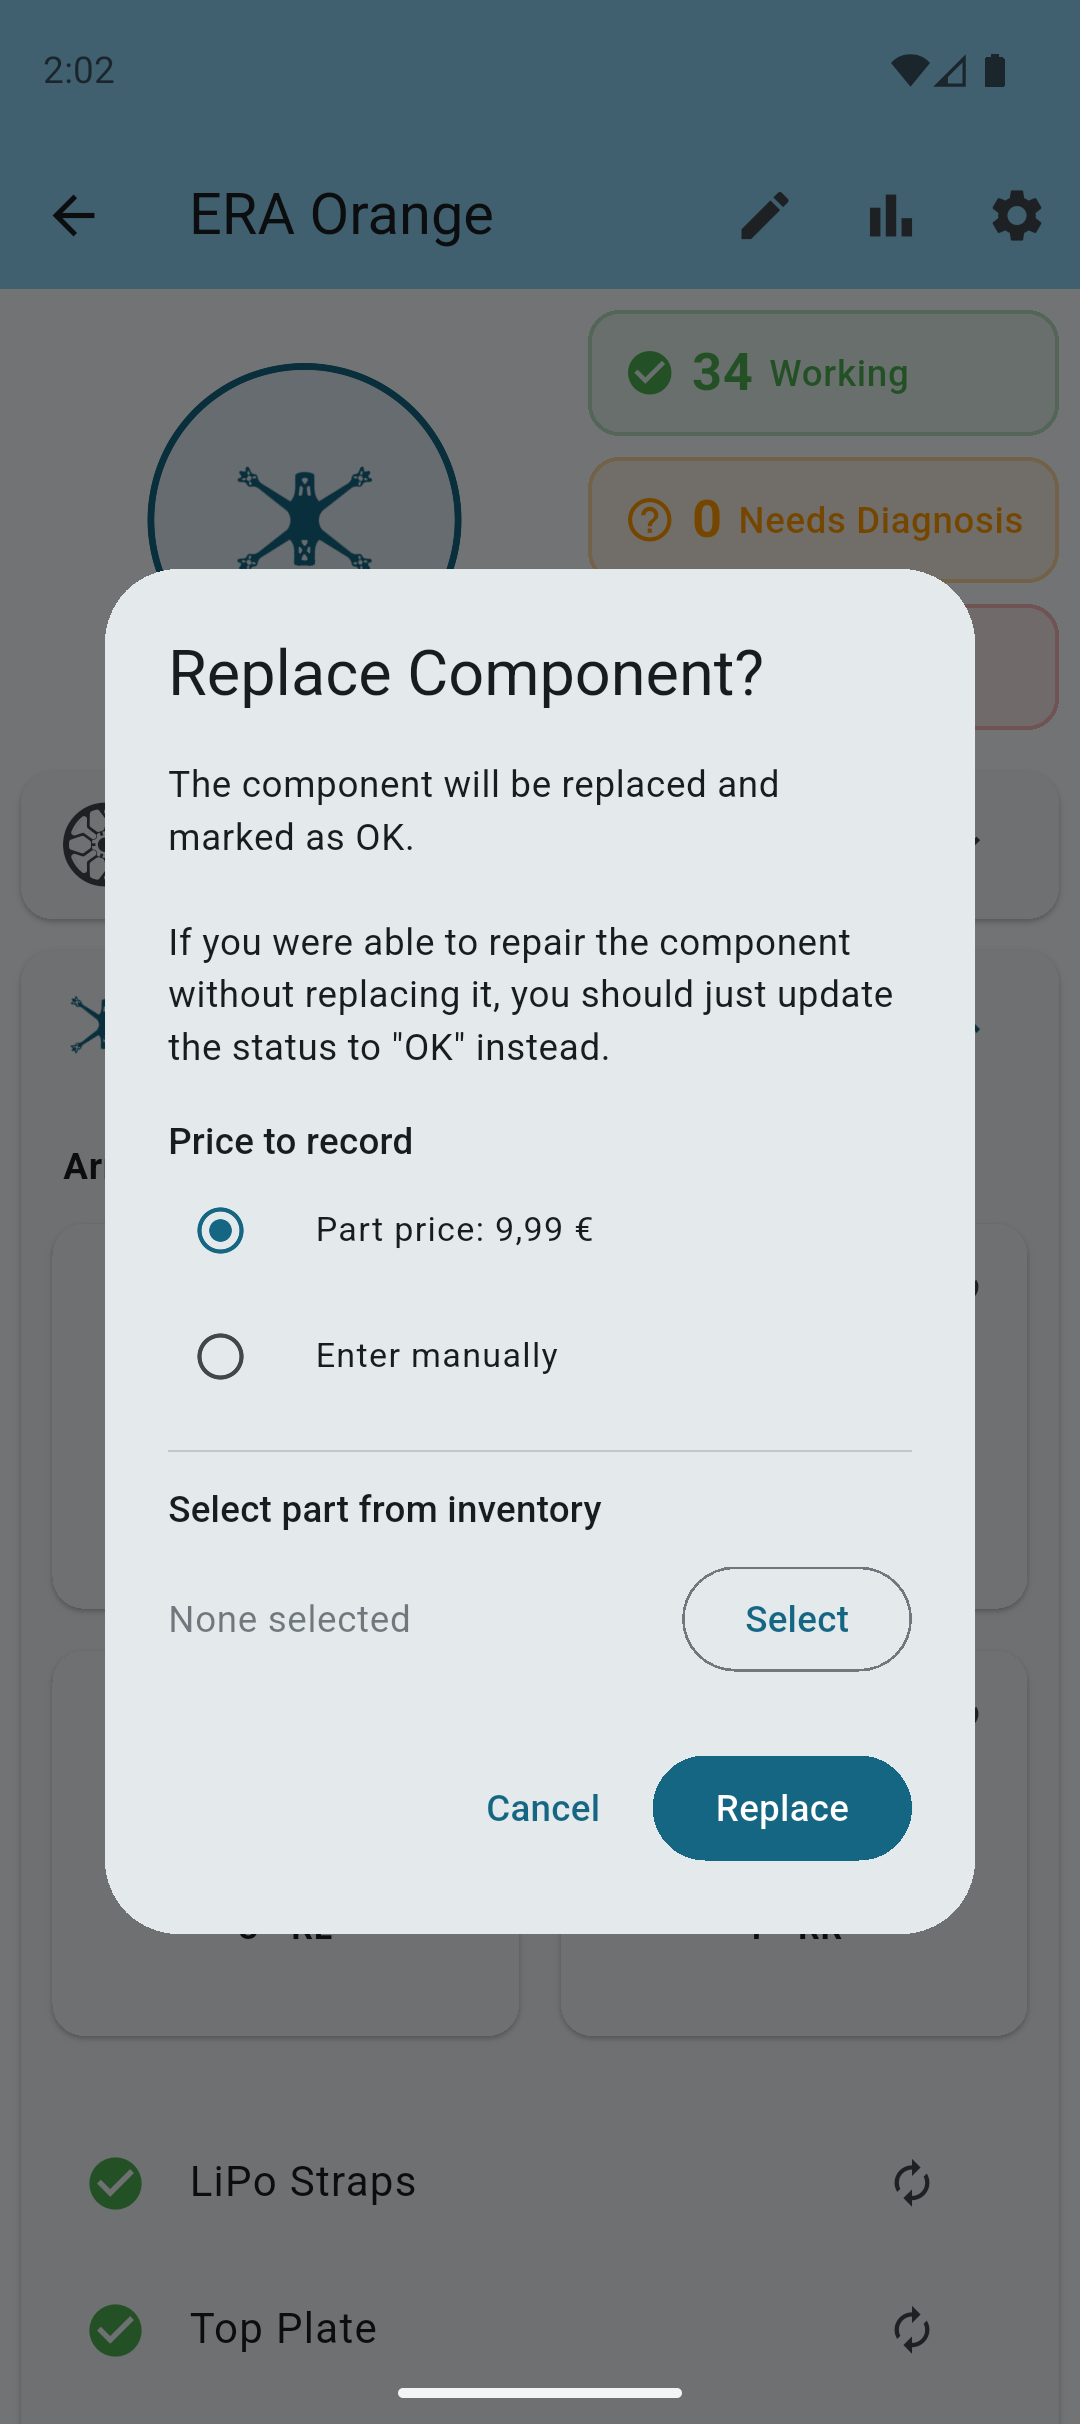
Select a part from your inventory

Once selected, the part will be highlighted in the component replacement dialog.
Note: If cost tracking is enabled, you have different options to track the cost of this part.
- Inventory price: This will use the price of the part as calculated by the system using WAC (Weighted Average Cost).
- Part price: This will use the price of the component that was manually entered on the component.
- Enter manually: This will allow you to enter a custom price for this replacement.
Tap Replace to confirm the replacement.
The selected part was now deducted from the inventory's stock as a component replacement.
